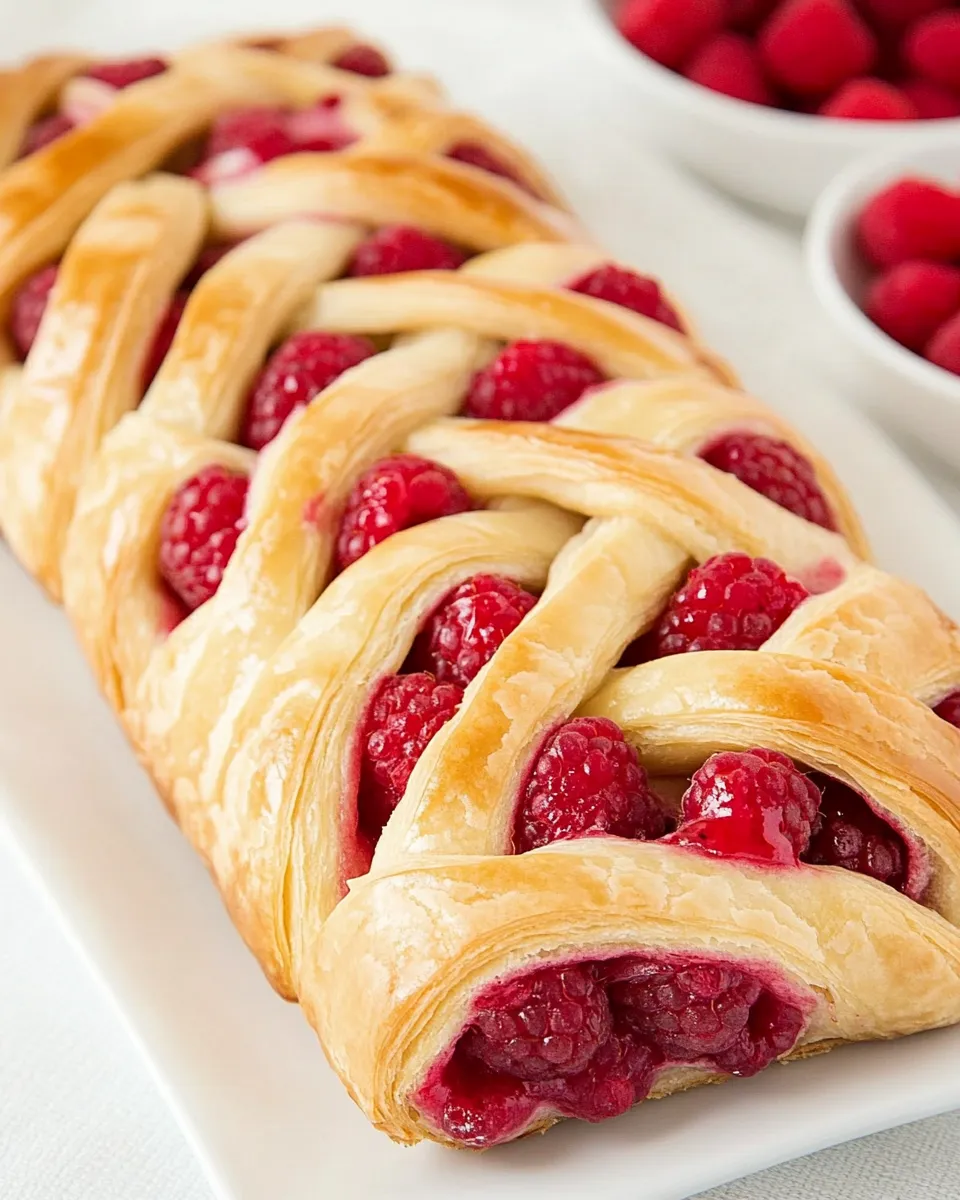
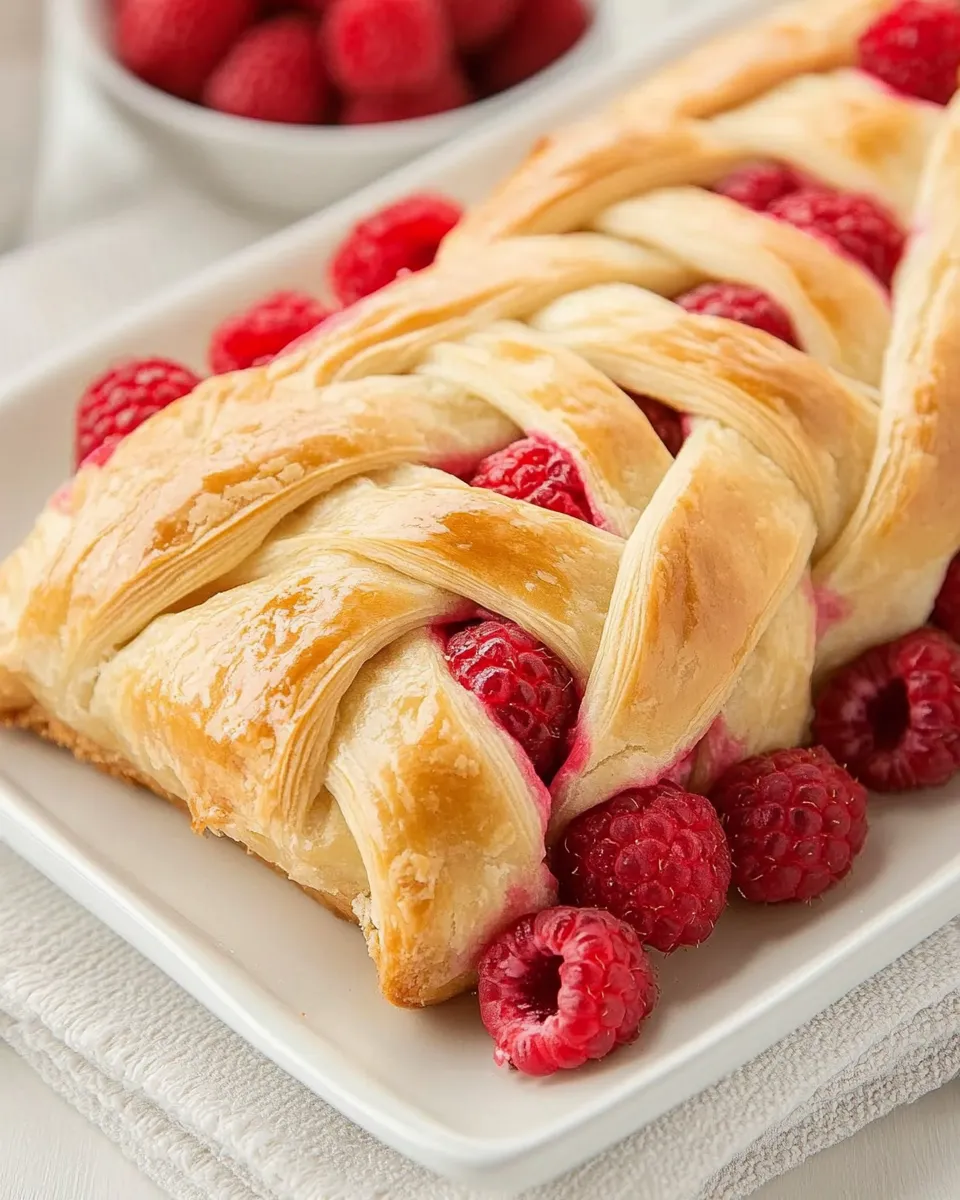
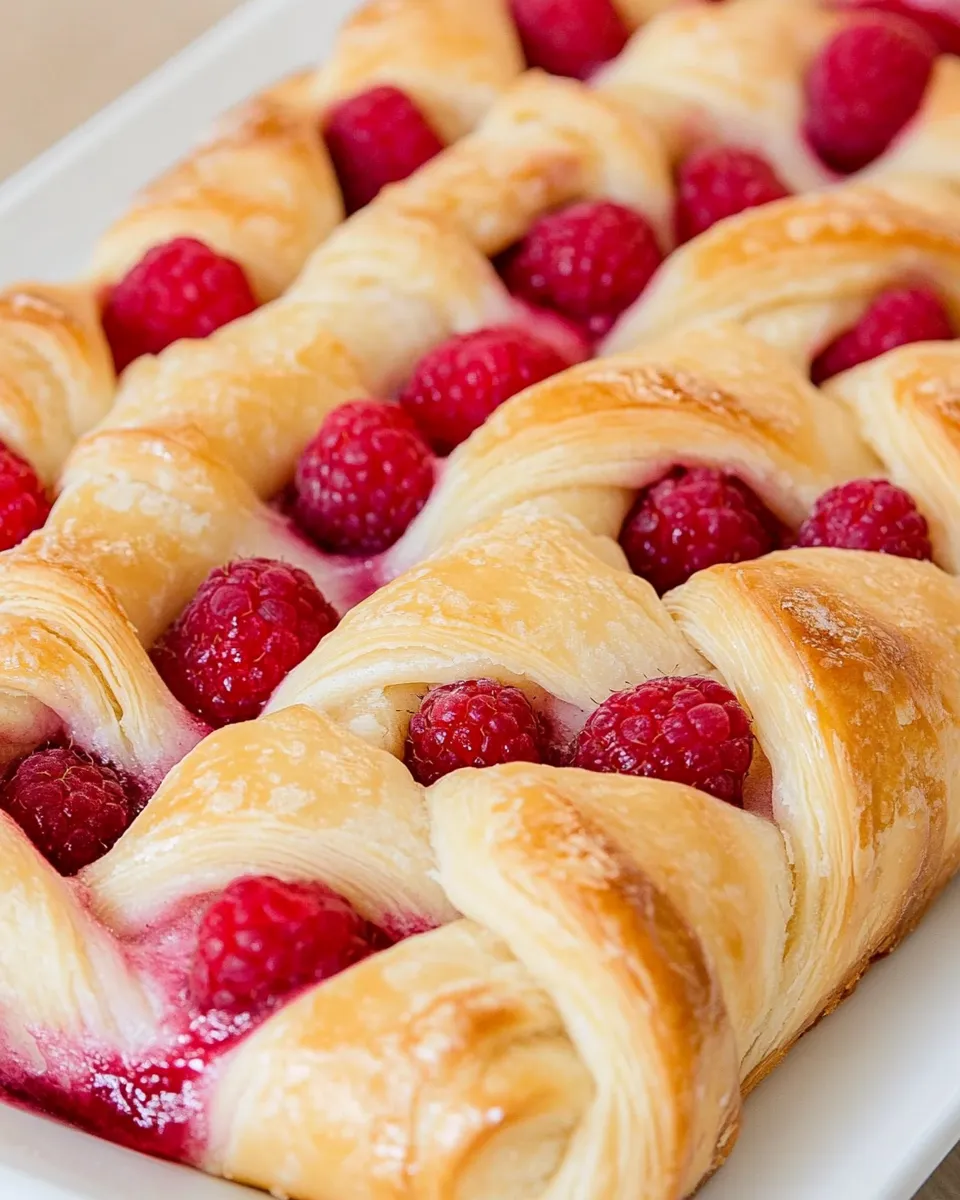
I bake because mornings matter. A braided Danish feels fancy without requiring a pastry chef’s apprenticeship — it’s all about a patient dough, a simple braid, and good timing. This Braided Raspberry Danish recipe yields a tender, slightly sweet enriched dough with a golden crust; it’s reliable and forgiving, which is why I make it when I want something that looks special but doesn’t take over the whole day.
Expect soft, slightly tacky dough, a short second rise to create loft, and a quick egg-wash finish for an irresistible sheen. The technique focuses on a straightforward braid that holds filling (jam or fresh fruit) in the center while the strips weave a pretty top. You’ll get consistent results if you follow the temperatures and times closely — yeast is fussy but not mysterious.
Below I walk you through what goes into the bowl, the step-by-step method exactly as tested, and practical notes on tools, substitutions, and common pitfalls that can derail your braid. Read through the tips before you start; they’ll save time and help you trust the process from proofing the yeast to pulling a golden braid from the oven.
What’s in the Bowl
Ingredients
- 1/3 cup sugar — sweetens the dough and helps feed the yeast for a good rise.
- 1/4 teaspoon salt — balances sweetness and strengthens the dough’s gluten.
- 1 package dry active yeast, I use Red Star Yeast — the leavening agent; proof it to confirm it’s active.
- 2 2/3- 3 cups flour, I used King Arthur Unbleached White Whole Wheat Flour — provides structure; use the lower amount first and add more only as needed.
- 2/3 cups milk — warms and hydrates the dough; contributes tenderness and flavor.
- 1/3 cup butter — enriches the dough for a tender crumb; melt and cool before adding.
- 1 egg — adds richness and helps bind the dough.
- 1 egg yolk — reserved for an egg wash to give the braid a glossy, golden finish.
- 1 teaspoon water — mixed with the yolk to make the egg wash the right consistency.
Braided Raspberry Danish Made Stepwise
- Warm 2/3 cup milk to 105–115°F (warm to the touch, not hot). Pour the warm milk into a small bowl, sprinkle the package of dry active yeast over the surface, stir in the 1/3 cup sugar, and let sit 5–10 minutes until foamy. If the mixture does not become foamy, the yeast may be inactive—discard and start with fresh yeast.
- While the yeast proofs, melt the 1/3 cup butter and let it cool until warm (not hot).
- In the bowl of a stand mixer, whisk together the 1/4 teaspoon salt and 2/3 cup of the flour (reserve the rest of the flour for later).
- Add the foamy yeast-milk mixture, the warm melted butter, and 1 whole egg to the mixer bowl. Mix on low speed just until the wet ingredients are combined with the dry.
- Fit the mixer with a dough hook. With the mixer running on low, add the remaining flour gradually—about 2 to 2 1/3 cups total—adding 1/4 cup at a time until a soft, slightly sticky dough forms. Use the lower amount of flour first and add more only if the dough is too sticky to handle.
- Knead the dough in the mixer on medium-low speed with the dough hook for 5–7 minutes, until the dough is smooth, elastic, and pulls away from the sides of the bowl but remains slightly tacky.
- Transfer the dough to a lightly greased bowl, turn once to coat the top, cover with plastic wrap or a clean kitchen towel, and let rise in a warm, draft-free place until doubled in size, about 1 to 1 1/2 hours.
- Punch the risen dough down, turn it out onto a lightly floured surface, and roll it into a rectangle suitable for braiding (a roughly 12 x 8–10 inch rectangle works well).
- To form a braid: trim the short ends so they are straight, then cut 1-inch-wide strips along both long sides of the rectangle, leaving a center panel about 3–4 inches wide. The center panel will remain flat while you braid the side strips over it.
- Fold the strips over the center panel alternately from each side to form a braid, overlapping each strip about halfway across the center. Tuck the ends under to finish and transfer the braided dough to a parchment-lined baking sheet. Cover loosely and let rise 20–30 minutes until puffy.
- Preheat the oven to 375°F. Meanwhile, make the egg wash by whisking together the reserved 1 egg yolk and the 1 teaspoon water.
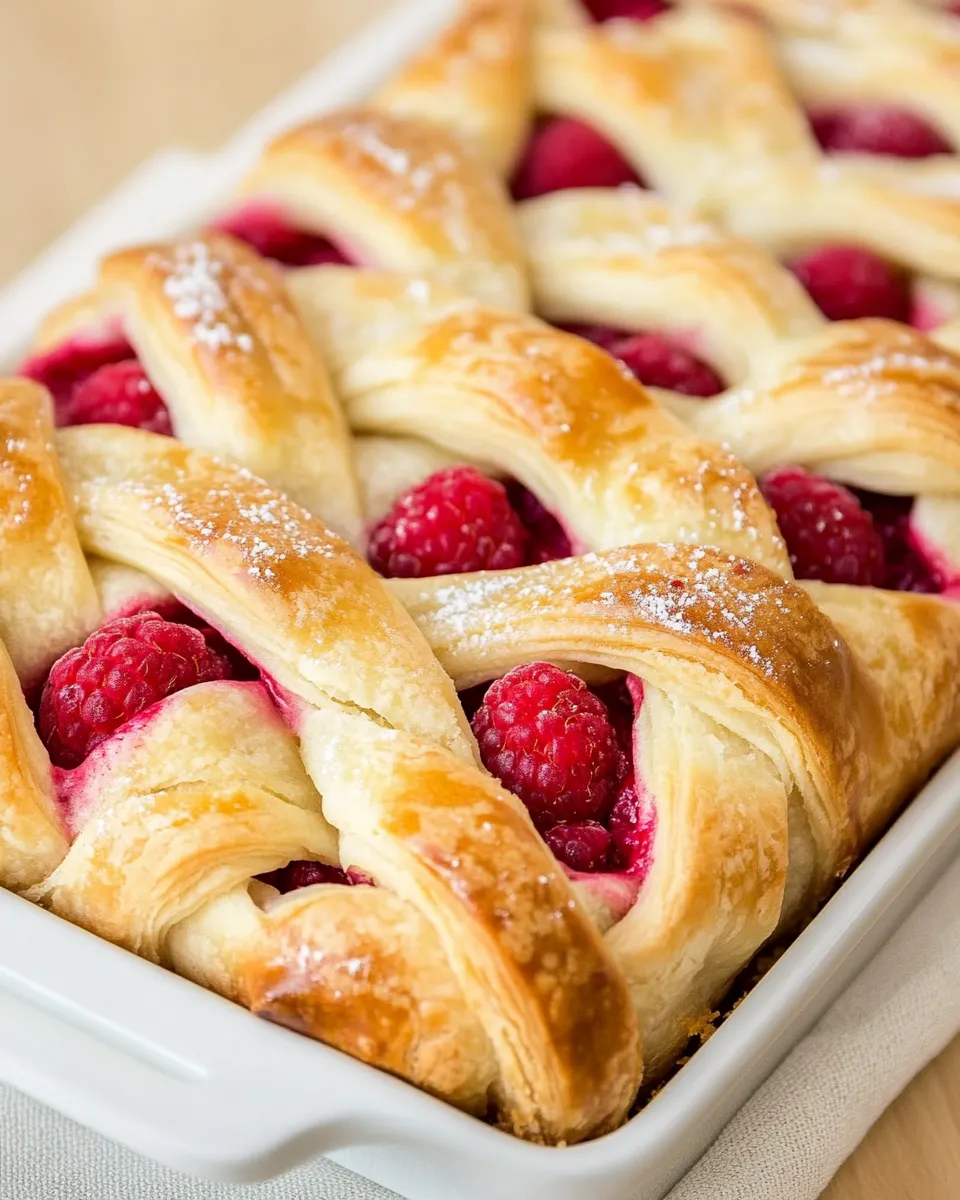
- Brush the braided dough with the egg-yolk wash, then bake in the preheated oven 18–22 minutes, or until the braid is golden brown and cooked through. Remove from the oven and cool on a wire rack before serving.
Why This Recipe is a Keeper
This braid gives you bakery-level presentation without a complicated laminated dough. The enriched dough is soft and slightly sweet, so it pairs with both fruit and rich spreads. The method is intentionally forgiving: proof the yeast, mix until the dough is tacky but manageable, and knead long enough for elasticity. Those three steps are what turn a plain mix of flour and fat into something tender and structured.
Once you know how to cut and fold the strips, the braid becomes a repeatable, satisfying technique. It’s work you can do in stages: proof the yeast while you melt butter, knead while you tidy the counter, then give it a final rise while the oven heats. The timing is flexible within the windows given, which makes this a practical weekend-baking project.
Smart Substitutions
Substitutions can preserve texture and flavor when you don’t have the exact ingredients on hand.
- Milk — swap with an equal amount of unsweetened non-dairy milk (soy or oat) for a dairy-free option; temperature still matters for proofing.
- Butter — you can use an equal amount of a neutral oil for a slightly different crumb; butter gives the best flavor and a richer mouthfeel.
- Flour — the recipe was tested with the flour specified; if you switch to all-purpose, start with the lower flour amount and add as needed. Whole wheat will produce a denser loaf; consider adding up to 1/2 cup additional liquid if the dough feels stiff.
- Yeast — if you only have instant yeast, reduce the proofing step by adding it directly to dry ingredients, though proofing active dry yeast as written confirms activity.
- Fillings — the braid’s center accepts jam, fresh berries, or curd. Use thick or drained fillings to avoid sogging the dough.
Toolbox for This Recipe
- Stand mixer with dough hook — speeds up mixing and kneading for a consistent dough.
- Instant-read thermometer — confirms milk temperature for successful yeast proofing.
- Rolling pin — for rolling the dough to the right rectangle.
- Sharp knife or bench scraper — to trim ends and cut 1-inch strips evenly.
- Parchment-lined baking sheet — prevents sticking and makes transfer simple.
- Pastry brush — to apply the egg-yolk wash evenly.
Mistakes That Ruin Braided Raspberry Danish
There are a few predictable missteps that make the difference between a beautiful braid and a disappointment.
- Hot milk for yeast proofing — if the milk is over 115°F, it can kill the yeast. Aim for warm to the touch, not hot, and check with a thermometer if unsure.
- Skipping the yeast foam check — if the yeast doesn’t foam after 5–10 minutes, it’s inactive. Starting with dead yeast means the dough won’t rise.
- Too much flour while mixing — adding all the flour at once makes a dry, heavy dough. Use the lower amount first and add more sparingly until you reach the described slightly sticky texture.
- Under-kneading — insufficient kneading leaves a weak structure; the dough should be smooth and elastic and pull away from the bowl sides.
- Overproofing the second rise — letting the braided dough puff too long before baking can flatten the braid and make it collapse in the oven.
- Using wet or watery filling — excess moisture in the center will make the braid soggy. Drain fresh fruit and thicken loose jams before assembling.
Fresh Seasonal Changes
Seasonal fruit upgrades are the easiest way to keep this braid fresh all year. In summer, macerated berries or a mix of berry jam and fresh berries work beautifully. In fall, switch to a pear or apple compote thickened slightly with cornstarch and spiced with a hint of cinnamon.
For holiday variations, fold in a little orange zest into the dough for brightness, or sprinkle coarse sugar on top after the egg wash for sparkle. The braid is a great canvas for seasonal flavor accents without changing the basic method.
Little Things that Matter
Small details make the final bake better. Use room-temperature egg for the dough so it blends evenly. Let melted butter cool to warm, not hot, before adding; hot butter can affect yeast and egg proteins. When rolling, keep the center panel a consistent width so the braid looks even and bakes uniformly.
When brushing with the yolk wash, use light even strokes to avoid pooling in the center panel. A thin even coat gives the braid a deep, glossy color without burning.
How to Store & Reheat
Store cooled braids wrapped loosely in plastic wrap at room temperature for up to two days. For longer storage, freeze whole or sliced in an airtight container for up to one month. Thaw overnight in the fridge or at room temperature, then refresh in a 300°F oven for 8–10 minutes until warmed through.
To reheat single slices, place on a baking sheet and warm at 325°F for 6–8 minutes. Avoid microwave reheating; it makes the pastry soggy and rubbery.
Top Questions & Answers
Q: Can I make the dough ahead?
A: Yes. After the initial rise, you can refrigerate the dough for up to 24 hours. Bring it back to room temperature before rolling and braiding. Chilling slows fermentation and can deepen flavor.
Q: My braid spreads out while baking — why?
A: The braid may be too warm or overproofed when it goes into the oven, or the strips were cut too wide. Chill briefly before baking if it becomes too soft during assembly.
Q: Can I substitute instant yeast?
A: Yes. Instant yeast can be mixed directly into dry ingredients without proofing, but I prefer proofing active dry yeast as written to confirm it’s alive.
Q: What filling works best without making it soggy?
A: Thick jams, curds, or drained macerated fruit are best. If using fresh fruit, toss with a little sugar and let drain to remove excess juice before adding to the center panel.
Let’s Eat
Serve this braid slightly warm or at room temperature. It’s excellent with a smear of cream cheese or mascarpone under the filling, and a cup of coffee or tea. Slice with a sharp serrated knife and plate the braid alongside fresh fruit for a weekend brunch centerpiece.
Make the braid once and you’ll see how small technique changes — keeping the center clear, trimming ends plainly, and using a light egg wash — make the result repeatable and delightful. Enjoy the hands-on moment of braiding, then step back and let the oven do the rest. Happy baking.
Braided Raspberry Danish
Equipment
- Stand mixer
- dough hook
- Mixing Bowl
- Whisk
- Rolling Pin
- Baking Sheet
- Parchment Paper
- Wire Rack
- Plastic wrap or kitchen towel
Ingredients
Ingredients
- 1/3 cup sugar
- 1/4 teaspoon salt
- 1 package dry active yeast I use Red Star Yeast
- 2 2/3- 3 cups flour I used King Arthur Unbleached White Whole Wheat Flour
- 2/3 cups milk
- 1/3 cup butter
- 1 egg
- 1 egg yolk
- 1 teaspoon water
Instructions
Instructions
- Warm 2/3 cup milk to 105–115°F (warm to the touch, not hot). Pour the warm milk into a small bowl, sprinkle the package of dry active yeast over the surface, stir in the 1/3 cup sugar, and let sit 5–10 minutes until foamy. If the mixture does not become foamy, the yeast may be inactive—discard and start with fresh yeast.
- While the yeast proofs, melt the 1/3 cup butter and let it cool until warm (not hot).
- In the bowl of a stand mixer, whisk together the 1/4 teaspoon salt and 2/3 cup of the flour (reserve the rest of the flour for later).
- Add the foamy yeast-milk mixture, the warm melted butter, and 1 whole egg to the mixer bowl. Mix on low speed just until the wet ingredients are combined with the dry.
- Fit the mixer with a dough hook. With the mixer running on low, add the remaining flour gradually—about 2 to 2 1/3 cups total—adding 1/4 cup at a time until a soft, slightly sticky dough forms. Use the lower amount of flour first and add more only if the dough is too sticky to handle.
- Knead the dough in the mixer on medium-low speed with the dough hook for 5–7 minutes, until the dough is smooth, elastic, and pulls away from the sides of the bowl but remains slightly tacky.
- Transfer the dough to a lightly greased bowl, turn once to coat the top, cover with plastic wrap or a clean kitchen towel, and let rise in a warm, draft-free place until doubled in size, about 1 to 1 1/2 hours.
- Punch the risen dough down, turn it out onto a lightly floured surface, and roll it into a rectangle suitable for braiding (a roughly 12 x 8–10 inch rectangle works well).
- To form a braid: trim the short ends so they are straight, then cut 1-inch-wide strips along both long sides of the rectangle, leaving a center panel about 3–4 inches wide. The center panel will remain flat while you braid the side strips over it.
- Fold the strips over the center panel alternately from each side to form a braid, overlapping each strip about halfway across the center. Tuck the ends under to finish and transfer the braided dough to a parchment-lined baking sheet. Cover loosely and let rise 20–30 minutes until puffy.
- Preheat the oven to 375°F. Meanwhile, make the egg wash by whisking together the reserved 1 egg yolk and the 1 teaspoon water.
- Brush the braided dough with the egg-yolk wash, then bake in the preheated oven 18–22 minutes, or until the braid is golden brown and cooked through. Remove from the oven and cool on a wire rack before serving.