I make cheese at home because it’s honest work with a quick payoff: fresh, milky, elastic mozzarella in under an hour and a half. This version is intentionally simple — few ingredients, clear temperatures, and a repeatable sequence. You don’t need years of practice or specialty dairy to pull it off.
The approach below focuses on control: measured water, dissolved acids and rennet, and careful heating. If you follow the steps and watch temperatures, the curd will behave. I’ll walk you through the exact ingredients, the step-by-step cooking guide, the equipment that matters, and the common mistakes to avoid.
Read the recipe once, assemble your tools, and then prioritize timing while you work. I’ll also give practical substitutions and storage advice so you can make the most of your batch once it’s done.
The Ingredient Lineup
Ingredients
- 250 ml water — divided: 200 ml to dissolve citric acid, 50 ml to dissolve rennet.
- 1 teaspoon citric acid — acidifier; it helps the milk to form curds at low temperatures.
- 30 drops liquid (vegetarian) rennet — the coagulant that sets the curd; vegetarian rennet is listed here.
- 3 liters fresh whole milk — the base for flavor and texture; use the freshest whole milk you can find.
- 1 teaspoon fine sea salt — seasons the curds after heating and before stretching.
Homemade Mozzarella Cooking Guide
- Put 200 ml of the 250 ml water in a small bowl and stir in the 1 teaspoon citric acid until fully dissolved.
- Put the remaining 50 ml water in a second small bowl and stir in the 30 drops liquid (vegetarian) rennet until fully dissolved.
- Pour the 3 liters fresh whole milk into a large pot. Stir in the citric-acid solution.
- Heat the milk over medium-low heat, stirring gently and monitoring with a thermometer, until it reaches 90°F / 32°C (this may take several minutes).
- Remove the pot from the heat and slowly pour in the rennet solution while stirring gently for about 30 seconds.
- Cover the pot and let the milk sit undisturbed for 5 minutes. If the milk has not set to a soft, tofu-like curd after 5 minutes, let it sit up to an additional 10 minutes.
- When set, use a long sharp knife to cut the curds into a grid pattern (cut all the way to the bottom of the pot).
- Return the pot to medium-low heat and gently stir the curds while heating until the curds reach 110°F / 43°C.
- Remove the pot from the heat and continue to stir the curds slowly for 5 more minutes.
- Using a slotted spoon or fine strainer, transfer the curds to a large bowl. Reserve about 2–3 cups of the whey for storage.
- Heat additional water to about 135°F / 57°C. Pour enough of this hot water into the bowl to cover the curds and let them sit 2–3 minutes, until the curds reach 135°F / 57°C.
- Sprinkle the 1 teaspoon fine sea salt evenly over the hot curds. Wearing heat-safe or rubber gloves, quickly and carefully fold and stretch the curds with both hands until they form a smooth, shiny, elastic mozzarella mass. If the curds remain loose or have a cottage-cheese texture, drain and add more hot (≈135°F/57°C) water and continue to stretch and knead until the proper texture is achieved. Avoid overworking the cheese to prevent a rubbery texture.
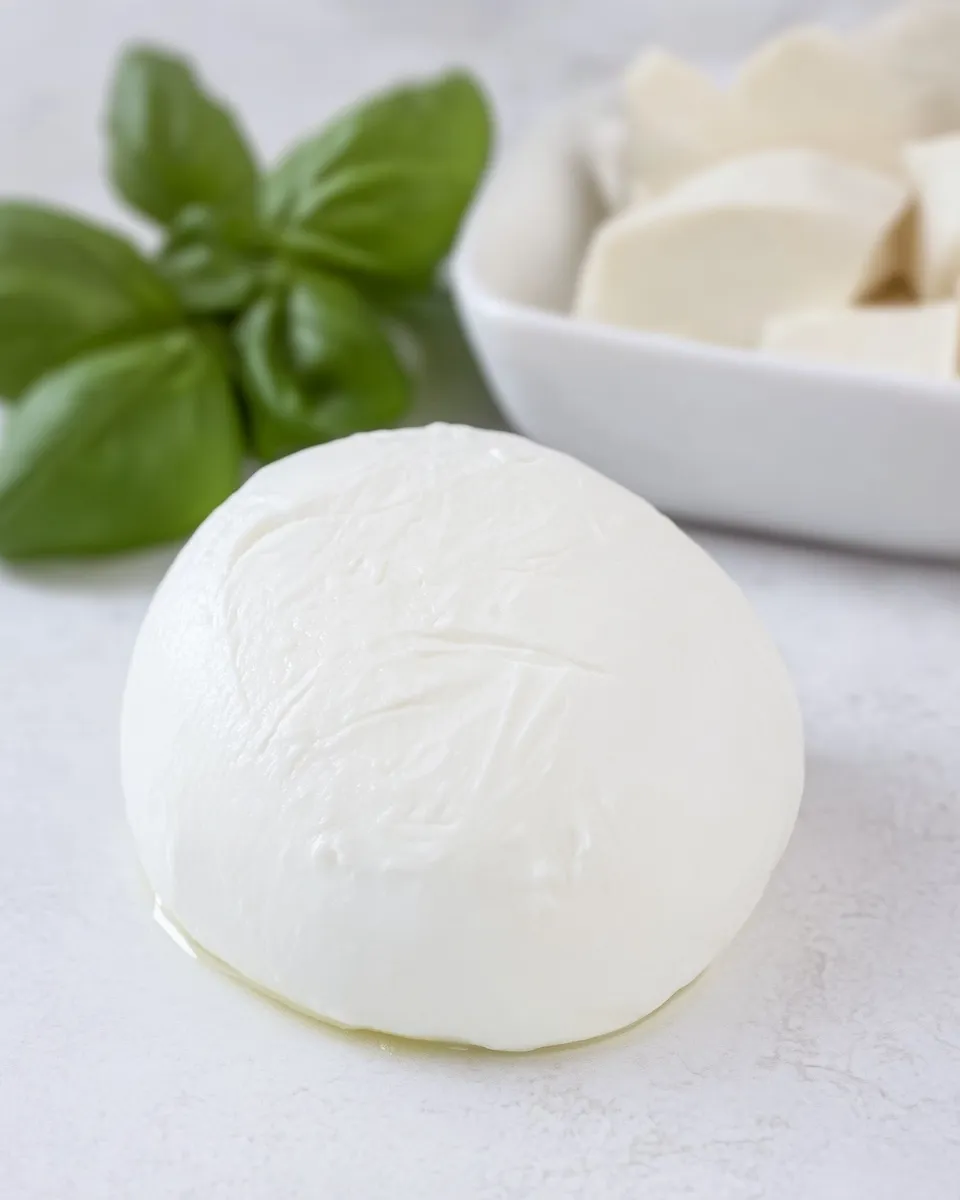
- Shape the mozzarella into one large ball or several smaller balls and place them in an airtight container.
- Pour the reserved whey (no additional salt added) over the formed mozzarella balls to cover them. Let cool, then eat once cooled or store the balls in their whey in the refrigerator for up to 2 days.
Why This Recipe Belongs in Your Rotation
This recipe is straightforward and forgiving if you keep an eye on temperatures. It teaches you the mechanics of acid + rennet coagulation without a long aging process or complicated cultures. In under two hours you get fresh cheese that melts beautifully and tastes clean and milky.
It’s also flexible for home kitchens: the ingredient list is short, and the steps are repeatable. Once you’ve done it a couple of times you’ll develop a feel for the curds — that’s when you’ll stop worrying and start customizing sizes and textures for different uses.
Smart Substitutions

If you can’t source one item exactly as listed, these swaps will help maintain success while keeping the core process unchanged.
- Liquid rennet alternative: If you only find rennet tablets or powdered rennet, follow the manufacturer’s dilution guidance so that the amount of active enzyme is similar to 30 drops of liquid rennet.
- Milk: The recipe uses whole milk for fat and stretch. Ultra-pasteurized milk generally does not form good curds, so avoid it. If your only option is lower-fat milk, expect a firmer, less elastic result.
- Citric acid: It’s the simplest way to acidify the milk. If you must, you can use carefully measured lemon juice in some recipes, but citric acid gives consistent pH control and is preferred here.
Equipment & Tools
Good results come from a few reliable tools. You don’t need a lab, but certain items make the process repeatable and faster.
- Large, heavy-bottomed pot — for even heating and to prevent scorching.
- Instant-read thermometer — indispensable; the recipe depends on hitting specific temperatures (90°F, 110°F, 135°F).
- Two small bowls — for dissolving citric acid and rennet separately in measured water.
- Long sharp knife — to cut curds cleanly to the bottom of the pot.
- Slotted spoon or fine strainer — to transfer curds without excessive whey.
- Heat-safe gloves or thick rubber gloves — for stretching and handling hot curds safely.
- Airtight container — to store mozzarella in reserved whey.
Mistakes That Ruin Homemade Mozzarella
There are a few easy missteps that turn stretchy mozzarella into a sad, grainy mess. Know them so you can avoid them.
- Skipping temperature checks: The recipe relies on hitting 90°F, 110°F, and 135°F. Going too hot or too cold at any stage affects coagulation and stretch.
- Using ultra-pasteurized milk: It often won’t form a proper curd. Use fresh, pasteurized whole milk instead.
- Overworking the curd: Excessive kneading after the stretch point can make the cheese rubbery. Stop when the curd becomes smooth and shiny.
- Under-dissolving citric acid or rennet: If these aren’t fully dissolved in their small volumes of water, they won’t distribute evenly through the milk and the curd may set unevenly.
- Cutting the curd too early: If the milk hasn’t set to a tofu-like curd, cutting can break the coagulation and yield a weak curd.
Better Choices & Swaps
These are practical adjustments that don’t change the recipe’s structure but help adapt it to what you have on hand or to desired outcomes.
- Smaller or larger balls: Divide the final mass into bite-sized bocconcini or one large ball depending on usage. Smaller balls cool faster and are great for salads.
- Whey reuse: The reserved whey can be used in place of water for cooking grains or in bread dough for a subtle dairy boost. Save it rather than discarding.
- Salt timing: The recipe salts the curds just before stretching — this gives even seasoning. Avoid salting too early, which can tighten the curds prematurely.
Pro Tips & Notes
These come from repetition and a few batches that taught me what to watch for. Pay attention and you’ll cut trial-and-error time in half.
- Prepare everything before you start: Have the two water bowls, rennet, citric acid, thermometer, and a heat source ready. Once the milk is in the pot the sequence moves quickly.
- Use gentle stirring: When heating and after adding rennet, stir gently. Aggressive agitation breaks curds and scatters whey where you don’t want it.
- Trust visual cues: The set curd should look like soft tofu and separate cleanly when cut. If it doesn’t, give it a few more minutes undisturbed before cutting.
- Stretch when hot: The 135°F / 57°C target is key. If the curd cools below that, it won’t stretch and will stay crumbly or cottage-cheese-like.
- Work quickly but safely: Wear gloves and expect the curds to feel very hot while stretching. Quick, decisive movements produce the best shiny surface.
Storage Pro Tips
Fresh mozzarella is best eaten quickly, but the recipe gives a simple short-term storage option that preserves texture and flavor.
- Store in reserved whey: Place formed balls in an airtight container and cover with the reserved whey as the recipe instructs. This keeps the curds hydrated and mildly flavored.
- Refrigeration window: The recipe notes storage in whey for up to 2 days. Beyond that the texture and flavor decline rapidly. Treat it like fresh bread: best on day one, acceptable on day two.
- Reheat gently: If the cheese loses some stretch in the fridge, dunk the ball briefly in hot (not boiling) water around 135°F/57°C to re-soften before stretching or melting.
Homemade Mozzarella Q&A
Quick answers to questions I get all the time.
- Q: Can I use low-fat or skim milk? A: The recipe calls for whole milk for a reason: fat contributes to a tender, elastic texture. Low-fat milk can produce a firmer, less stretchy cheese.
- Q: My curds never set — what went wrong? A: Check that the citric acid and rennet were dissolved and that your milk isn’t ultra-pasteurized. Also confirm the milk reached the specified 90°F before adding rennet and that you allowed adequate setting time.
- Q: Is vegetarian rennet mandatory? A: No. It’s listed here because some cooks prefer it. Animal-derived rennet will work if used according to its dilution and strength guidance.
- Q: Can I freeze fresh mozzarella? A: Freezing will change texture and water content; the cheese will be fine for cooking after thawing but not ideal for fresh eating.
Let’s Eat
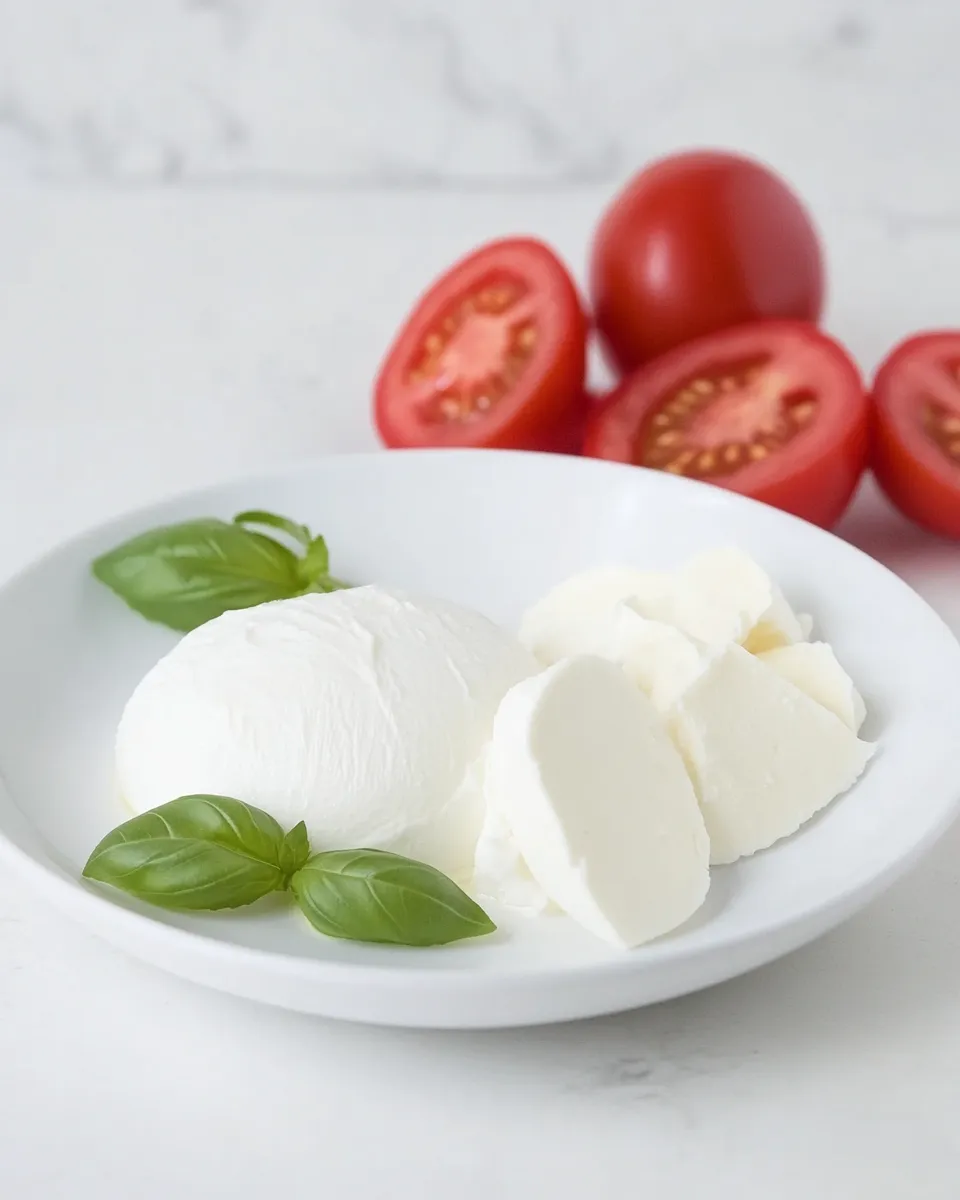
Fresh mozzarella from your kitchen is one of those small victories that lifts a simple meal. Slice it thick for a Caprese with ripe tomatoes and basil, tear it into a pizza that bubbles and browns, or cube it into salads. Eat it the day you make it for the cleanest flavor.
If you’re serving, let the balls come to room temperature briefly out of the whey; the flavor opens up and the texture softens. Keep the reserved whey—use it for soups, baking, or as a cooking liquid. And after a few batches you’ll find a rhythm that turns this from a recipe into a routine.

Easy Homemade Mozzarella
Equipment
- Small Bowl
- Large Pot
- Thermometer
- long sharp knife
- Slotted Spoon
- fine strainer
- Large Bowl
- heat-safe or rubber gloves
- Airtight container
Ingredients
Ingredients
- 250 mlwater
- 1 teaspooncitric acid
- 30 dropsliquid rennet vegetarian rennet
- 3 litersfresh whole milk
- 1 teaspoonfine sea salt
Instructions
Instructions
- Put 200 ml of the 250 ml water in a small bowl and stir in the 1 teaspoon citric acid until fully dissolved.
- Put the remaining 50 ml water in a second small bowl and stir in the 30 drops liquid (vegetarian) rennet until fully dissolved.
- Pour the 3 liters fresh whole milk into a large pot. Stir in the citric-acid solution.
- Heat the milk over medium-low heat, stirring gently and monitoring with a thermometer, until it reaches 90°F / 32°C (this may take several minutes).
- Remove the pot from the heat and slowly pour in the rennet solution while stirring gently for about 30 seconds.
- Cover the pot and let the milk sit undisturbed for 5 minutes. If the milk has not set to a soft, tofu-like curd after 5 minutes, let it sit up to an additional 10 minutes.
- When set, use a long sharp knife to cut the curds into a grid pattern (cut all the way to the bottom of the pot).
- Return the pot to medium-low heat and gently stir the curds while heating until the curds reach 110°F / 43°C.
- Remove the pot from the heat and continue to stir the curds slowly for 5 more minutes.
- Using a slotted spoon or fine strainer, transfer the curds to a large bowl. Reserve about 2–3 cups of the whey for storage.
- Heat additional water to about 135°F / 57°C. Pour enough of this hot water into the bowl to cover the curds and let them sit 2–3 minutes, until the curds reach 135°F / 57°C.
- Sprinkle the 1 teaspoon fine sea salt evenly over the hot curds. Wearing heat-safe or rubber gloves, quickly and carefully fold and stretch the curds with both hands until they form a smooth, shiny, elastic mozzarella mass. If the curds remain loose or have a cottage-cheese texture, drain and add more hot (≈135°F/57°C) water and continue to stretch and knead until the proper texture is achieved. Avoid overworking the cheese to prevent a rubbery texture.
- Shape the mozzarella into one large ball or several smaller balls and place them in an airtight container.
- Pour the reserved whey (no additional salt added) over the formed mozzarella balls to cover them. Let cool, then eat once cooled or store the balls in their whey in the refrigerator for up to 2 days.
Notes
Wear rubber gloves before forming your cheese balls, as the whole thing gets really hot!
Use hot water, but not boiling water, otherwise, your curd will dissolve.
Do not overwork the mozzarella "dough", as it will make it rubbery.