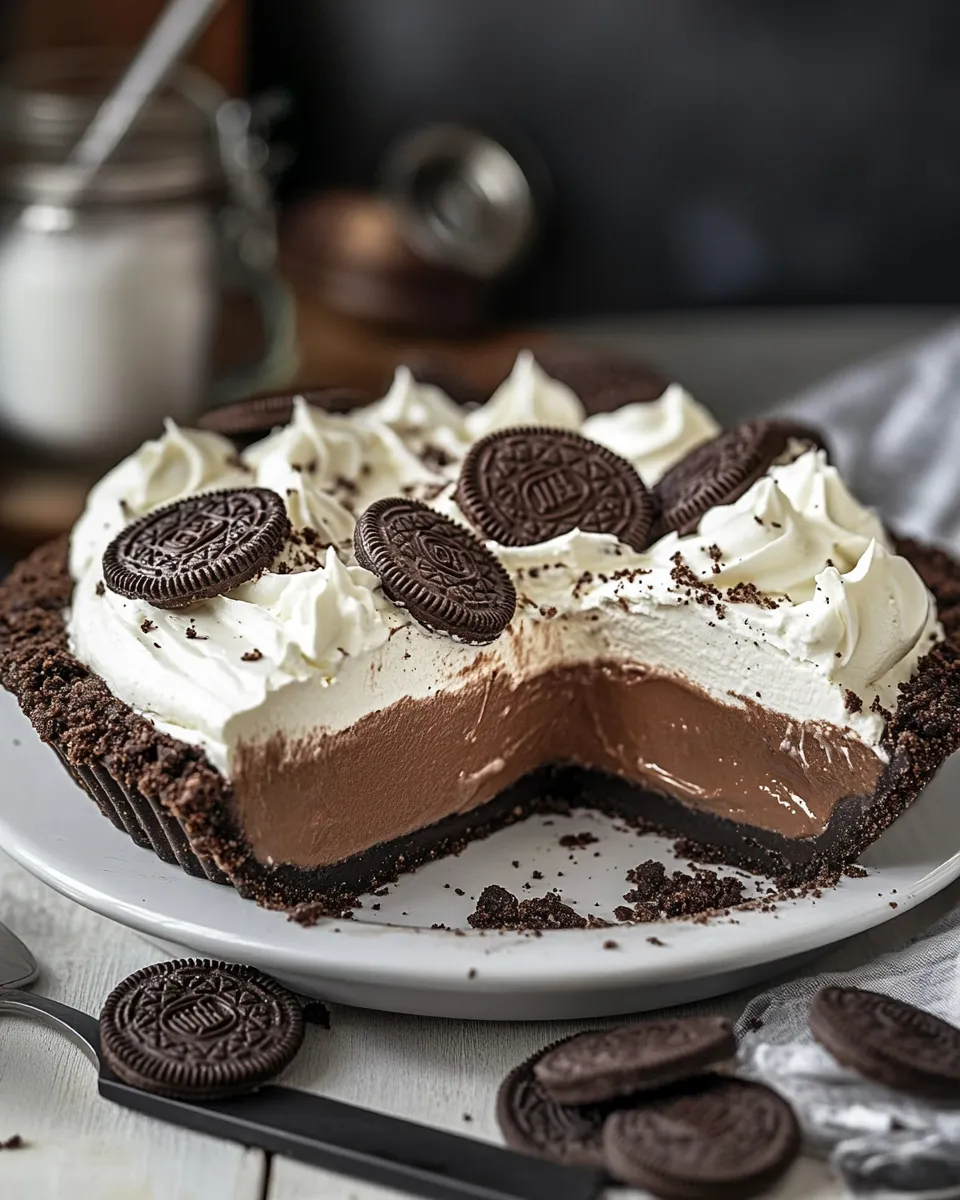
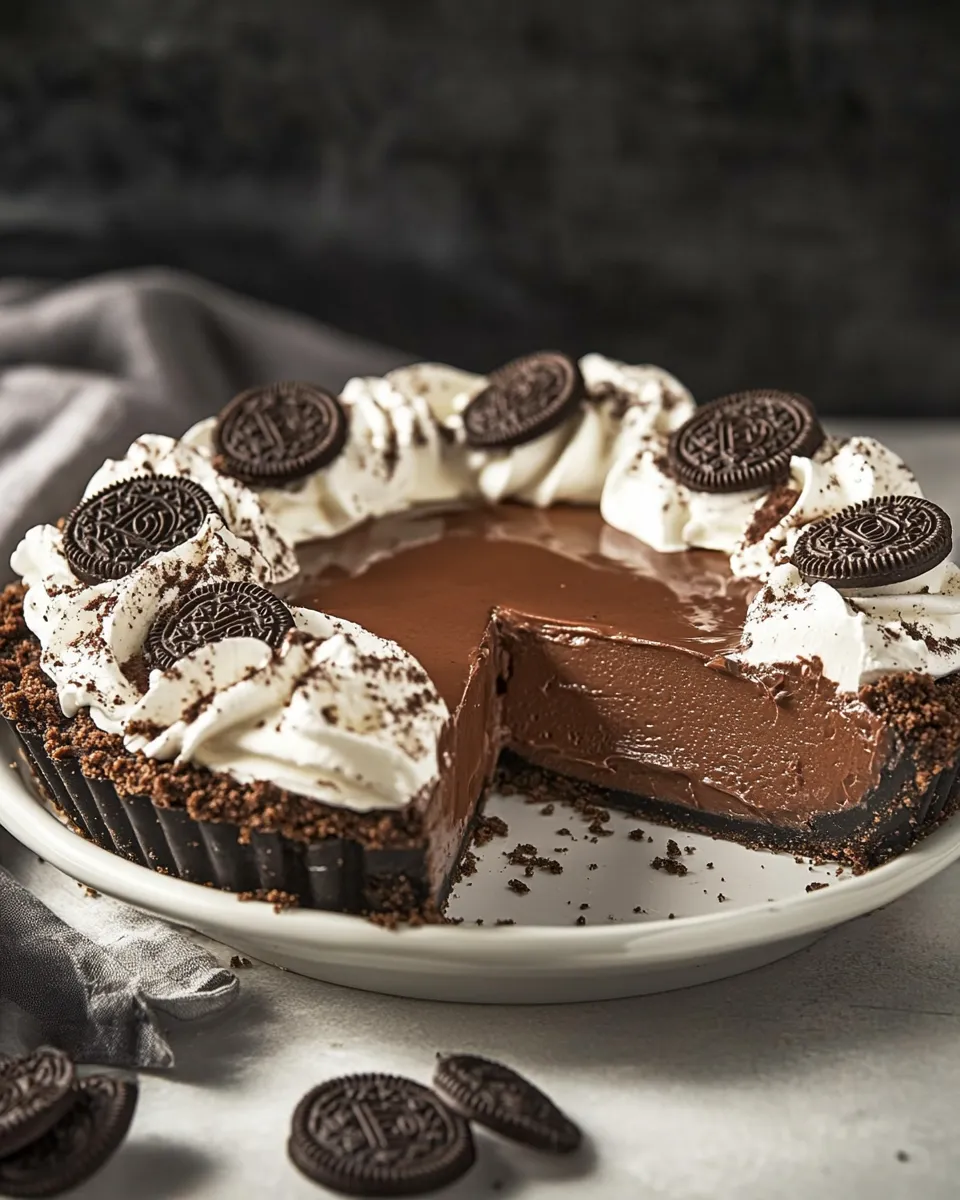
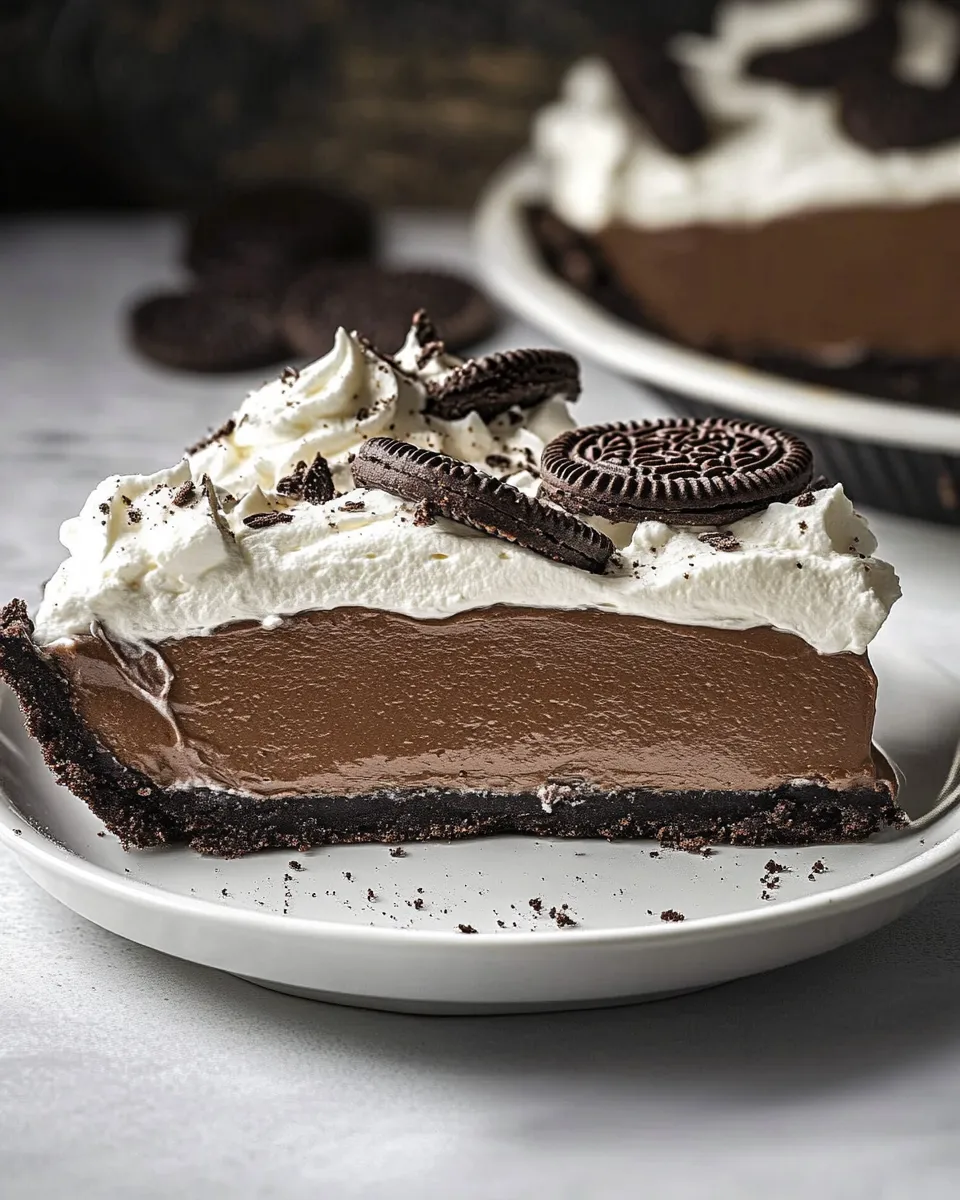
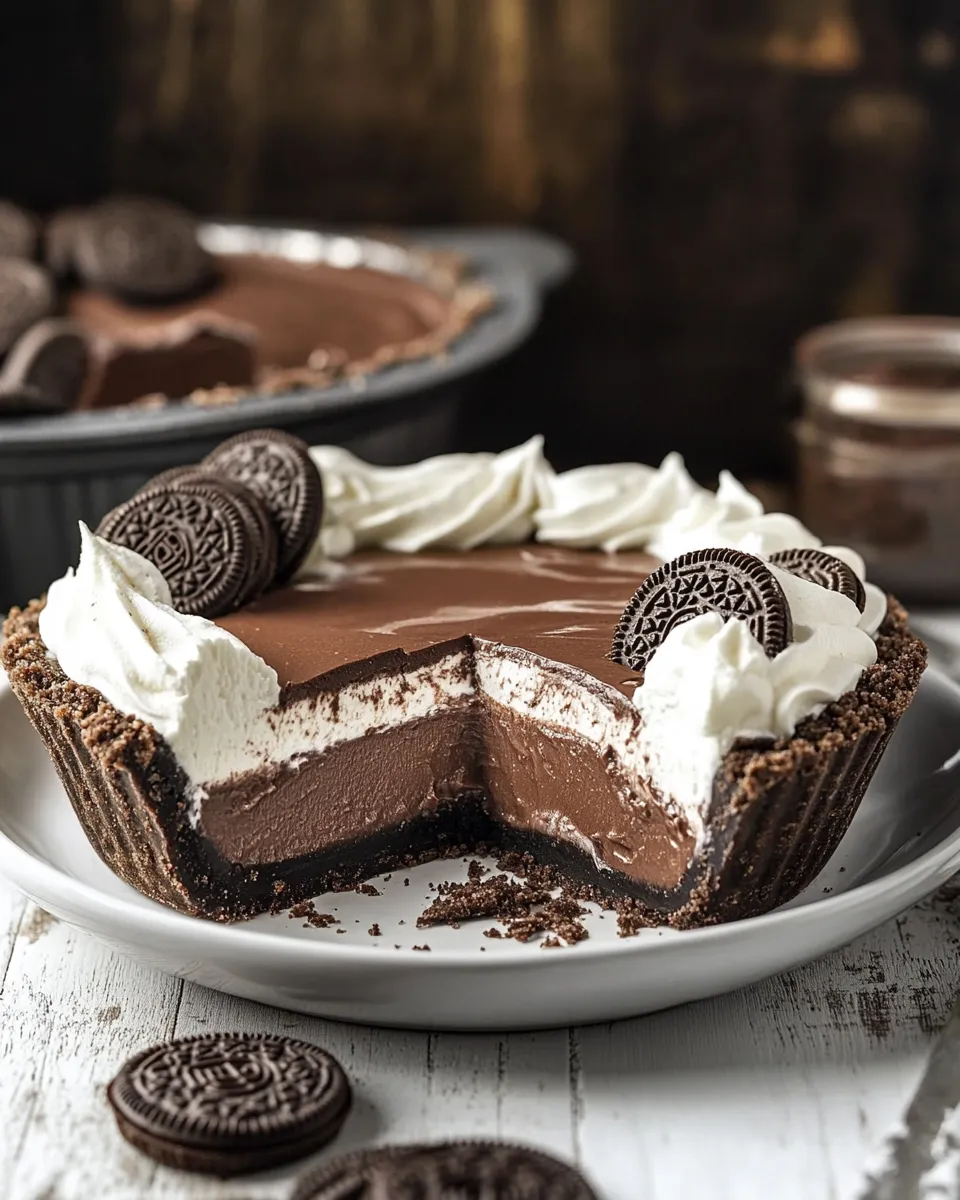
This Chocolate Cream Pie with an Oreo crust is the kind of dessert I make when I want something impressive with minimal fuss. The crust is ready in minutes from crushed Oreos and melted butter, and the ganache filling sets into a glossy, sliceable center that tastes rich but never heavy. Finish with freshly whipped cream and you’ve got a pie that disappears quickly at any table.
I keep this pie in regular rotation because the components are straightforward, the technique is forgiving, and the results are reliably crowd-pleasing. You don’t need tempering skills or a complicated schedule—just attention to heat and timing. I’ll walk you through exactly what I did in the test kitchen and how to avoid the small mistakes that can make a big difference.
Below you’ll find the ingredient list (with notes), the exact step-by-step method, troubleshooting tips, useful equipment, diet-based substitutions, storage instructions, and answers to the questions I get most often. Read it once through, gather your ingredients, and you’ll be slicing into this pie in a few hours.
The Ingredient Lineup
Ingredients
- (1) package Oreo cookies, crushed into crumbs (see post for more info on this) — forms the chocolatey, crunchy crust; press firmly for a stable base.
- 8 tablespoons unsalted butter, melted — binds the crumbs and adds richness; use melted butter while warm for easier mixing.
- 16 ounces semi-sweet chocolate, finely chopped — the flavor backbone of the ganache; chopping small helps it melt evenly.
- 2 and 1/4 cups heavy cream — used to make the hot cream that melts the chocolate into ganache; watch the heat so it simmers but doesn’t boil.
- 1/2 cup (1 stick) unsalted butter, at room temperature, cut into cubes — added to the ganache for silkiness and shine; room temp ensures it emulsifies smoothly.
- 1 and 1/2 cups heavy cream — for the whipped cream topping; chill the bowl and beaters for best results.
- 1/4 cup confectioners’ sugar, sifted — lightly sweetens the whipped cream and stabilizes it for a short period.
Stepwise Method: Chocolate Cream Pie (Oreo Pie Crust)
- In a large bowl, combine (1) package Oreo cookie crumbs and 8 tablespoons unsalted butter, melted. Mix until the crumbs are evenly moistened. Press the mixture firmly and evenly into a 9″ pie plate, covering the bottom and up the sides. Place the crust in the freezer for 30 minutes.
- Put 16 ounces semi-sweet chocolate, finely chopped, into a large heatproof bowl and set it aside.
- In a small saucepan over medium heat, bring 2 and 1/4 cups heavy cream just to a low simmer (do not let it boil), then remove the pan from the heat.
- Pour the hot cream over the chopped chocolate. Let sit undisturbed for 1 minute, then whisk until the chocolate and cream are completely combined and smooth, about 1–2 minutes.
- Add 1/2 cup (1 stick) unsalted butter, at room temperature and cut into cubes, to the chocolate mixture. Stir with a spatula until the butter is fully melted and the ganache is smooth and glossy. Set the ganache aside to cool slightly (a few minutes) if it feels very hot.
- Remove the Oreo crust from the freezer. Carefully pour the chocolate ganache into the crust (it will come close to the top). Smooth the top if needed.
- Refrigerate the pie until the ganache is set, about 2 hours.
- While the pie chills, make the whipped cream: in a large bowl using a handheld mixer or in the bowl of a stand mixer fitted with the whisk attachment, beat 1 and 1/2 cups heavy cream with 1/4 cup sifted confectioners’ sugar until soft peaks form.
- When ready to serve, spoon or dollop the whipped cream onto the center of the pie, slice, and serve immediately.
Why This Recipe Belongs in Your Rotation
This pie strikes a balance between simple technique and high impact. The ganache filling requires just a brief moment of attention—heat the cream, pour it over chopped chocolate, whisk—and it turns into a professional-looking, glossy filling. The Oreo crust gives texture and a built-in chocolate boost without baking. Together, they create a dessert that looks like it took longer than it did.
It’s versatile. Make it for a weeknight treat, dinner with friends, or a potluck. The components scale well if you want to make multiple pies, and the timing is cooperative: while the ganache sets, you can prepare a salad, finish a main, or tidy up the kitchen. If you appreciate desserts that are both elegant and efficient, keep this one handy.
Ingredient Swaps & Substitutions
Swapping thoughtfully keeps the end texture similar. Use any chocolate you prefer—bittersweet for less sweetness, or a high-quality semisweet for depth. If you use a chocolate with a different cocoa butter content, the ganache may set a bit firmer or softer, so allow the pie to chill until it feels stable.
For the crust, you can swap the Oreos for another chocolate sandwich cookie if you need to. The butter is essential to bind the crumbs; using salted butter will change the seasoning slightly but can be acceptable—just omit any extra salt elsewhere.
Equipment at a Glance
Keep the tool list short. You’ll need a large bowl for the crust, a 9″ pie plate, a small saucepan for heating cream, a heatproof bowl to make ganache in, and either a handheld mixer or stand mixer for the whipped cream. A good whisk and a flexible spatula make the ganache and spreading effortless.
Mistakes Even Pros Make
Too-hot cream. If the cream boils, it can scorch or separate the ganache. Bring it to a low simmer and remove from heat immediately. Let the cream rest for a few seconds before pouring if it’s visibly boiling.
Cold chocolate. Pop the chopped chocolate into a warm place or chop it fine so it melts evenly. Large chunks extend the whisking time and can leave streaks. The one-minute rest after pouring the cream is crucial; it lets heat transfer and makes whisking clean and smooth.
Under-pressing the crust. If you don’t press the crumbs firmly into the pan, the crust will crumble when sliced. Press evenly along the sides and bottom, then chill thoroughly so it firms up before filling.
Substitutions by Diet
Gluten-free: Use gluten-free chocolate sandwich cookies for the crust. Confirm your chocolate is labeled gluten-free.
Dairy-free / Vegan: This recipe relies heavily on cream and butter; converting it changes texture significantly. You can try full-fat coconut cream in place of heavy cream for the ganache and whipped topping, and use dairy-free chocolate and vegan butter, but the result will be different in flavor and set. I recommend testing small batches before serving to guests.
Lower-sugar: Use a dark chocolate with higher cocoa percentage to reduce sugar, and skip added sugar in the whipped cream, or cut it back to taste. The crust will remain sweet because of the Oreos.
Notes from the Test Kitchen
Temperature checks matter. When we tested this, pies set reliably when chilled at standard refrigerator temperatures for about two hours. If your fridge runs warm or the pie is in a crowded fridge, it may need longer. I give it at least two hours and often leave it three for a firmer slice.
Whipped cream consistency. We found that stopping at soft peaks gives a cream that’s easy to spoon or dollop onto the center of the pie without weighing it down. If you prefer a more stable topping for slicing, whip to medium peaks and serve soon after; over-whipping makes the cream grainy.
Presentation tip: keep the whipped cream in the center rather than spreading to the edges. It looks cleaner and lets the ganache shine. If you want a piped look, chill your bowl and nozzle and use a large round tip to pipe a single mound or a ring.
Keep It Fresh: Storage Guide
Refrigerate covered. Once assembled, the pie keeps well in the refrigerator for 3–4 days. Cover it loosely with plastic wrap or keep it in a pie carrier to prevent fridge odors from transferring. The whipped cream may weep slightly after a day; re-whip a small amount of cream and freshen the top if needed before serving.
Freezing. I do not recommend freezing the assembled pie—the whipped cream and the ganache texture will be affected. If you must, freeze the un-whipped ganache-filled pie (without the whipped cream) wrapped well for up to one month. Thaw overnight in the refrigerator, then top with freshly whipped cream before serving.
Top Questions & Answers
Q: Can I bake the Oreo crust?
A: The recipe doesn’t require baking. Chilling the crust in the freezer firms it quickly. If you prefer a firmer base, a 10-minute bake at 350°F will set it, but watch closely so the edges don’t burn.
Q: My ganache looked separated—what happened?
A: Separation is usually heat-related. If the cream was too hot or the butter added in cold chunks without emulsifying, the mixture can split. Let it cool slightly and whisk vigorously; if it won’t combine, warm gently over a bain-marie while whisking to bring it back together.
Q: How do I get clean slices?
A: Use a sharp knife warmed under hot water and wiped dry between slices. Chill the pie thoroughly before cutting. Clean, hot knives slice ganache cleanly without smearing.
Bring It Home
This Chocolate Cream Pie with an Oreo crust makes the list of desserts I reach for when I want to impress without a marathon in the kitchen. It’s dependable, adaptable, and fast enough for last-minute plans. The instructions above are exactly how I build the pie in the test kitchen: a pressed Oreo crust, a silky ganache, a quick chill, and a fresh whipped cream finish. Follow those steps, respect the temperatures, and you’ll have a pie that eats like a celebration.
Gather your Oreos and chocolate, plan for a couple hours of total time (most of it hands-off), and enjoy a rich, chocolate-forward pie that feels special. If you try it, tell me what you did differently and how it turned out—I love swapping notes on small tweaks that make a dish even better in different kitchens.
Chocolate Cream Pie (Oreo Pie Crust)
Equipment
- 9-inch pie plate
- Large Bowl
- food processor or rolling pin (to crush cookies)
- Freezer
- Heatproof bowl
- Small saucepan
- Whisk
- Spatula
- handheld mixer or stand mixer with whisk attachment
- Refrigerator
Ingredients
Ingredients
- 1 package Oreo cookies, crushed into crumbs (see post for more info on this)
- 8 tablespoonsunsalted butter melted
- 16 ouncessemi-sweet chocolate finely chopped
- 2 and 1/4 cups heavy cream
- 1/2 cup 1 stick unsalted butter, at room temperature, cut into cubes
- 1 and 1/2 cups heavy cream
- 1/4 cupconfectioners’ sugar sifted
Instructions
Instructions
- In a large bowl, combine (1) package Oreo cookie crumbs and 8 tablespoons unsalted butter, melted. Mix until the crumbs are evenly moistened. Press the mixture firmly and evenly into a 9" pie plate, covering the bottom and up the sides. Place the crust in the freezer for 30 minutes.
- Put 16 ounces semi-sweet chocolate, finely chopped, into a large heatproof bowl and set it aside.
- In a small saucepan over medium heat, bring 2 and 1/4 cups heavy cream just to a low simmer (do not let it boil), then remove the pan from the heat.
- Pour the hot cream over the chopped chocolate. Let sit undisturbed for 1 minute, then whisk until the chocolate and cream are completely combined and smooth, about 1–2 minutes.
- Add 1/2 cup (1 stick) unsalted butter, at room temperature and cut into cubes, to the chocolate mixture. Stir with a spatula until the butter is fully melted and the ganache is smooth and glossy. Set the ganache aside to cool slightly (a few minutes) if it feels very hot.
- Remove the Oreo crust from the freezer. Carefully pour the chocolate ganache into the crust (it will come close to the top). Smooth the top if needed.
- Refrigerate the pie until the ganache is set, about 2 hours.
- While the pie chills, make the whipped cream: in a large bowl using a handheld mixer or in the bowl of a stand mixer fitted with the whisk attachment, beat 1 and 1/2 cups heavy cream with 1/4 cup sifted confectioners’ sugar until soft peaks form.
- When ready to serve, spoon or dollop the whipped cream onto the center of the pie, slice, and serve immediately.
Notes
Whipped cream should be made right before serving!