I love making small, handheld treats that look fancy but take almost no brain power. These Chocolate Peanut Butter and Jelly Cups are exactly that: a simple assembly of three pantry staples into something incredibly satisfying. They set up fast in the freezer and hold up well, which makes them perfect for a last-minute dessert, a sweet snack, or a little homemade gift.
There’s no tempering, no piping, no candy thermometer. You melt chocolate, form thin shells, dollop peanut butter and a touch of jam, then seal them up. The technique is forgiving: work quickly when the chocolate is warm, use the freezer to set things fast, and sprinkle a bit of coarse salt at the end if you like contrast.
If you bake a lot or just want a reliable, tasty riff on a classic PB&J, this recipe will be a keeper. Below I’ll walk you through the ingredients, the exact steps, swaps, troubleshooting, storage tips, and a short Q&A so you can make a batch with confidence.
What Goes In
Ingredients
- 8 oz dark chocolate — forms the shells and the top seal; pick a good-quality bar for flavor.
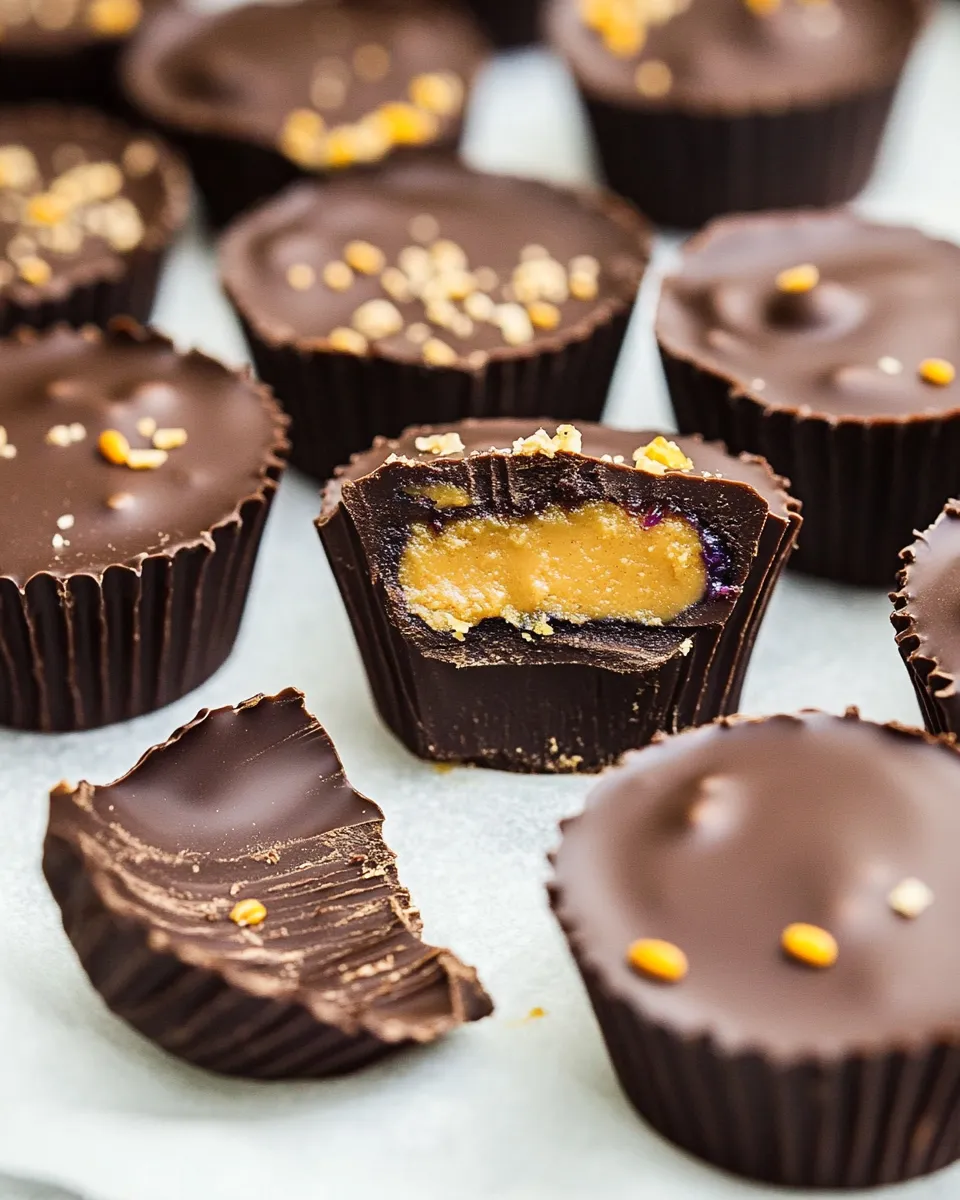
- ¼ cup smooth peanut butter — the creamy center; measure it so you can portion evenly into each cup.
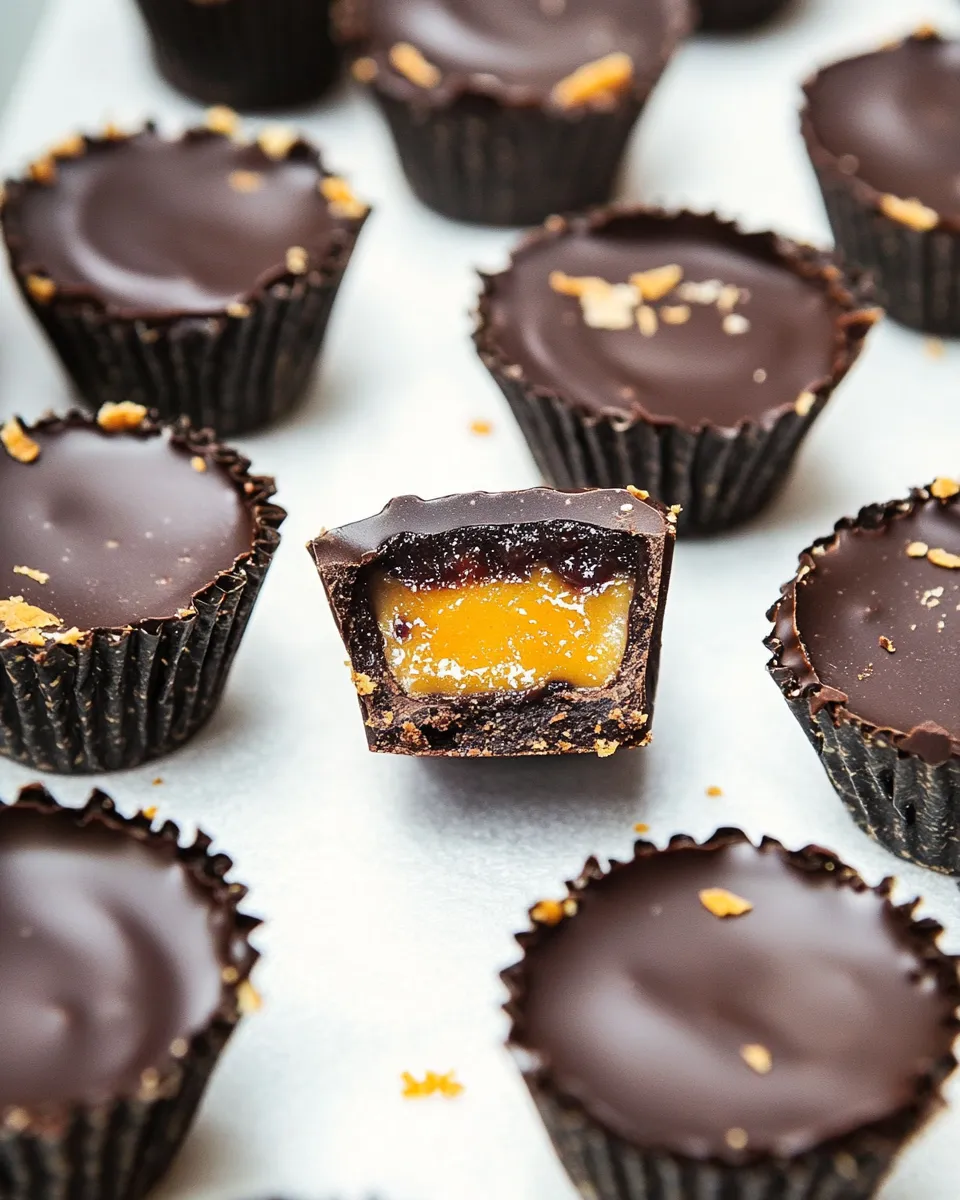
- ¼ cup jelly or jam of choice — adds the sweet, fruity counterpoint; keep it fairly spreadable.
- Flaked or coarse salt, optional — a tiny pinch balances the sweetness and heightens chocolate flavor.
Chocolate Peanut Butter and Jelly Cups in Steps
- Line a mini muffin tray with 24 mini muffin liners and make space in the freezer for the tray. Set the empty tray aside.
- Break the 8 oz dark chocolate into small pieces. Melt the chocolate either: (a) in the microwave in 30‑second intervals, stirring between each interval, until smooth and fully melted; or (b) using a double boiler: bring about 1 cup of water to a low simmer, set a heatproof bowl on the pot without the bowl touching the water, place the chocolate in the bowl and stir occasionally until melted. Remove from heat.
- Spoon about 1 teaspoon of the melted chocolate into each lined mini muffin cup. Tilt and rotate the tray or use the back of the spoon to spread the chocolate up the sides to form a shell, leaving the center open. Work fairly quickly while the chocolate is warm.
- Transfer the tray to the freezer for about 5 minutes, until the chocolate shells are set and no longer tacky.
- Remove the tray from the freezer. Add about 1/2 teaspoon smooth peanut butter into the center of each shell, then add about 1/2 teaspoon jelly or jam on top of the peanut butter.
- Spoon about 1 teaspoon of the remaining melted chocolate over the peanut butter and jelly in each cup to seal the tops. If the chocolate has thickened, briefly rewarm (a few seconds in the microwave) until pourable but not hot. Smooth the tops as needed.
- Sprinkle each cup with a pinch of flaked or coarse salt, if using. Return the tray to the freezer for another 5–10 minutes, until fully set. Remove and enjoy.
Why You’ll Keep Making It
These little cups hit several satisfying notes: rich chocolate, nutty creaminess, and a bright hit of jam. They’re portable and portion-controlled, which is useful when you want something sweet but don’t want a whole plate of cookies on your counter. They also scale easily: make one tray for the week, or three trays for a party.
They come together fast and require no special skills. The visual payoff—neat chocolate shells with a glossy top and a sprinkle of salt—feels more impressive than the five minutes of active work they take. Plus, they’re an ideal way to use up an odd jar of jam or a few squares of leftover chocolate.
Easy Ingredient Swaps
- Chocolate — swap dark for milk or semi-sweet if you prefer a sweeter cup; white chocolate works but melts differently and may set softer.
- Peanut butter — use natural peanut butter if you like a grainier texture; for nut-free, sunflower seed butter is a great 1:1 swap.
- Jelly or jam — any flavor works; raspberry, strawberry, and grape are classic. Thicker preserves might need a quick warm to loosen them.
- Salt — omit if you don’t like salty-sweet, or use a very light dusting of cocoa powder as an alternative garnish.
Tools of the Trade
- Mini muffin tray — the right size creates compact, uniform cups.
- Mini muffin liners — paper liners make removal easier and keeps cups tidy.
- Heatproof bowl and small pot — for the double-boiler method if you prefer gentle melting.
- Spoons (teaspoon measuring spoons) — makes portioning chocolate and fillings consistent.
- Microwave-safe bowl — if you melt chocolate in the microwave; a sturdy spatula or spoon for stirring.
Troubles You Can Avoid
- Thick, clumpy melted chocolate — don’t overheat. If it thickens, rewarm in very short bursts and stir until smooth. Avoid adding water; chocolate will seize.
- Shells that are too thin — spread the chocolate higher on the walls in step 3 so the shell holds the filling without breaking when bitten.
- Peanut butter oozing out — measure the fillings carefully. Use about 1/2 teaspoon peanut butter and 1/2 teaspoon jam; overfilling makes sealing messy.
- Condensation on cups — if the cups sit too long at room temperature after freezing, condensation can form. Keep them frozen until a few minutes before serving.
Make It Diet-Friendly
- Lower sugar — choose a lower-sugar dark chocolate (look for 70% or higher) and a no-sugar-added jam to cut sweet calories.
- Lower fat — reducing peanut butter will change texture, but you can use powdered peanut butter reconstituted to a thicker paste to shave fat.
- Keto option — use a sugar-free chocolate and a low-carb fruit preserve or a small smear of crushed berries with a touch of sweetener.
- Allergy-friendly — swap peanut butter for sunflower seed butter for a nut-free version; ensure chocolate is processed in an allergen-safe facility if needed.
Flavor Logic
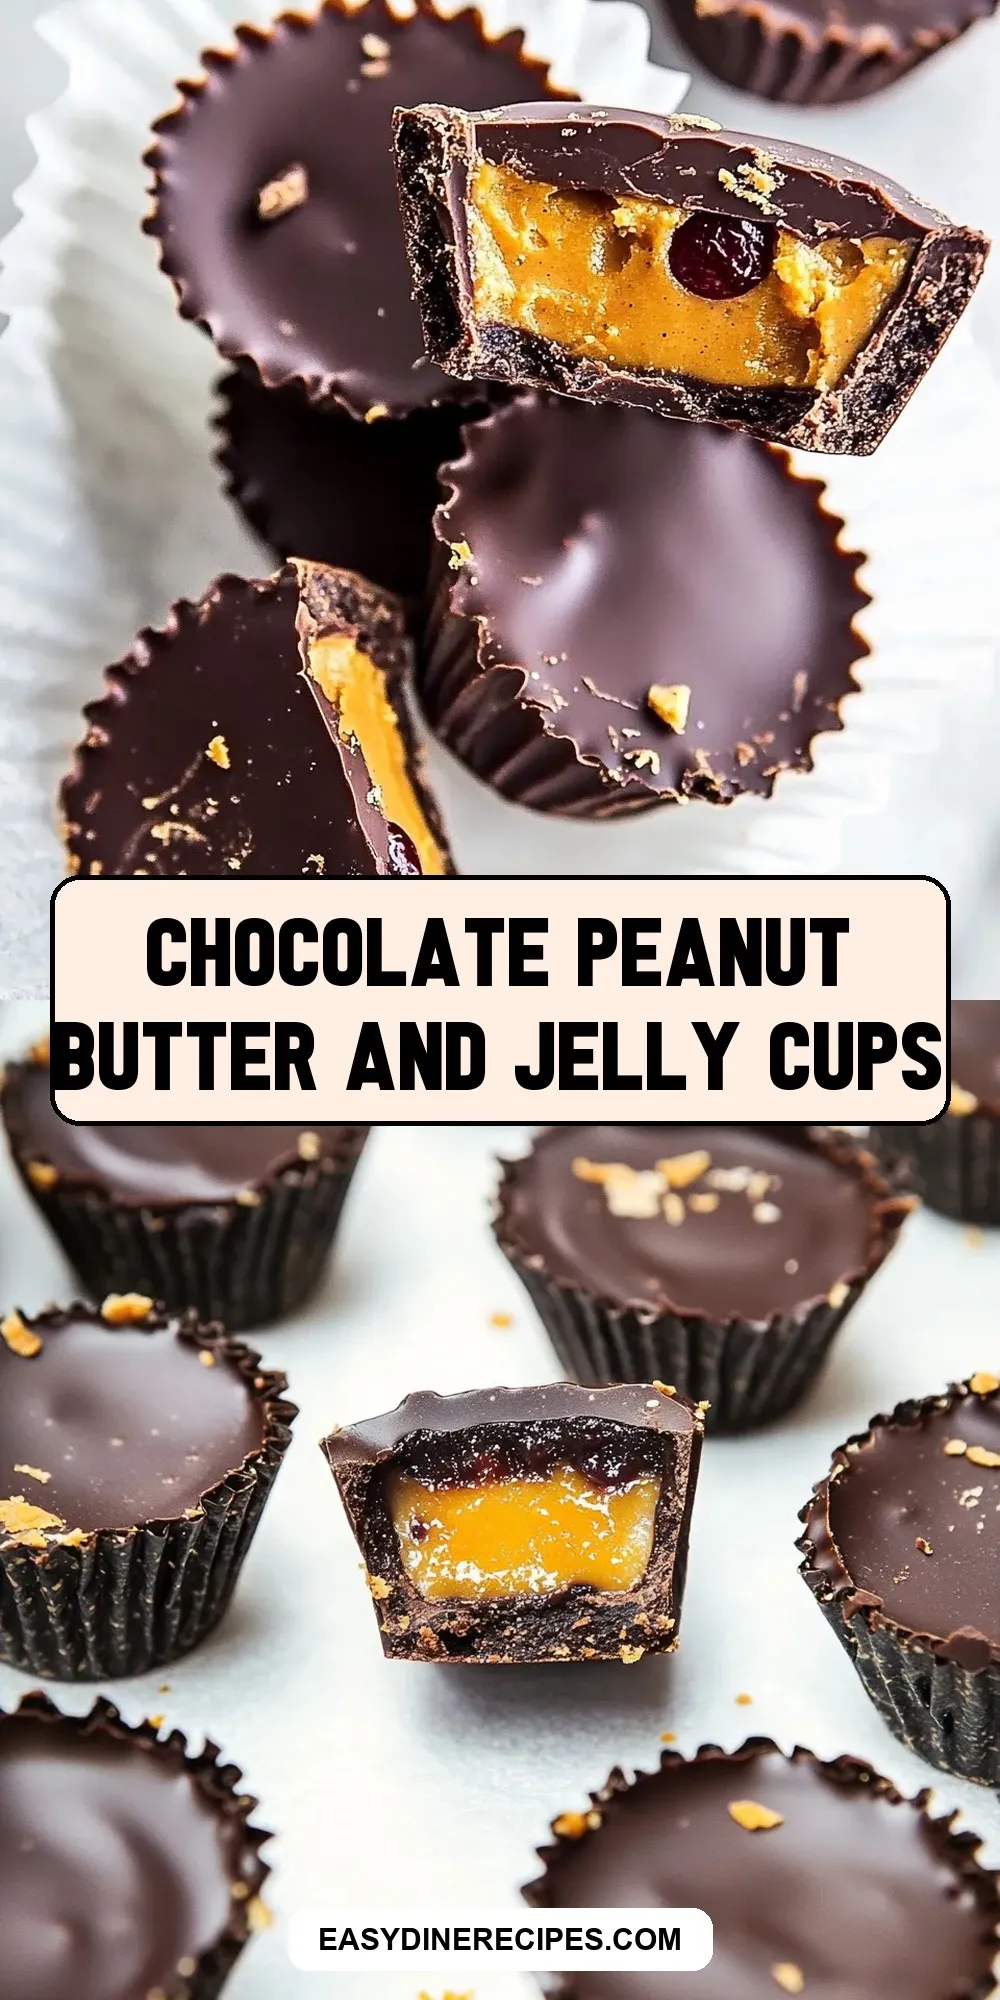
The magic here is contrast. Dark chocolate gives a firm, bitter-sweet frame. Peanut butter adds fat, salt, and a savory note that balances the chocolate. Jam brings acidity and bright sweetness—without it, the cups would skew one-dimensional. The pinch of flaked salt at the end is optional but powerful; it amplifies chocolate’s complexity and makes each bite sing.
Texture matters too. You want a thin chocolate shell that snaps, creamy peanut butter in the middle, and a soft jam pocket. That variety in one bite is what turns this from a simple snack into a memorable treat.
Keep It Fresh: Storage Guide
- Short term (ready to eat) — store in a single layer in an airtight container in the refrigerator for up to 1 week. Chocolate can sweat when moved from cold to warm, so let them rest at room temperature for a few minutes before eating if you prefer softer chocolate.
- Long term — freeze in an airtight container with parchment between layers for up to 2 months. Thaw in the fridge or at room temperature for 15–30 minutes before serving.
- Transporting — keep chilled in a cooler or insulated bag with an ice pack for events, especially in warm weather, to prevent melting.
Quick Q&A
- Can I use chunky peanut butter? — Yes. Chunky will add crunch and change the mouthfeel. It’s delicious but slightly harder to portion smoothly.
- My chocolate seized — can I fix it? — If water got in, it may seize into a grainy paste. You can try adding a small amount of neutral oil or cocoa butter and warming gently while stirring, but results vary. Starting over with dry equipment is often easiest.
- How can I make larger cups? — Use a standard muffin tin and scale portions: about 1 tablespoon for the shell, 1/2 tablespoon peanut butter, 1/2 tablespoon jam, and 1 tablespoon to seal. Keep an eye on setting times.
- Do I have to chill them in the freezer? — Chilling speeds the process and gives a nice firm set. You can chill in the refrigerator, but it will take longer and might not be as firm.
Ready to Cook?
Set out a tray, melt some chocolate, and make a batch. The process is quick, the ingredients are simple, and the result is a neat, indulgent snack everyone understands. If you’re making them for a gathering, double or triple the recipe and stash extras in the freezer—the cups hold up well.
Make one tray first to practice the shell thickness and filling amounts. Once you’ve nailed those, the rest is assembly-line simple. Enjoy the process, and don’t be shy with the salt—even a tiny pinch transforms the flavors.

Chocolate Peanut Butter and Jelly Cups
Equipment
- mini muffin tray
- mini muffin liners
- microwave-safe bowl or heatproof bowl
- double boiler or saucepan for simmering water
- Spoon
Ingredients
Ingredients
- 8 ozdark chocolate
- 1/4 cupsmooth peanut butter
- 1/4 cupjelly or jam of choice
- Flaked or coarse salt optional
Instructions
Instructions
- Line a mini muffin tray with 24 mini muffin liners and make space in the freezer for the tray. Set the empty tray aside.
- Break the 8 oz dark chocolate into small pieces. Melt the chocolate either: (a) in the microwave in 30‑second intervals, stirring between each interval, until smooth and fully melted; or (b) using a double boiler: bring about 1 cup of water to a low simmer, set a heatproof bowl on the pot without the bowl touching the water, place the chocolate in the bowl and stir occasionally until melted. Remove from heat.
- Spoon about 1 teaspoon of the melted chocolate into each lined mini muffin cup. Tilt and rotate the tray or use the back of the spoon to spread the chocolate up the sides to form a shell, leaving the center open. Work fairly quickly while the chocolate is warm.
- Transfer the tray to the freezer for about 5 minutes, until the chocolate shells are set and no longer tacky.
- Remove the tray from the freezer. Add about 1/2 teaspoon smooth peanut butter into the center of each shell, then add about 1/2 teaspoon jelly or jam on top of the peanut butter.
- Spoon about 1 teaspoon of the remaining melted chocolate over the peanut butter and jelly in each cup to seal the tops. If the chocolate has thickened, briefly rewarm (a few seconds in the microwave) until pourable but not hot. Smooth the tops as needed.
- Sprinkle each cup with a pinch of flaked or coarse salt, if using. Return the tray to the freezer for another 5–10 minutes, until fully set. Remove and enjoy.
Notes
Chocolate
: You can use any type of melting chocolate you like. I prefer to keep these a little on the healthier side by using 60% or more dark chocolate but milk or even white chocolate will work.