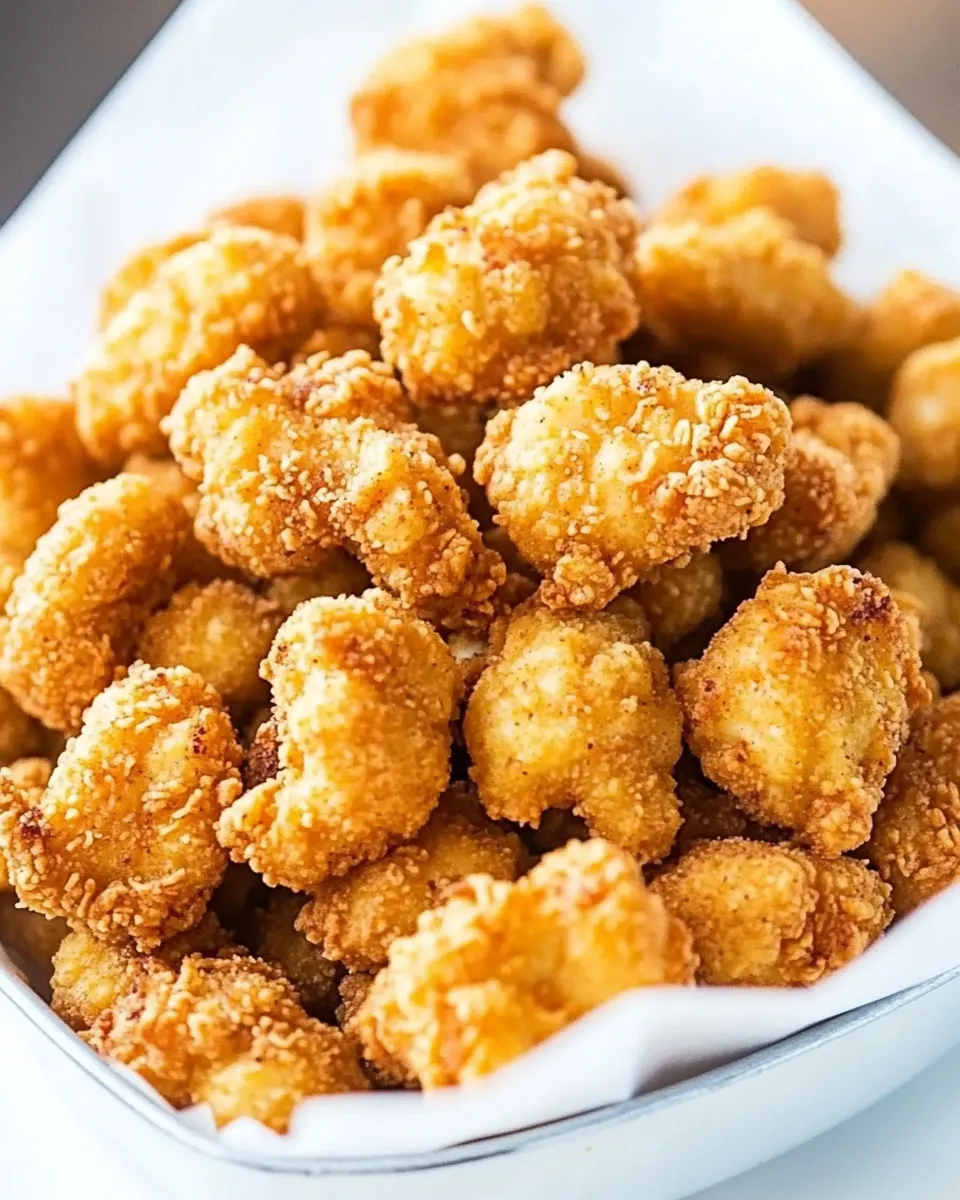
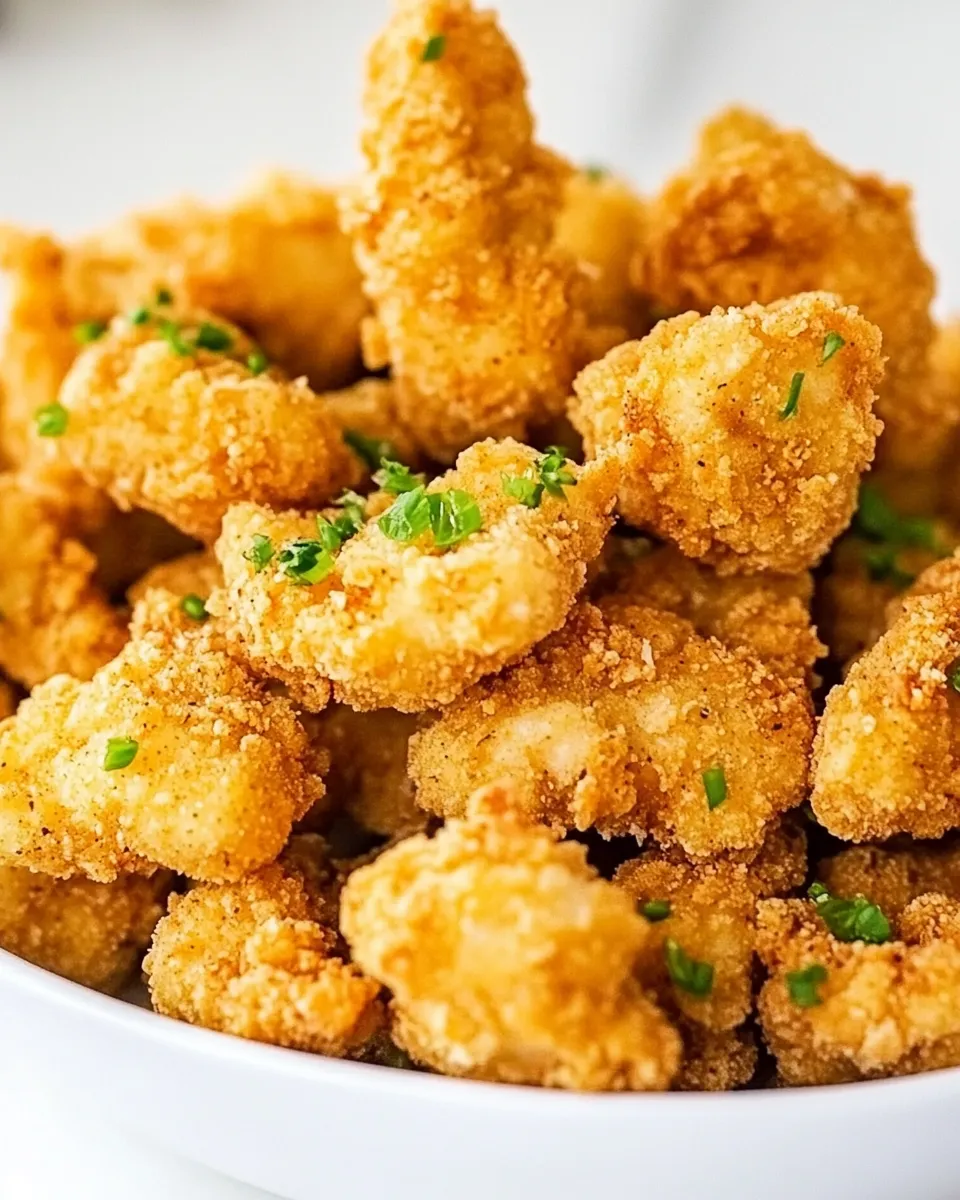
This popcorn chicken recipe is the kind of thing I make when I want a crunchy, shareable snack that feels a little indulgent but comes together predictably. It’s all about a simple three-step coating: seasoned flour, a tangy buttermilk dip, and a layer of panko for extra crunch. The method is forgiving, and the payoff is pieces of juicy chicken with a crisp, golden exterior—perfect for dipping or piling into a sandwich.
I keep this in my rotation because it’s fast to prep, and the steps are repeatable. Once your oil is at the right temperature you can crank through batches, and everything stays crisp if you let the pieces rest briefly after frying. There’s nothing fancy required—mostly careful attention to temperature and timing.
Below you’ll find ingredient notes, the exact step-by-step frying instructions I use every time, troubleshooting for common pitfalls, swap ideas for dietary needs, and practical reheating and storage tips. Read through the ingredient list and the safety notes before you start frying so the whole process is smooth and safe.
Ingredient Notes
Before you start, a few quick notes about what each ingredient does and why it matters. These tips will help you get consistently crisp, well-seasoned popcorn chicken.
Ingredients
- 4 boneless skinless chicken breasts (6 ounces each) — Trim fat and cut into uniform bite-size pieces so everything cooks evenly.
- 2 cups buttermilk — Acidic and slightly thick; tenderizes the chicken and helps the coating stick.
- 2 dashes Cholula hot sauce (or Tabasco hot sauce) — Adds a bit of heat and a vinegar note to the buttermilk; optional but recommended for depth.
- 1½ cups all-purpose flour — The seasoned flour creates a dry base layer that helps the buttermilk adhere.
- 1 teaspoon coarse sea salt — Seasoning the flour avoids bland breading; coarse salt is easier to control for texture.
- 1 teaspoon coarse black pepper — Freshly cracked is best for bright pepper flavor throughout the coating.
- 1 teaspoon paprika — Adds color and a mild sweetness to the seasoned flour.
- ¾ teaspoon onion powder — Boosts savory depth without altering texture.
- 2 cups panko breadcrumbs — Larger flakes than regular breadcrumbs; they give the exterior its signature crunch.
- Vegetable oil or shortening for frying (at least 4 cups) — Neutral oil with a high smoke point keeps the coating crisp and golden; amount depends on your pot size to reach a 2–3 inch oil depth.
Crispy Popcorn Chicken: From Prep to Plate
- Trim any excess fat from the 4 boneless skinless chicken breasts and dice into small bite-size pieces about 3/4 inch square. Pat the pieces dry with paper towels and set aside.
- In a medium bowl whisk together 2 cups buttermilk and 2 dashes Cholula (or Tabasco) hot sauce.
- In a shallow bowl whisk together 1½ cups all-purpose flour, 1 teaspoon coarse sea salt, 1 teaspoon coarse black pepper, 1 teaspoon paprika, and ¾ teaspoon onion powder.
- Place 2 cups panko breadcrumbs in a third shallow bowl.
- Pour at least 4 cups vegetable oil or shortening into a Dutch oven and heat to 350°F (a candy or food thermometer works best). Heating may take about 15 minutes—do not start frying until oil reaches 350°F.
- Work in batches. For each batch, dredge the chicken pieces in the seasoned flour, shaking off excess; dip them into the buttermilk mixture so they are evenly coated; then press them into the panko so each piece is well coated.
- Carefully add just a few coated pieces at a time to the hot oil and fry, maintaining the oil temperature at 350°F, until the outside is deep golden brown and a thermometer inserted into the center reads 165°F—about 2 to 3 minutes per batch.
- Remove cooked pieces with a slotted spoon and transfer to paper towels or brown paper bags to drain excess oil. Let the oil return to 350°F before frying the next batch.
- Repeat steps 6–8 until all the chicken is cooked. Serve after a brief drain/rest.
What You’ll Love About This Recipe
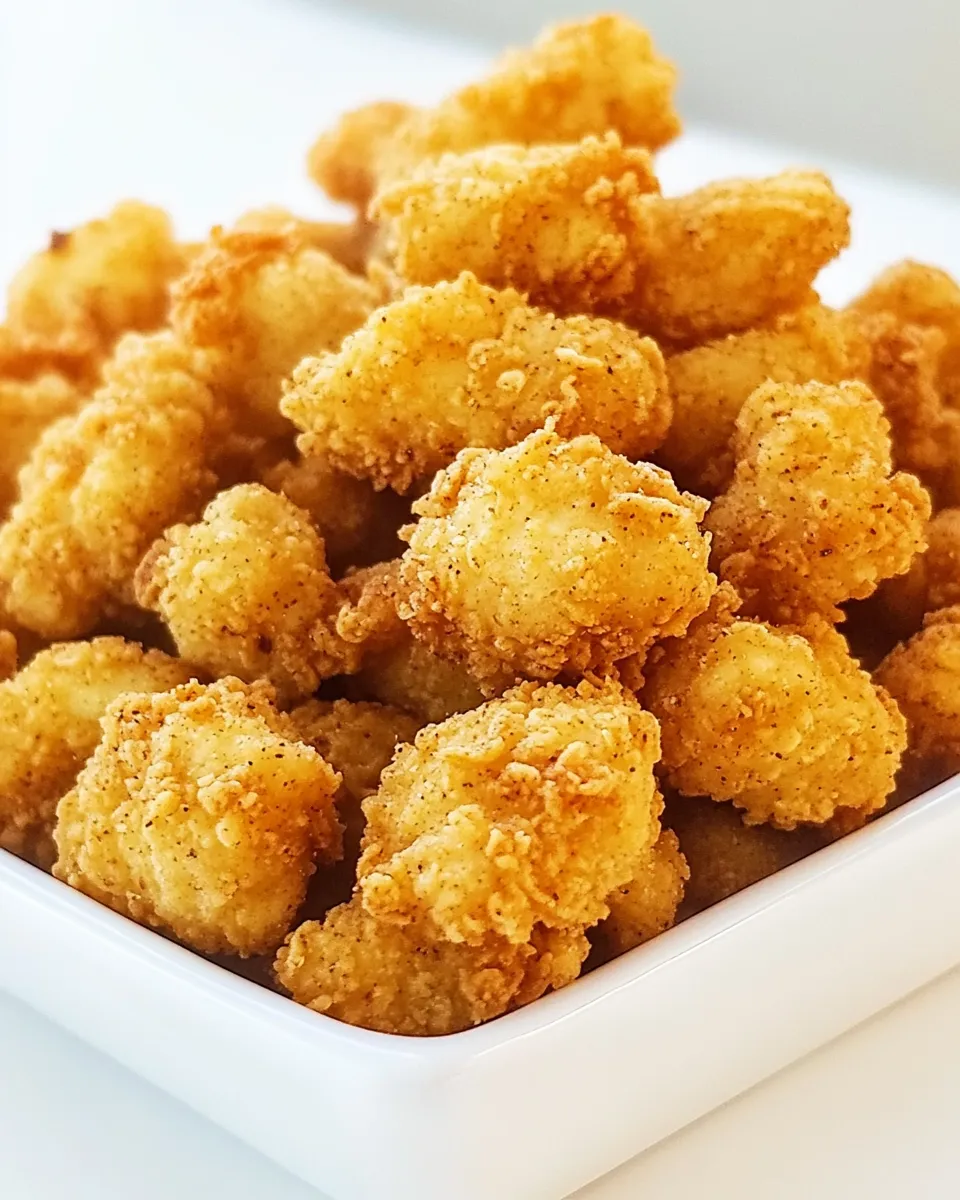
- Reliable crunch from the panko: the larger flakes stay crisp and visible after frying.
- Buttermilk tenderizes the chicken, keeping the interior juicy while the outside crisps up.
- Simple pantry seasonings deliver balanced flavor without masking the chicken.
- Quick cook time: individual pieces cook fast, so you can serve hot plates in minutes once frying starts.
- Flexible for sauces and serving formats—dipping, sandwiches, or salads.
Dairy-Free/Gluten-Free Swaps

- Dairy-free buttermilk: swap the buttermilk for an equal amount of unsweetened plant-based milk (soy, oat, or almond) mixed with 1–2 tablespoons vinegar or lemon juice to mimic acidity and tenderizing. Note: that changes flavor slightly but keeps the method.
- Gluten-free flour: replace the all-purpose flour with a 1:1 gluten-free flour blend for dredging. Ensure the blend contains xanthan gum to mimic binding properties.
- Gluten-free crumbs: use certified gluten-free panko or crushed gluten-free cereal/crackers to recreate the crunchy exterior.
- Oil choice: stick with neutral, high smoke-point oils (e.g., canola, sunflower) that are naturally dairy- and gluten-free.
Kitchen Gear Checklist
- Heavy Dutch oven or deep, heavy-bottomed pot — holds oil steadily and minimizes temperature swings.
- Candy or deep-fry thermometer — critical for maintaining 350°F and consistent frying.
- Three shallow bowls — one for flour, one for buttermilk, one for panko, to set up a simple assembly line.
- Slotted spoon or spider skimmer — removes pieces cleanly and drains oil.
- Paper towels or brown paper bags — for draining finished pieces quickly to keep them crisp.
- Instant-read thermometer — check that the chicken is 165°F in the thickest piece.
- Tongs and a baking sheet — useful for moving batches to a resting area if you want to keep them warm in a low oven (optional).
Mistakes That Ruin Crispy Popcorn Chicken
- Frying at the wrong temperature: too cool and the coating soaks up oil and goes greasy; too hot and the outside browns before the inside reaches 165°F. Keep oil at 350°F.
- Overcrowding the pot: adding too many pieces at once drops oil temperature and prevents proper browning. Fry in small batches and let oil recover between batches.
- Uneven chicken pieces: pieces that vary widely in size will cook at different rates. Cut to roughly 3/4 inch squares for uniform doneness.
- Skipping the flour step: not using a dry flour dredge first can cause the buttermilk to slide off and the panko to fail to adhere properly.
- Not drying the chicken: wet pieces dilute the seasoned flour and make the coating sloppy. Pat dry before dredging.
Seasonal Serving Ideas
- Spring: Serve with a simple lemon-herb yogurt dip and a crunchy slaw of radish, carrot, and spring greens for brightness.
- Summer: Offer a trio of dips—barbecue, spicy mayo, and ranch—alongside sliced cucumbers and cherry tomatoes for a picnic platter feel.
- Fall: Pair with roasted root vegetables and a maple-mustard dipping sauce to lean into warmer flavors.
- Winter: Serve over mashed potatoes or tucked into warm brioche buns with caramelized onions for a comforting take.
Pro Tips & Notes
Breading workflow
- Set up an assembly line: flour, buttermilk, panko. Work steadily and keep hands dry to avoid clumping.
- Press the panko onto the buttermilk-coated pieces—don’t just roll them lightly. A firm press ensures panko adheres and won’t fall off during frying.
Frying and temperature control
- Use a thermometer in the oil, not just your judgment. Temperature swings are the main culprit for inconsistent texture.
- Let the oil return to 350°F between batches. It can take a minute or two, and rushing leads to greasy chicken.
- Remove pieces with a slotted spoon and let them drain briefly on paper towels or brown paper—don’t pile them up or they’ll steam and lose crispness.
Safety
- Never leave hot oil unattended. Keep a lid nearby to smother flames if necessary and know where your fire extinguisher is stored.
- Use long-handled tools and keep a clear workspace to avoid accidental splashes.
Refrigerate, Freeze, Reheat
- Storage: After cooling completely, store popcorn chicken in an airtight container in the refrigerator for up to 3 days.
- Freezing: Spread cooled pieces on a sheet pan and flash-freeze until firm, then transfer to a freezer bag for up to 2 months. This prevents clumping and preserves texture.
- Reheating for best crispness: reheat in a 375°F oven on a wire rack set over a baking sheet for 8–12 minutes, flipping once, until heated through and crisp. Avoid the microwave unless you’re in a pinch—the crust will soften.
Questions People Ask
- Can I bake these instead of frying? You can, but the texture will differ. Baking yields a drier interior and less dramatic crunch than frying. If you bake, spray pieces with oil and use panko, then bake at 425°F and watch closely.
- Why is my coating falling off? Likely because the flour stage was skipped, the chicken was too wet, or the panko wasn’t pressed on firmly. Also avoid moving pieces too much in the oil for the first 30–45 seconds so the crust can set.
- Can I use thighs instead of breasts? Yes. Dark meat is more forgiving and stays juicier; cut into similar-sized pieces to ensure even cooking.
- How do I know when the chicken is done? Use an instant-read thermometer—the internal temperature should be 165°F.
That’s a Wrap
Follow the simple three-step coating and keep a close eye on your oil temperature and batch sizes. The result is dependable: small, crunchy pieces of chicken that are juicy inside and perfectly golden out. Whether you’re feeding a crowd, building a sandwich, or making snacks for movie night, this method will serve you well. Start with good prep, respect the oil temperature, and you’ll get crispy popcorn chicken every time.
Crispy Popcorn Chicken
Equipment
- Medium Bowl
- Shallow Bowls
- Dutch Oven
- candy or food thermometer
- Slotted Spoon
- Paper Towels
- brown paper bags
Ingredients
Ingredients
- 4 boneless skinless chicken breasts (6 ounces each)
- 2 cupsbuttermilk
- 2 dashes Cholula hot sauce or Tabasco hot sauce
- 1 1/2 cupsall-purpose flour
- 1 teaspooncoarse sea salt
- 1 teaspooncoarse black pepper
- 1 teaspoonpaprika
- 3/4 teaspoononion powder
- 2 cupspanko breadcrumbs
- vegetable oil or shortening for frying at least 4 cups
Instructions
Instructions
- Trim any excess fat from the 4 boneless skinless chicken breasts and dice into small bite-size pieces about 3/4 inch square. Pat the pieces dry with paper towels and set aside.
- In a medium bowl whisk together 2 cups buttermilk and 2 dashes Cholula (or Tabasco) hot sauce.
- In a shallow bowl whisk together 1½ cups all-purpose flour, 1 teaspoon coarse sea salt, 1 teaspoon coarse black pepper, 1 teaspoon paprika, and ¾ teaspoon onion powder.
- Place 2 cups panko breadcrumbs in a third shallow bowl.
- Pour at least 4 cups vegetable oil or shortening into a Dutch oven and heat to 350°F (a candy or food thermometer works best). Heating may take about 15 minutes—do not start frying until oil reaches 350°F.
- Work in batches. For each batch, dredge the chicken pieces in the seasoned flour, shaking off excess; dip them into the buttermilk mixture so they are evenly coated; then press them into the panko so each piece is well coated.
- Carefully add just a few coated pieces at a time to the hot oil and fry, maintaining the oil temperature at 350°F, until the outside is deep golden brown and a thermometer inserted into the center reads 165°F—about 2 to 3 minutes per batch.
- Remove cooked pieces with a slotted spoon and transfer to paper towels or brown paper bags to drain excess oil. Let the oil return to 350°F before frying the next batch.
- Repeat steps 6–8 until all the chicken is cooked. Serve after a brief drain/rest.
Notes
The panko bread crumbs add a really nice crunch to the popcorn chicken. Make sure to really turn each piece of chicken fully in the flour, then the buttermilk, then the panko so that they’re well coated before frying.
For perfectly fried chicken pieces, maintain a decent depth of oil and the proper oil temperature of 350°F for best results.
When removing the chicken from the pot, use a slotted spoon to make sure you drain as much oil as possible before transferring it to the plate.