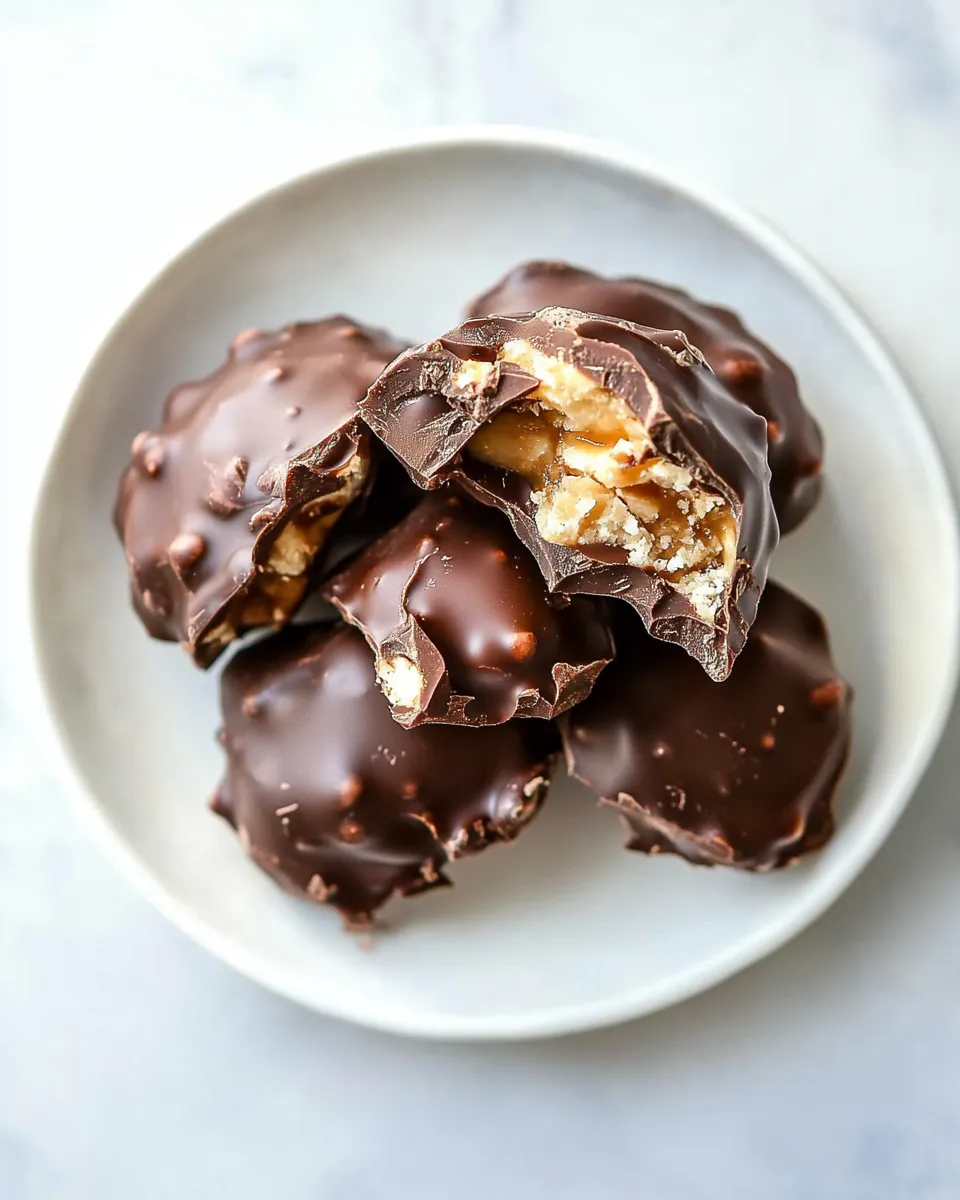
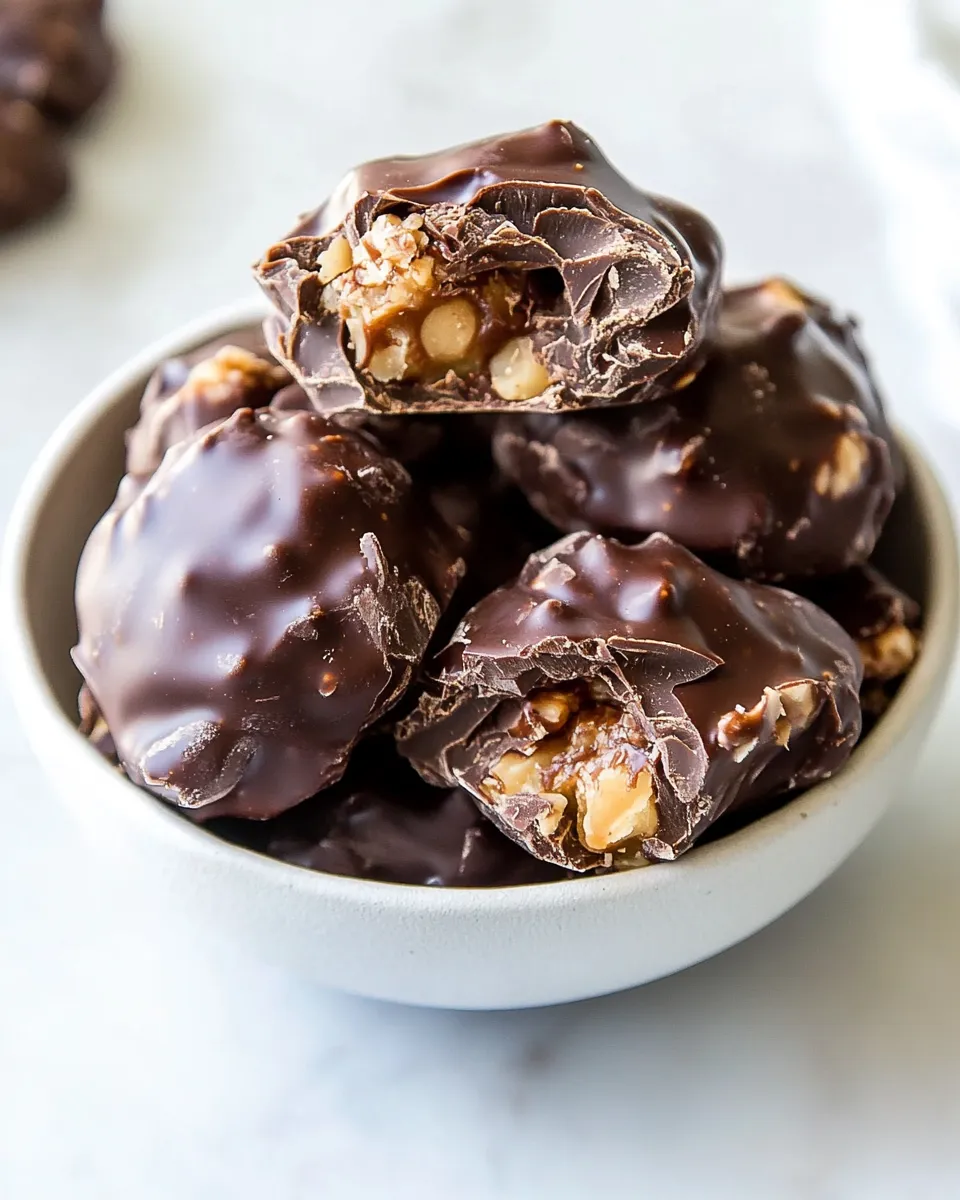
These are the turtles you’ll actually want to gift, plate, and hide in the back of the pantry. Crunchy toasted pecans, buttery soft caramel, and a glossy chocolate coat — the kind of candy that makes people stop mid-conversation. There’s a rhythm to making them: toast, cook, chill, dip. Once you’ve done it a couple of times it becomes quick and predictable.
I test and tweak so you don’t have to. This version leans on a microwave caramel for speed and consistency, and it keeps the classic finish: a pecan-centered caramel mound dipped in chocolate. The result is dependable, dessert-table-ready, and forgiving if you follow the temperature checks below.
I’ll walk you through exact ingredients, every step, substitutions, and common mistakes to avoid. Bring a sheet pan, a microwave-safe bowl, and a good spatula — the rest is mostly patience and well-timed taps of the fork.
What You’ll Need

Ingredients
- 6 tablespoons salted butter — provides fat and flavor; salt balances the sweetness.
- 1/2 cup light brown sugar, packed — adds caramel depth and moisture.
- 1/2 cup granulated sugar — helps the caramel set cleanly.
- 1/2 cup sweetened condensed milk — creates a creamy, stable caramel base.
- 1/2 cup light corn syrup — prevents crystallization for smooth caramel.
- 1/2 teaspoon vanilla extract — brightens the caramel flavor; add after heating.
- 2 cups pecan halves — toast them for more aroma and crunch; roughly chop after toasting.
- 16 oz almond bark or high quality chocolate — choose almond bark for convenience or good-quality chocolate for flavor.
Mastering Homemade Chocolate Turtles: How-To
- Preheat oven to 350°F (175°C). Spread 2 cups pecan halves in a single layer on a baking sheet and toast in the oven 5–10 minutes, stirring once, until fragrant but not burned. Remove from oven, let cool, then roughly chop the pecans. Set chopped pecans aside.
- Line a baking sheet with parchment paper or a Silpat liner. Set the lined sheet aside.
- Place 6 tablespoons salted butter in a large microwave-safe bowl and microwave until melted. Add 1/2 cup light brown sugar (packed), 1/2 cup granulated sugar, 1/2 cup sweetened condensed milk, and 1/2 cup light corn syrup to the bowl and stir to combine.
- Microwave the mixture on HIGH for about 6–8 minutes, watching carefully to prevent boiling over. After microwaving, check the caramel temperature with an instant-read thermometer (target about 235°F / soft-ball stage) or perform the ice-water test: spoon a small amount of caramel into a cup of ice water and pinch it—if it forms a soft ball, it is ready; if not, return to the microwave in 30-second increments and test again.
- Using oven mitts or hot pads, carefully remove the bowl from the microwave. Stir 1/2 teaspoon vanilla extract into the hot caramel, then stir in the chopped toasted pecans until evenly coated.
- Using a large spoon, drop spoonfuls of the pecan-caramel mixture onto the prepared parchment-lined baking sheet to form individual mounds (you should get about 20, but size is up to you). Refrigerate the sheet until the caramel mounds are set, about 20 minutes.
- Place 16 oz almond bark or high-quality chocolate in a microwave-safe bowl and melt in the microwave in 30-second intervals, stirring between each interval, until smooth and fully melted. Alternatively, melt the chocolate in a double boiler and stir until smooth.
- Working one mound at a time, use a fork to lower a caramel-pecan cluster into the melted chocolate, coat it completely, lift it out with the fork, and tap the fork against the side of the bowl to let excess chocolate drip off. Return the dipped cluster to the parchment-lined baking sheet. Repeat until all clusters are coated.
- Let the chocolate set at room temperature or in the refrigerator until firm. Store the finished turtles in an airtight container at room temperature or in the fridge for 2–3 weeks.
What You’ll Love About This Recipe
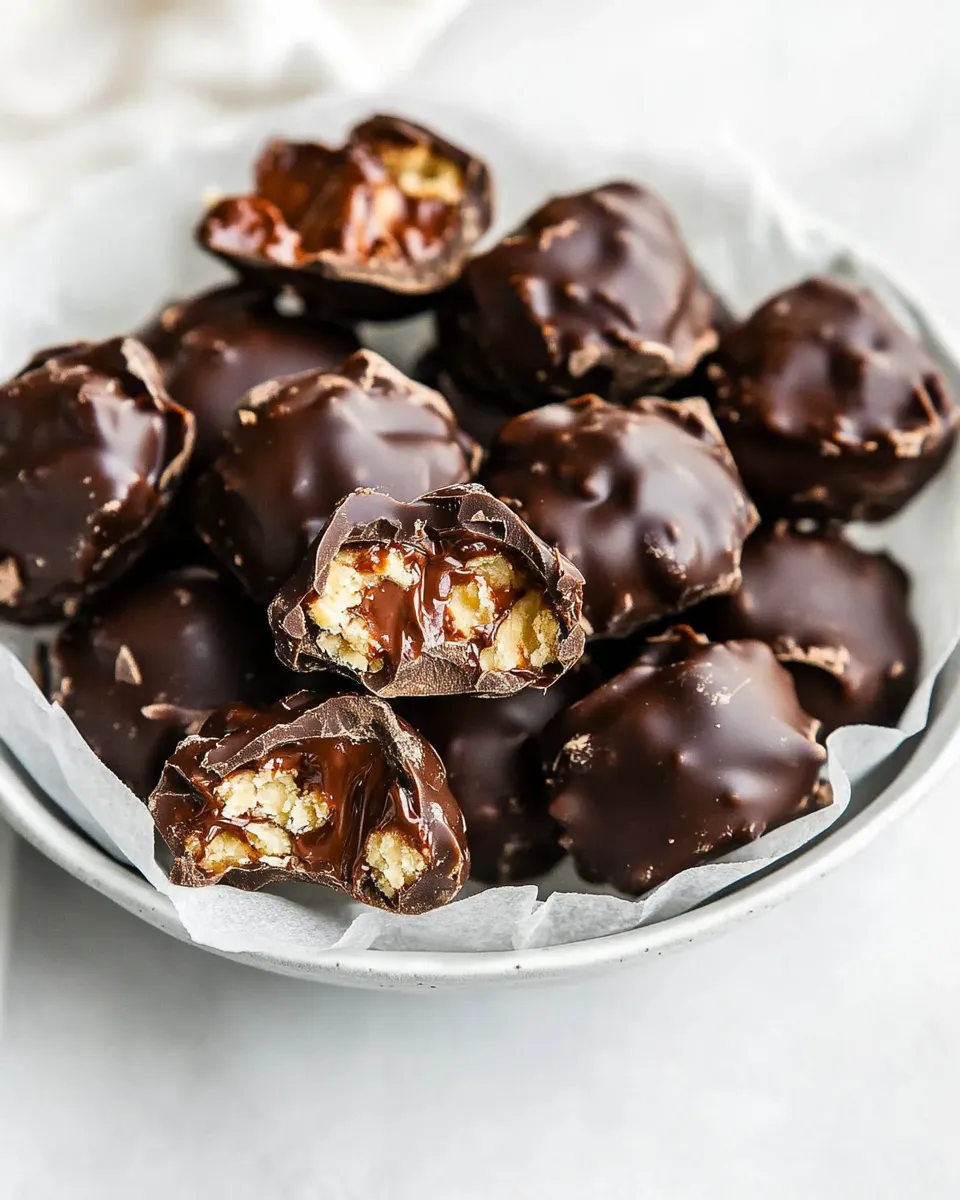
This turtle recipe is straightforward and reliable. The microwave caramel is fast, and the corn syrup keeps it silky so you won’t chase crystallized sugar. Toasting the pecans first adds flavor and crispness that stands up to the soft caramel.
The method scales well. Make them small for cocktail parties or larger for gift tins. You control the texture by how finely you chop the pecans — leave some halves for visual presence or chop them fine for evenly distributed crunch.
Finally, these are portable and keep nicely. Wrapped in parchment or packed into tins, they’re an excellent homemade present that travels well without melting immediately or losing shape.
What to Use Instead
Substitutions are simple if you need them:
- Almond bark or quality chocolate: If you prefer a different coating, use semi-sweet, milk, or dark chocolate. Almond bark melts easily and firms quickly; higher-quality chocolate gives richer flavor.
- Pecans: Walnuts or hazelnuts work. For a nut-free option, substitute roasted sunflower seeds or toasted coconut (see Adaptations section).
- Salted butter: Unsalted butter plus a pinch of fine sea salt works if you want control over sodium.
Hardware & Gadgets
Minimal tools make this an approachable candy to whip up at home:
- Large microwave-safe bowl — for making the caramel reliably and safely.
- Baking sheet and parchment paper or Silpat — nonstick surface for setting turtles.
- Instant-read thermometer — highly recommended to hit the soft-ball stage (about 235°F).
- Forks and a spoon — for dipping and portioning the caramel-pecan mounds.
- Double boiler (optional) — for gently melting chocolate if you prefer stovetop control.
What Not to Do
- Don’t skip the temperature check. Caramel undercooked will be too soft and may spread; overcooked becomes hard and brittle.
- Don’t leave the microwave unattended while the caramel is cooking. It can bubble up and boil over quickly.
- Don’t try to dip warm caramel mounds. If they’re not set, they’ll flatten or melt into a mess.
- Don’t place hot bowls on thin countertops without protection. The bowl will be very hot after microwaving.
Adaptations for Special Diets
With a few swaps you can accommodate several diets.
- Vegan: Use vegan butter and a dairy-free, sweetened condensed milk alternative (coconut-based versions exist). Use dairy-free chocolate for coating.
- Nut-free: Replace pecans with roasted sunflower or pumpkin seeds. Toast them first for better flavor.
- Lower-sugar: True low-sugar caramel is difficult because sugar defines caramel texture. Consider making smaller turtles to reduce per-serving sugar or choose dark chocolate for a less-sweet finish.
What Could Go Wrong
Here are the most common failures and quick fixes:
- Caramel too soft after chilling: Likely undercooked. Rewarm the caramel and continue cooking in 30-second increments until it reaches the soft-ball stage (about 235°F).
- Caramel too hard or grainy: It was overcooked or crystallized. If grainy, you can try reheating gently with a splash of water or cream and stirring to smooth, but results vary.
- Chocolate blooms or looks dull: Chocolate may have been overheated. Gently re-melt and cool to around 88–90°F before reusing. For gloss, tempering helps but isn’t required for short-term home storage.
- Turtles flatten: The caramel mounds weren’t chilled enough before dipping. Refrigerate until set before coating.
Meal Prep & Storage Notes
Plan for about 30–60 minutes active time and a short cooling window. Make the pecans and caramel ahead of time for efficient assembly: toasted pecans can be prepared a day ahead and stored in an airtight container; caramel-pecan mounds can be refrigerated and dipped within 24 hours.
Store finished turtles in an airtight container. The recipe’s directions say they keep 2–3 weeks at room temperature or in the fridge. For best texture, room temperature is fine in a cool pantry; refrigerate if your kitchen is warm or if you prefer a firmer chocolate shell.
If you freeze them, wrap individually and use within 1–2 months. Thaw in the refrigerator to avoid condensation on the chocolate surface.
Troubleshooting Q&A
Q: My caramel didn’t reach the soft-ball stage. What do I do?
A: Return it to the microwave in 30-second bursts, stirring between each session, and test again with the thermometer or ice-water test.
Q: The chocolate seized or turned grainy while melting. Help.
A: Seizing happens from moisture. Start fresh with dry chocolate and ensure bowls and utensils are completely dry. Melt slowly in short intervals and stir thoroughly.
Q: Turtles look oily after sitting out.
A: Fat separation can occur if chocolate wasn’t fully hardened or if stored too warm. Chill briefly to set the chocolate and then keep them in a cooler location.
Q: How big should each mound be?
A: The directions estimate about 20 mounds from the recipe. Make them small for bite-sized turtles or larger if you want a substantial candy — just note larger pieces take longer to set and to coat evenly.
Hungry for More?
If you liked these turtles, try variations: drizzle contrasting chocolate over the set turtles for a pretty finish, or sprinkle flaky sea salt on top right after dipping for a sweet-salty bite. These make lovely homemade gifts — pack them in parchment-lined tins or stack them between layers of wax paper.
For other easy candies that travel well, consider brittle, peppermint bark, or simple truffles. Candy-making becomes addictive: once you’ve mastered one, the confidence to experiment with flavors and textures follows quickly.
Homemade Chocolate Turtles
Equipment
- Oven
- Baking Sheet
- parchment paper or Silpat liner
- Large microwave-safe bowl
- Microwave
- Instant Read Thermometer
- oven mitts or hot pads
- Fork
- double boiler (optional)
Ingredients
Ingredients
- 6 tablespoonssalted butter
- 1/2 cuplight brown sugar packed
- 1/2 cupgranulated sugar
- 1/2 cupsweetened condensed milk
- 1/2 cuplight corn syrup
- 1/2 tspvanilla extract
- 2 cupspecan halves
- 16 ozalmond bark or high quality chocolate*
Instructions
Instructions
- Preheat oven to 350°F (175°C). Spread 2 cups pecan halves in a single layer on a baking sheet and toast in the oven 5–10 minutes, stirring once, until fragrant but not burned. Remove from oven, let cool, then roughly chop the pecans. Set chopped pecans aside.
- Line a baking sheet with parchment paper or a Silpat liner. Set the lined sheet aside.
- Place 6 tablespoons salted butter in a large microwave-safe bowl and microwave until melted. Add 1/2 cup light brown sugar (packed), 1/2 cup granulated sugar, 1/2 cup sweetened condensed milk, and 1/2 cup light corn syrup to the bowl and stir to combine.
- Microwave the mixture on HIGH for about 6–8 minutes, watching carefully to prevent boiling over. After microwaving, check the caramel temperature with an instant-read thermometer (target about 235°F / soft-ball stage) or perform the ice-water test: spoon a small amount of caramel into a cup of ice water and pinch it—if it forms a soft ball, it is ready; if not, return to the microwave in 30-second increments and test again.
- Using oven mitts or hot pads, carefully remove the bowl from the microwave. Stir 1/2 teaspoon vanilla extract into the hot caramel, then stir in the chopped toasted pecans until evenly coated.
- Using a large spoon, drop spoonfuls of the pecan-caramel mixture onto the prepared parchment-lined baking sheet to form individual mounds (you should get about 20, but size is up to you). Refrigerate the sheet until the caramel mounds are set, about 20 minutes.
- Place 16 oz almond bark or high-quality chocolate in a microwave-safe bowl and melt in the microwave in 30-second intervals, stirring between each interval, until smooth and fully melted. Alternatively, melt the chocolate in a double boiler and stir until smooth.
- Working one mound at a time, use a fork to lower a caramel-pecan cluster into the melted chocolate, coat it completely, lift it out with the fork, and tap the fork against the side of the bowl to let excess chocolate drip off. Return the dipped cluster to the parchment-lined baking sheet. Repeat until all clusters are coated.
- Let the chocolate set at room temperature or in the refrigerator until firm. Store the finished turtles in an airtight container at room temperature or in the fridge for 2–3 weeks.
Notes
Microwave Caramel:
My caramel takes about 7 minutes in the microwave, but time may vary depending on the wattage of your microwave.
Chocolate:
I prefer
Almond Bark
because it sets up really well at room temperature (and still tastes great). If using pure chocolate, make sure it's high quality so it will melt well, like
Bakers chocolate bars
or
Ghirardelli brand chocolate chips
.