Roasted garlic is one of those tiny kitchen transformations that feels like sorcery: a raw, sharp bulb becomes sweet, caramelized, and spreadable. It’s the little boost that upgrades toast, sauces, and weeknight dinners without extra fuss. You get depth of flavor from a single pan and a small handful of pantry staples.
I keep a tray of roasted heads in the fridge most weeks. They rescue rushed meals and make even simple bread sing. The method below is straightforward, reliable, and scales: roast four heads at once, or reduce the batch and adjust the dish size so the cloves stay upright.
This post gives you the exact steps I follow, why they work, sensible swaps, and practical tips for storage and use. No tricks—just clear instructions so your garlic comes out tender, caramel-colored, and ready to spread.
Shopping List
Buy good garlic and a neutral extra virgin olive oil you like to eat. For texture and seasoning, pick sea salt or kosher salt and freshly ground black pepper. If you roast often, a small cast-iron skillet or shallow baking dish is worth the investment.
At the store:
- Garlic — look for firm, dry heads without sprouts or soft spots.
- Extra virgin olive oil — a milder bottle for roasting, not the peppery finishing oil.
- Sea salt or kosher salt — for even seasoning.
- Fresh ground black pepper — grind just before roasting for best aroma.
Ingredients
- 4 heads garlic — main ingredient; roasting concentrates sweetness and softens the cloves for spreading.
- 2 tablespoons extra virgin olive oil — divides between coating the dish and drizzling over the cut tops; helps caramelize and prevents drying.
- 1 teaspoon sea salt or kosher salt — seasons the cloves as they roast, bringing out sweet notes.
- ⅓ teaspoon fresh ground black pepper — adds mild bite and aromatic contrast to the roasted garlic.
Roast Garlic (Roasted Garlic) in Steps
- Preheat the oven to 400°F (200°C).
- Pour a small amount of the 2 tablespoons extra virgin olive oil into the bottom of a small baking dish or cast-iron skillet and spread to lightly coat the surface.
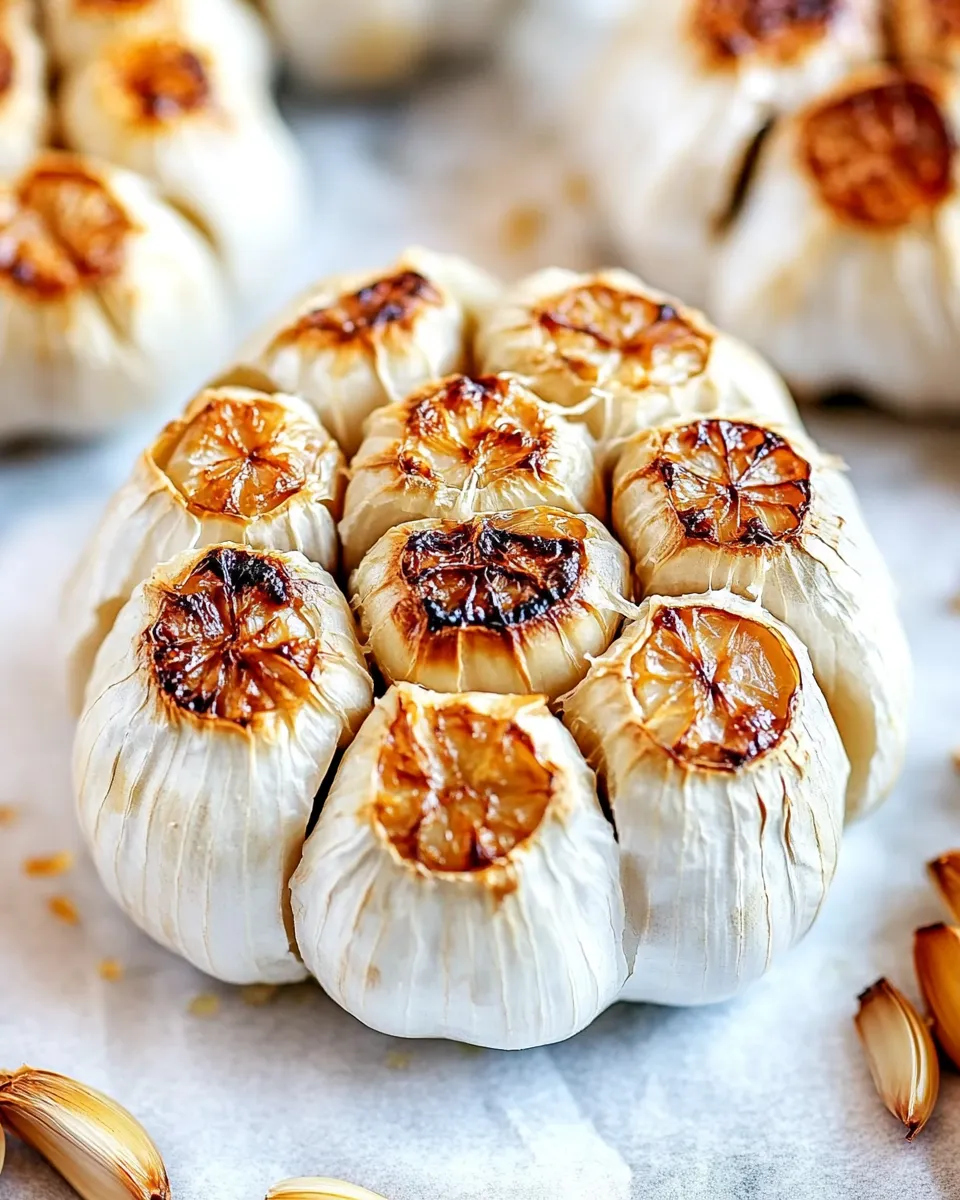
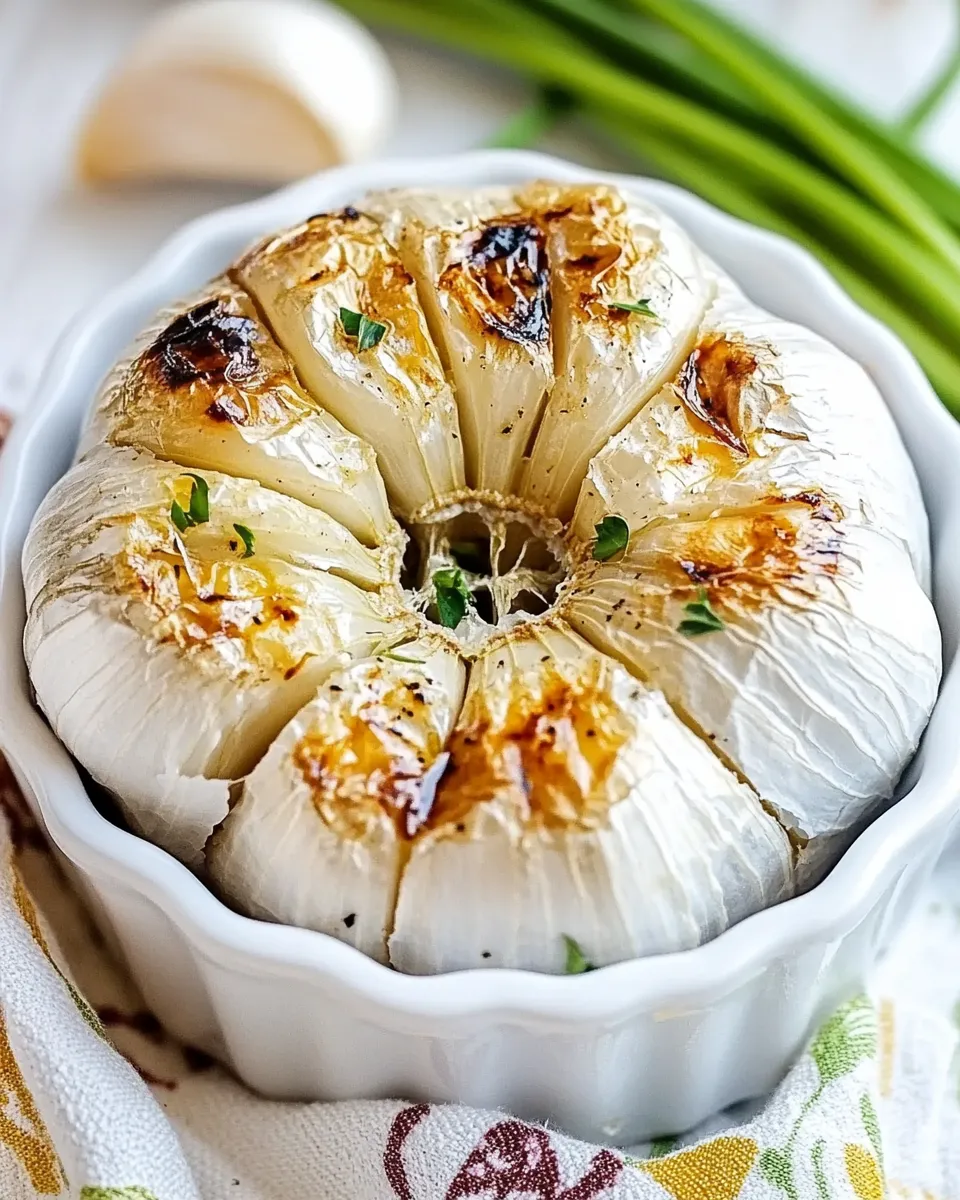
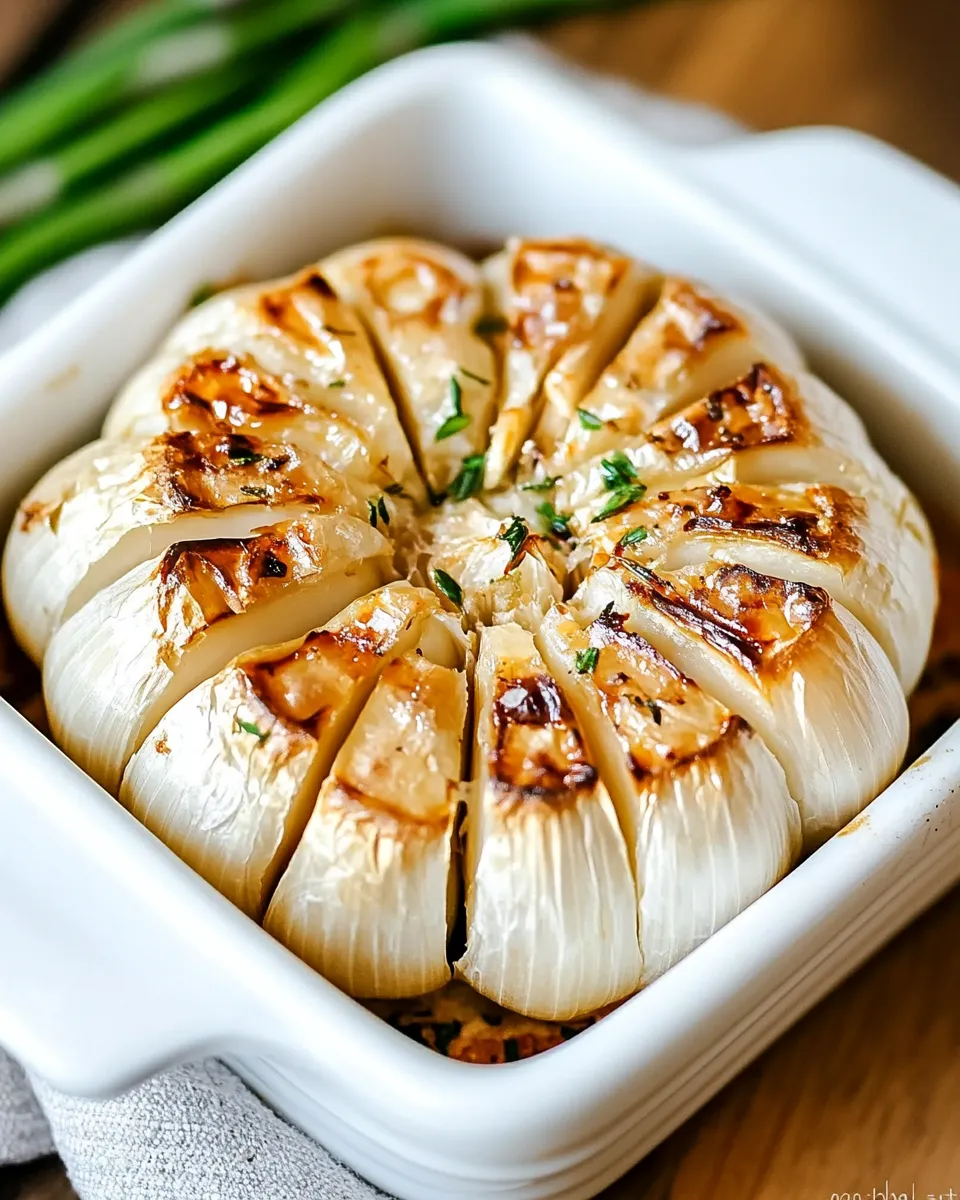
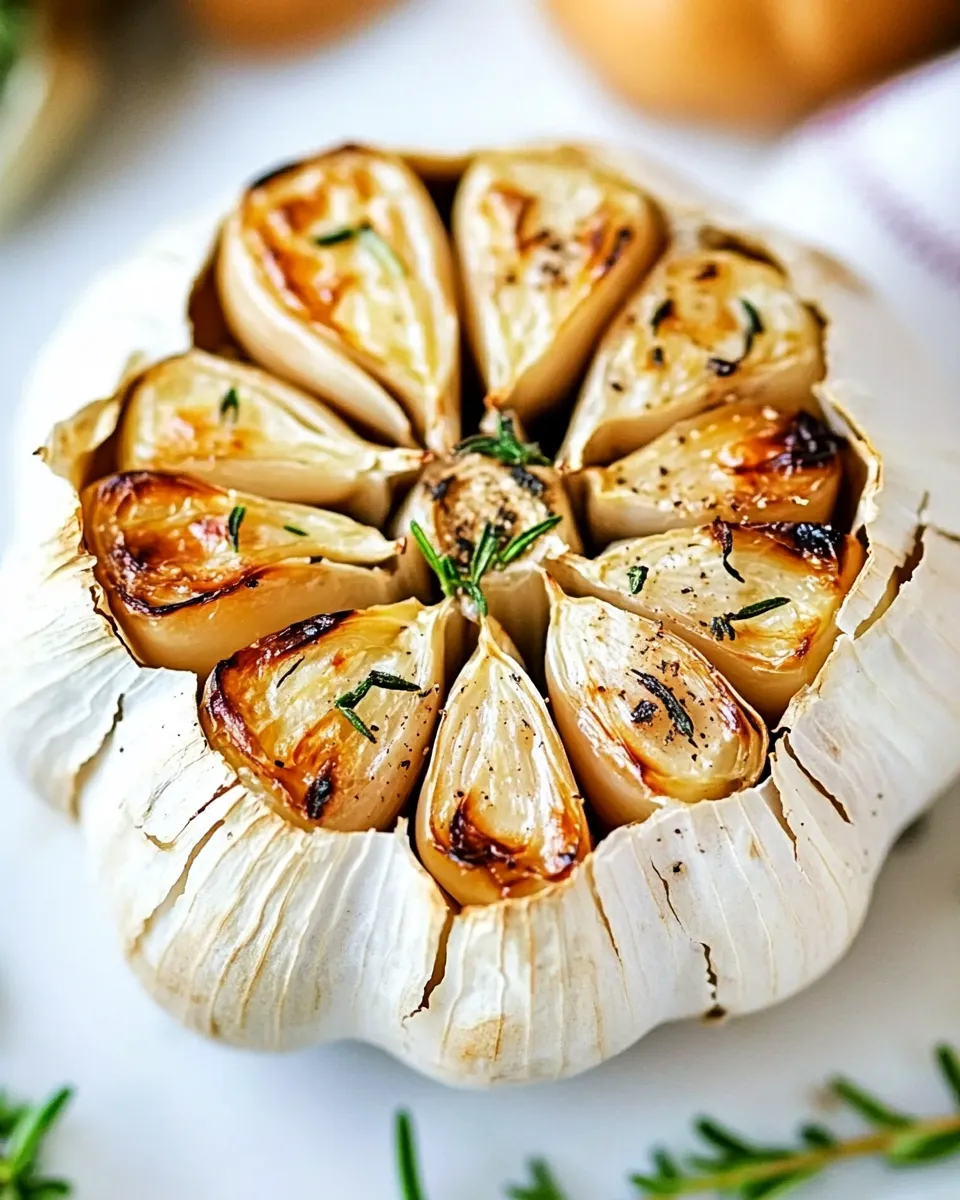
- Remove any loose outer papery skins from each head of garlic. Using a sharp knife, cut off the top quarter or third of each head so the tops of the cloves are exposed.
- Place the 4 heads of garlic in the dish with the root end down and the cut side up. Arrange them snugly so they stay upright during roasting. If you are roasting fewer heads, crumple foil and tuck it between heads or use a smaller dish to keep them upright.
- Drizzle the remaining of the 2 tablespoons extra virgin olive oil over the exposed cut tops of the garlic heads.
- Evenly sprinkle 1 teaspoon sea salt or kosher salt and 1/3 teaspoon fresh ground black pepper over the garlic heads.
- Cover the dish tightly with foil and bake for 40–50 minutes. The garlic is done when the cloves are fork-tender and have a caramel color; if not ready, return to the oven and check again after a few minutes.
- Remove the dish from the oven and let the garlic cool until it is safe to handle.
- To remove the roasted cloves, place a head root-side down on a cutting board and gently push from the root end upward to squeeze the soft, spreadable cloves out.
- Use the roasted garlic immediately or store as desired; it is spreadable and can be added to bread, sauces, soups, or other dishes.
Why You’ll Keep Making It
Roasted garlic gives you concentrated, mellow garlic flavor without the harsh bite of raw cloves. A single head yields enough spreadable garlic to flavor multiple meals. It’s flexible: spread on bread, stirred into mashed potatoes, blended into salad dressings, or whisked into pan sauces. The time investment is small for a big payoff—40–50 minutes mostly passive oven time.
Once you taste that nutty, slightly sweet garlic, you’ll find reasons to add it everywhere. It’s an easy way to make leftovers better, rescue under-seasoned soups, and make a humble vinaigrette feel gourmet. It also stores well, so you can make a batch ahead and use it across the week.
Ingredient Swaps & Substitutions
There’s not much to swap here without changing the result, but small adjustments can tailor the flavor:
- Use milder or more robust olive oil depending on how pronounced you want the oil flavor. A neutral extra virgin olive oil keeps the garlic tasting pure; a peppery oil adds another savory note.
- If you prefer less oil, you can reduce it slightly, but keep enough to coat the dish and drizzle over the exposed cloves so they caramelize instead of drying out.
- Salt type: sea salt and kosher salt behave similarly here. Use whichever you have; the quantity in the recipe is forgiving.
- Black pepper: fresh-ground provides the best aroma. You can omit it for a purer sweet garlic or add a pinch of red pepper flakes after roasting for heat.
What’s in the Gear List
Keep gear minimal and practical. You don’t need anything fancy to roast garlic well.
- Small baking dish or cast-iron skillet — a shallow vessel that fits the heads snugly. Cast iron holds heat evenly; any ovenproof dish will work.
- Aluminum foil — to tightly cover the dish so the garlic steams gently while browning.
- Sharp knife — to remove the top of the heads cleanly and expose the cloves.
- Small spoon or rubber spatula — to scoop out soft cloves after roasting, or a cutting board to press them out as instructed.
What Not to Do
Common beginner mistakes can turn this simple method into a disappointment. Avoid these:
- Don’t roast at too high a temperature. 400°F (200°C) balances caramelization and gentle steaming. Higher heat risks burning the exposed cloves before the centers soften.
- Don’t skip oil. The small amount of olive oil prevents the cut tops from drying and helps the sugars caramelize evenly.
- Don’t leave heads loose in a large pan. If the bulbs tip over, oil and seasoning will run off and they won’t roast uniformly. Use foil or a smaller dish to keep them upright.
- Don’t undercook. Check at 40 minutes, but be prepared to add a few minutes—don’t remove garlic that’s still firm. It should be fork-tender and caramel colored.
Warm & Cool Weather Spins
Roasting garlic is oven-based, so seasons don’t change the technique much, but you can adapt how you use the finished cloves.
- Warm-weather uses: fold roasted garlic into cold olive oil-based dressings, mix into yogurt or labneh for a cooling dip, or toss into chilled pasta salads for depth without heat.
- Cool-weather uses: stir roasted garlic into soups, braises, mashed root vegetables, or melted into butter for a finishing spread on roasted meat or toast.
Pro Perspective
Why this temperature and time
400°F (200°C) gives a good balance between gentle steam under foil and enough heat to caramelize the exposed clove surfaces. The 40–50 minute window is broad because garlic head size and oven variance matter. Look for fork-tender cloves and a deep caramel color.
Small professional tweaks
In a restaurant, I might roast extra heads at once and portion the soft cloves into small airtight containers. Some pros brush each cut top with a little oil and a sprinkle of salt before covering; this ensures consistent seasoning on each head. If you want a smokier note, roast in a cast-iron skillet and finish briefly un-covered to deepen color, watching carefully so it doesn’t burn.
Store, Freeze & Reheat
Roasted garlic stores well:
- Refrigerator: Place roasted cloves or whole heads in an airtight container for up to 1 week. If stored in oil, keep the container refrigerated and use within a few days to be safe.
- Freezer: Squeeze cloves into an ice cube tray, cover with a thin film of oil or water, and freeze. Once solid, transfer cubes to a sealed bag and use within 3 months. Thaw in the fridge or fold a frozen cube into a hot pan or sauce to break down quickly.
- Reheating: Roasted garlic is typically used cold or at room temperature. If you want it warm, mash a few cloves into a saucepan with a little butter or oil and heat gently—don’t overcook or it will toughen.
Ask & Learn
Questions I hear a lot: “Can I roast individual cloves?” Yes, but they brown faster and can dry out; keep a close eye. “What about bigger bulbs?” Larger heads may need an extra 5–10 minutes. “Can I roast in an air fryer?” You can, using a small pan at about 375°F and checking earlier—air fryers vary a lot.
Tip: if a head has green shoots (sprouts), it will roast fine but the flavor may be slightly grassy. For the sweetest result, start with firm, white, un-sprouted heads.
Bring It to the Table
Once you’ve squeezed the soft cloves out, use them like a flavor concentrate. Mash a clove on warm bread and drizzle a little olive oil over it. Stir several cloves into butter for garlic bread that’s deep and caramelized without the raw bite. Whisk roasted garlic into soups or pan sauces at the end of cooking so the sweetness carries through without losing its delicate texture.
Keep small containers or frozen cubes on hand. A few roasted cloves can turn plain potatoes into something special or transform a rushed dinner into a thoughtful plate. The method is simple; the results are reliably delicious.
How To Roast Garlic (Roasted Garlic)
Equipment
- Oven
- small baking dish or cast-iron skillet
- Aluminum Foil
- Sharp Knife
- Cutting Board
- Fork
Ingredients
Ingredients
- 4 headsgarlic
- 2 tablespoonsextra virgin olive oil
- 1 teaspoonsea saltor kosher salt
- 1/3 teaspoonfresh ground black pepper
Instructions
Instructions
- Preheat the oven to 400°F (200°C).
- Pour a small amount of the 2 tablespoons extra virgin olive oil into the bottom of a small baking dish or cast-iron skillet and spread to lightly coat the surface.
- Remove any loose outer papery skins from each head of garlic. Using a sharp knife, cut off the top quarter or third of each head so the tops of the cloves are exposed.
- Place the 4 heads of garlic in the dish with the root end down and the cut side up. Arrange them snugly so they stay upright during roasting. If you are roasting fewer heads, crumple foil and tuck it between heads or use a smaller dish to keep them upright.
- Drizzle the remaining of the 2 tablespoons extra virgin olive oil over the exposed cut tops of the garlic heads.
- Evenly sprinkle 1 teaspoon sea salt or kosher salt and 1/3 teaspoon fresh ground black pepper over the garlic heads.
- Cover the dish tightly with foil and bake for 40–50 minutes. The garlic is done when the cloves are fork-tender and have a caramel color; if not ready, return to the oven and check again after a few minutes.
- Remove the dish from the oven and let the garlic cool until it is safe to handle.
- To remove the roasted cloves, place a head root-side down on a cutting board and gently push from the root end upward to squeeze the soft, spreadable cloves out.
- Use the roasted garlic immediately or store as desired; it is spreadable and can be added to bread, sauces, soups, or other dishes.