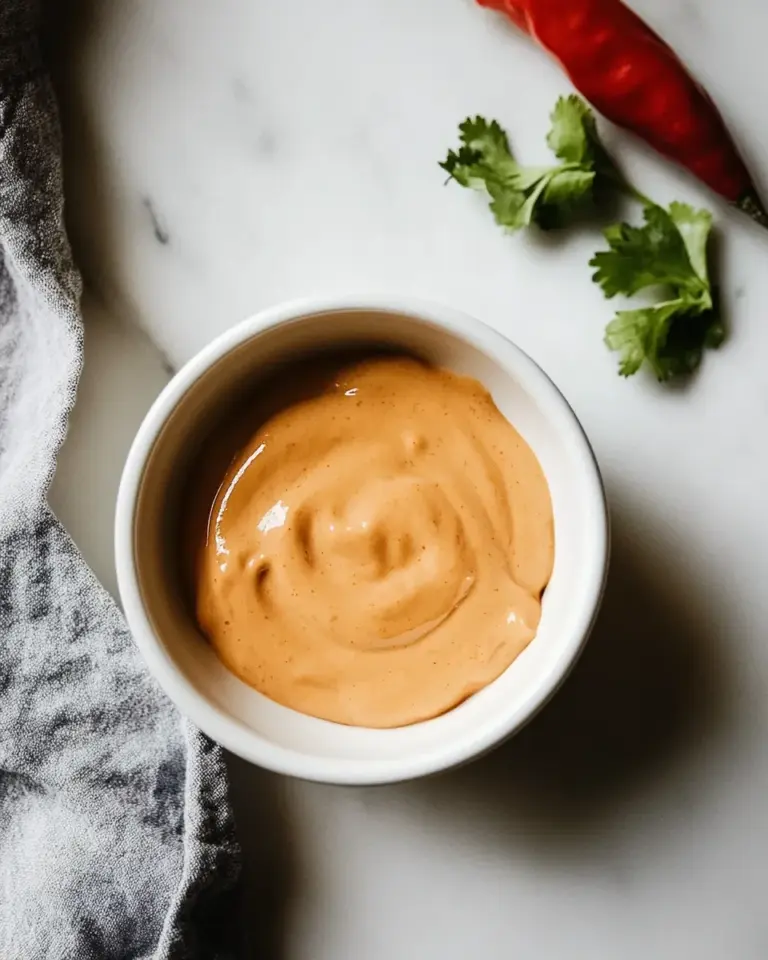
Everyone needs a reliable nacho cheese dip in their repertoire. This one is simple, melts beautifully, and clings to chips with the kind of silky pull that makes you reach for one more. I make it when friends drop by, when the game is on, or when a quiet Saturday needs comforting. It’s straightforward, fast, and—most importantly—delicious.
There’s a little technique in here that makes a big difference: coating the cheese with cornstarch and adding it in small handfuls to warm evaporated milk. The cornstarch keeps the cheese from turning grainy, and the evaporated milk gives body without the wateriness regular milk can introduce. A splash of hot sauce and some minced canned jalapeños finish the dip with a gentle heat and brightness.
If you want a go-to recipe that reliably delivers glossy, smooth cheese sauce with minimal fuss, this is it. Read through the gear and troubleshooting notes before you start, and you’ll be dipping with confidence in under 15 minutes.
What’s in the Bowl

Ingredients
- 8 oz shredded Cheddar Cheese — the base of the dip; shredded melts more evenly than block slices.
- 1 tbsp cornstarch — tossed with the cheese to prevent separation and graininess.
- 12 oz evaporated milk — gives a rich, slightly concentrated creaminess without thinning the sauce.
- 1 tbsp hot sauce — adds balanced heat and a little tang; adjust to taste if you prefer milder or spicier.
- 1 tbsp canned jalapenos minced — brings texture and a pickled note; use more or less depending on how much heat you like.
- tortilla chips for dipping — for serving; pick sturdy chips that can handle a thick dip.
Method: Nacho Cheese Dip
- In a medium bowl, toss 8 oz shredded Cheddar cheese with 1 tbsp cornstarch until the cheese is evenly coated.
- Pour 12 oz evaporated milk into a medium nonstick skillet and warm over medium-low heat until the milk is hot and steaming at the edges (do not boil), about 2–3 minutes.
- Reduce heat to low. Add the coated cheese to the skillet in small handfuls, whisking or stirring after each addition until the cheese is melted and smooth before adding more.
- Continue cooking on low to medium-low, whisking frequently, until the mixture is fully smooth and slightly thickened, about 6–8 minutes total from when you begin adding the cheese.
- Stir in 1 tbsp hot sauce and 1 tbsp canned minced jalapenos until evenly combined, heating just until warmed through, about 30–60 seconds.
- Remove from heat and serve immediately with tortilla chips.
Why It’s My Go-To

This dip hits a lot of boxes: it’s fast, requires only a few pantry staples, and performs reliably. The cornstarch trick is the real MVP here. It keeps the cheese from separating and creates that glossy, clingy texture you want for nachos. Evaporated milk brings richness without needing cream or a béchamel base. Together they make a sauce that feels decadent but comes together with minimal effort.
I also love how forgiving the method is. You don’t have to stir at a frantic pace, and the low-and-slow melting prevents overheating the cheese. A quick finish with hot sauce and jalapeños gives the dip personality without taking it overboard. Serve immediately, and it’s the perfect social food—portable, shareable, and irresistible.
International Equivalents

Cheese dips exist in many cultures, even if they’re not labeled “nacho cheese.” In Mexico, a warm cheese fondue-like sauce called queso fundido relies on melting cheese with chiles and sometimes a touch of milk or cream. In parts of Europe, melted cheese dips resemble fondue and are often paired with bread instead of chips. In the U.S., this Nacho Cheese Dip sits between a smooth queso and a cafeteria-style cheese sauce—richer than processed powdered mixes, but much simpler than a full béchamel-based cheese sauce.
Think of this as the approachable American-style cheese dip that nods to queso fundido without the oven finish. It adapts easily to regional tastes: add smoky elements, fresh chiles, or herbs to make it feel local without changing the core technique.
What’s in the Gear List
- Medium mixing bowl — for tossing the cheese and cornstarch evenly.
- Measuring spoons and a kitchen scale (optional) — the amounts matter for texture, so measure as written.
- Medium nonstick skillet — nonstick helps prevent scorching while you melt the cheese.
- Whisk or heatproof spatula — a whisk speeds smoothing; a spatula works if you scrape the pan well.
- Serving bowl or small skillet for the table — keep it warm if you want to serve straight from the pan.
- Tongs or sturdy chips — for dipping and presentation.
Errors to Dodge
- Heating too fast. Boiling the milk or melting cheese over high heat leads to separation or grainy texture. Keep heat low and patient.
- Skipping the cornstarch. Without it the emulsion can break and the sauce can become oily or grainy as it cools.
- Dumping all the cheese at once. Add the cheese in small handfuls and wait for it to melt before adding more. This prevents clumps and uneven melting.
- Using pre-shredded cheese with too many anti-caking agents. Pre-shredded cheese often contains cellulose to stop clumping; it can affect melt quality. Freshly shredded from a block is best when possible.
- Letting it sit too long before serving. The dip is best right away. If it sits, it will thicken and may need careful reheating (see storing & rewarming).
Seasonal Spins
This dip is a great canvas for seasonal flavors. In summer, add a spoonful of roasted fresh chiles or a few diced tomatoes for brightness. In autumn, fold in a touch of smoked paprika or a small amount of roasted poblano for depth. Winter calls for heartier add-ins—think a splash of stout or a finely chopped cured meat stirred in at the end (use sparingly so the cheese remains the star).
Keep in mind: if you add juicy vegetables, drain them well first so you don’t water down the sauce. Small, concentrated flavor boosters—roasted, pickled, or smoked—work best.
If You’re Curious
Why cornstarch? It acts as a stabilizer. Coating the shredded cheese with a little cornstarch prevents the proteins from clumping and separates the fat, delivering a smoother sauce. It’s a gentle, reliable emulsifier for simple cheese sauces made without a roux.
Why evaporated milk and not regular milk? Evaporated milk has less water and a slightly caramelized flavor from the canning process. That concentration gives the dip body without needing heavy cream, and it helps the final sauce hold together without thinning out.
Can you swap the cheese? Cheddar is classic here for flavor and melt. Stronger or softer cheeses will affect texture. If you try a different cheese, be mindful of moisture and fat content. Some cheeses don’t melt as smoothly without a stabilizer or additional dairy.
Cooling, Storing & Rewarming
Cooling & Storing
Let the dip cool slightly at room temperature—no more than 1 hour total—then transfer to an airtight container and refrigerate. Stored this way, the dip will keep for 3–4 days. Avoid leaving it out for long periods; dairy-based dips belong in the fridge once they fall below safe hot-holding temperatures.
Rewarming
Reheat gently to bring the dip back to dippable consistency. Warm it over low heat in a skillet, stirring constantly, or microwave in short bursts at 20–30 second intervals, stirring between each burst. If the dip has thickened, stir in a tablespoon of evaporated milk (or a splash of milk) at a time until you reach the desired texture. Heat slowly; high heat will make the cheese seize up and become grainy.
Ask & Learn
Questions make recipes better. If you want a sharper sauce, ask about cheeses that melt well. If you’re curious about making it spicier, ask how to balance heat without overwhelming the cheese. Tell me if you tried using different chiles or a smoked element—I always troubleshoot temperature and texture tips based on reader experiments.
Leave a note on timing and crowd size. I can suggest how to scale or keep the dip warm for a party. The key variables are keeping the heat low and resisting the urge to rush the melting.
Hungry for More?
If you like this straightforward dip, you’ll enjoy other quick party sauces: think creamy salsas, bean dips, or a simple warm spinach-and-cheese spread. Each one leans on the same principle—control the heat, use the right binder, and finish with an acid or pickle for brightness. Try serving this Nacho Cheese Dip with a variety of dippers: thick-cut chips, toasted pita, or even crisp vegetables for a slightly lighter option.
Enjoy the ritual of sharing—this dip was made for passing plates, for lingering conversations, and for small, happy moments when a good chip meets its match. If you try it, tell me how you served it and what tweaks you made. I love hearing what readers discover at their own stove.

Nacho Cheese Dip
Equipment
- Cast iron pan
- Whisk
Ingredients
Ingredients
- 8 oz.shredded Cheddar Cheese
- 1 tbspcornstarch
- 12 oz.evaporated milk
- 1 tbsphot sauce
- 1 tbspcanned jalapenosminced
- tortilla chips for dipping
Instructions
Instructions
- In a medium bowl, toss 8 oz shredded Cheddar cheese with 1 tbsp cornstarch until the cheese is evenly coated.
- Pour 12 oz evaporated milk into a medium nonstick skillet and warm over medium-low heat until the milk is hot and steaming at the edges (do not boil), about 2–3 minutes.
- Reduce heat to low. Add the coated cheese to the skillet in small handfuls, whisking or stirring after each addition until the cheese is melted and smooth before adding more.
- Continue cooking on low to medium-low, whisking frequently, until the mixture is fully smooth and slightly thickened, about 6–8 minutes total from when you begin adding the cheese.
- Stir in 1 tbsp hot sauce and 1 tbsp canned minced jalapenos until evenly combined, heating just until warmed through, about 30–60 seconds.
- Remove from heat and serve immediately with tortilla chips.
Notes
Cheese needs to be cooked slow and low, constantly whisking, to prevent curdling or seizing. Be patient!