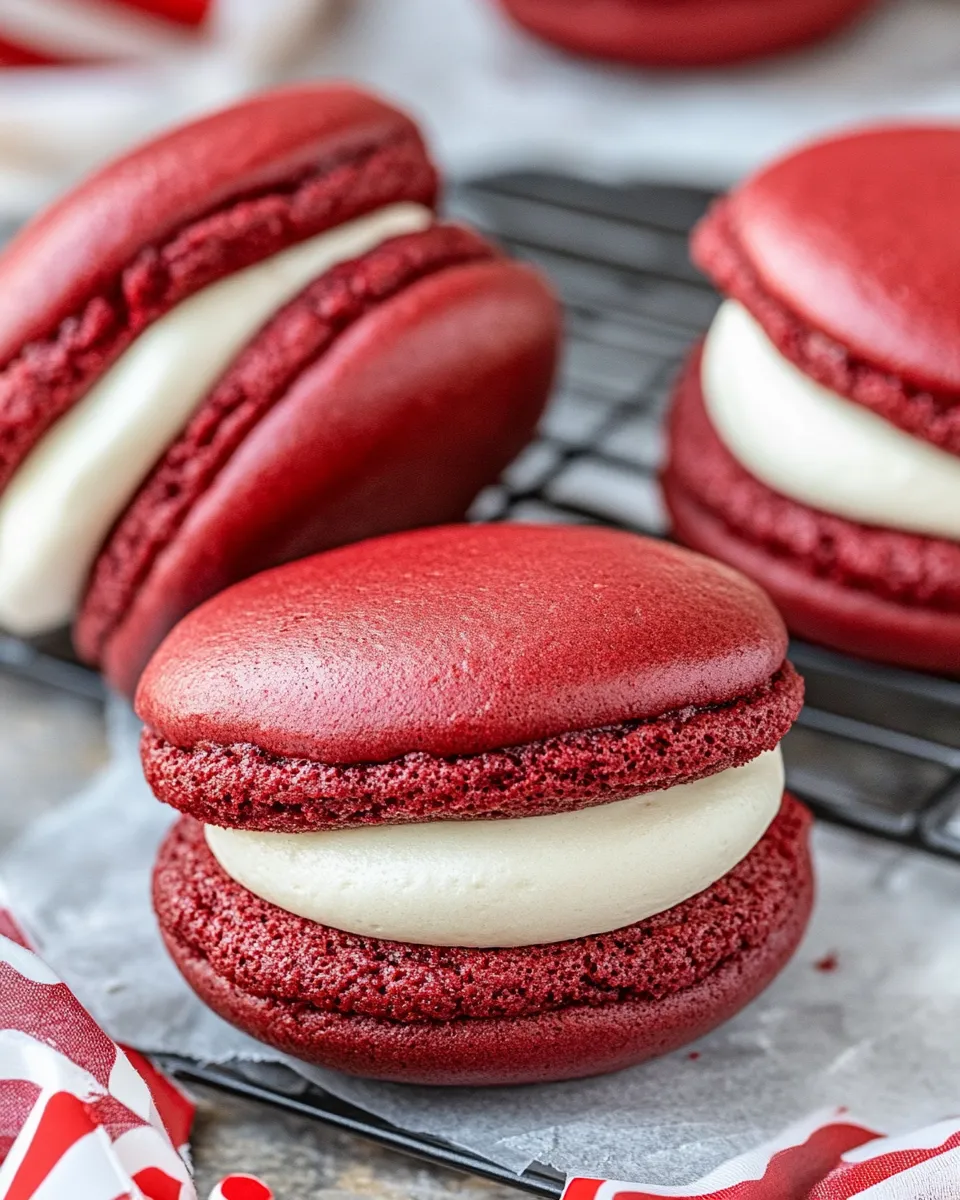
If you’re looking for the perfect treat that’s both visually stunning and delicious, look no further than these Red Velvet Whoopie Pies! Imagine two soft and fluffy red velvet cookies sandwiched around a creamy filling that just melts in your mouth.
They’re an irresistible combination of flavor and texture, making them a perfect dessert for any occasion—birthdays, celebrations, or simply a sweet treat for yourself.
Let’s dive into this amazingly simple recipe that guarantees satisfaction in every bite!
Why This Recipe Is a Must-Try

Red Velvet Whoopie Pies are not just a feast for the eyes; they are also soft, tender, and bursting with flavor.
The distinctive flavor of cocoa and the beautiful crimson color of the red velvet make these treats stand out.
Plus, who can resist the creamy filling that holds everything together? They are nostalgic and comforting, bringing back memories of childhood treats, while still being trendy enough for modern-day dessert tables.
Trust me—you’ll want to add this delightful recipe to your baking repertoire!
Ingredients
- 2 ½ cups (300 g) all-purpose flour
- 2 tablespoons (10 g) cocoa powder
- 1 teaspoon baking soda
- 1 teaspoon baking powder
- ½ teaspoon salt
- ½ cup (113 g) unsalted butter, softened to room temperature
- 1 cup (200 g) granulated sugar
- 1 large egg, at room temperature
- 2 teaspoons red food coloring
- 1 teaspoon pure vanilla extract
- ½ teaspoon white vinegar
- 1 cup (240 ml) buttermilk, at room temperature
This list of ingredients is straightforward, and most of them can be found in your kitchen.
The key to success for these whoopie pies lies in the balance of dry and wet ingredients, ensuring a perfect texture and flavor.
How To Make Red Velvet Whoopie Pies
Step 1: Preheat the Oven
Start by preheating your oven to 350°F (180°C).
Line a couple of baking sheets with parchment paper.
This will ensure your whoopie pies bake evenly and don’t stick, allowing for easy removal once they’re done.
Step 2: Combine the Dry Ingredients
In a medium bowl, whisk together the all-purpose flour, cocoa powder, baking soda, baking powder, and salt.
This step is important because it ensures that all the leavening agents are evenly distributed throughout the flour.
Step 3: Cream the Butter and Sugar
In a large mixing bowl, use an electric mixer to cream the softened butter and granulated sugar together until the mixture is light and fluffy.
This usually takes about 2-3 minutes.
Step 4: Add the Egg, Red Food Coloring, and Flavorings
Once the butter and sugar are fluffy, add in the large egg, red food coloring, vanilla extract, and white vinegar.
Mix until everything is well combined.
The batter will start to turn into that beautiful red hue!
Step 5: Mix in the Buttermilk
Next, add half of the buttermilk to the red velvet mixture and stir gently.
Then, gradually add the flour mixture until just combined.
Be careful not to overmix! Then, add the remaining buttermilk, mixing until you have a smooth batter.
Step 6: Scoop the Batter
Using a cookie scoop or two spoons, drop mounds of batter onto your prepared baking sheets.
Make sure to leave enough space between each mound for the cookies to spread while baking.
About 2 inches apart should do!
Step 7: Bake!
Place your baking sheets in the preheated oven and bake for 10-12 minutes, or until the cookies spring back when lightly touched.
They may look a bit underdone, but they will set up as they cool.
Step 8: Cool the Cookies
Once they are done baking, remove them from the oven and let them rest on the baking sheet for a few minutes before transferring them to a wire rack to cool completely.
Step 9: Prepare the Filling
While your cookies are cooling, you can make the filling! A classic filling could be a cream cheese frosting, but for a lighter touch, you can mix whipped cream with a bit of powdered sugar and vanilla.
Step 10: Assemble the Whoopie Pies
Once your cookies are fully cooled, take one cookie and spoon a generous amount of filling on the flat side.
Top it with another cookie, flat side down.
Press gently to spread the filling to the edges.
Voila! Your Red Velvet Whoopie Pie is ready!
Expert Tips
- Ensure all your ingredients are at room temperature for the best mixing results.
- Don’t skip the vinegar! It reacts with the baking soda to give your whoopie pies that perfect lift.
- For a fun twist, consider adding a sprinkle of chocolate chips into the batter for added texture.
- Use gel food coloring for a more vibrant color that doesn’t add too much liquid to the batter.
Variations and Customizations

- Try using different flavored fillings like peanut butter or marshmallow fluff for a unique spin!
- For a less sweet option, a simple whipped cream filling can lighten things up.
- Experiment by adding a hint of espresso powder to the batter for a rich mocha flavor.
- Add chopped nuts or coconut flakes to the batter for a delightful crunch.
How to Store Leftovers
If you happen to have any leftover whoopie pies (which is unlikely!), store them in an airtight container at room temperature for up to 3 days.
You can also refrigerate them for a longer shelf life, but be aware that this will change their texture slightly.
If you want to enjoy them later, consider freezing them.
Wrap each whoopie pie individually in plastic wrap and then place them in a freezer bag.
They can last for up to 3 months in the freezer.
Just thaw at room temperature before indulging!
FAQ
Can I make these whoopie pies without buttermilk?
Yes! You can substitute buttermilk with a mixture of milk and vinegar.
Just use 1 cup of milk and add 1 tablespoon of vinegar to it.
Let it sit for 5-10 minutes to curdle before using.
How can I make these whoopie pies gluten-free?
To make a gluten-free version, substitute the all-purpose flour with a gluten-free flour blend.
Ensure it has xanthan gum for the best results!
Can I use a different type of food coloring?
Definitely! While red is traditional for red velvet, you can use any food coloring you like.
Just keep in mind that the color will affect the final appearance.
Why are my whoopie pies flat?
Flat whoopie pies usually result from overmixing the batter, which can deflate the air bubbles created during creaming.
Another reason could be not using enough leavening agent, so double-check your baking soda and powder measurements.
Conclusion
These Red Velvet Whoopie Pies are more than just dessert; they are an experience to savor.
The rich red color, soft texture, and delightful creamy filling all come together brilliantly in this treat.
Whether you’re sharing them at a gathering or enjoying them alone with a cup of coffee, these whoopie pies will certainly become a favorite.
So, why wait? Gather your ingredients and start baking—your taste buds will thank you!

Red Velvet Whoopie Pies
Equipment
- Mixing Bowl
- Electric Mixer
- Baking Sheets
- Parchment Paper
- Cookie Scoop
- Wire Rack
Ingredients
Dry Ingredients
- 2.5 cups All-purpose flour
- 2 tablespoons Cocoa powder
- 1 teaspoon Baking soda
- 1 teaspoon Baking powder
- 0.5 teaspoon Salt
Wet Ingredients
- 0.5 cup Unsalted butter, softened
- 1 cup Granulated sugar
- 1 large Egg at room temperature
- 2 teaspoons Red food coloring
- 1 teaspoon Pure vanilla extract
- 0.5 teaspoon White vinegar
- 1 cup Buttermilk at room temperature
Instructions
- Step 1: Preheat your oven to 350°F (180°C) and line baking sheets with parchment paper.
- Step 2: In a medium bowl, whisk together the flour, cocoa powder, baking soda, baking powder, and salt.
- Step 3: In a large mixing bowl, cream the softened butter and sugar until light and fluffy (about 2-3 minutes).
- Step 4: Add the egg, red food coloring, vanilla extract, and vinegar to the butter mixture and mix until combined.
- Step 5: Mix in half of the buttermilk, then gradually add the flour mixture until just combined. Add the remaining buttermilk and mix until smooth.
- Step 6: Using a cookie scoop, drop mounds of batter onto the prepared baking sheets, leaving space between each.
- Step 7: Bake for 10-12 minutes, or until the cookies spring back when lightly touched.
- Step 8: Let the cookies cool on the baking sheet for a few minutes before transferring to a wire rack to cool completely.
- Step 9: Prepare the filling (cream cheese frosting or whipped cream with powdered sugar and vanilla).
- Step 10: Assemble the whoopie pies by spooning filling onto one cookie and topping with another cookie.