If you’re looking for a fun and festive treat to make with your kids or to impress at your next gathering, these Spider and Owl Krispie Treats are sure to be a hit! With their playful design and deliciously crunchy texture, these treats combine the classic flavors of Cocoa Pebbles and marshmallows to create a delightful snack that’s perfect for Halloween or any occasion that calls for a touch of whimsy. Easy to make and even more fun to decorate, these treats are not only a feast for the eyes but also a treat for the taste buds. Let’s dive into the world of spooky snacks!
What Makes This Recipe Special
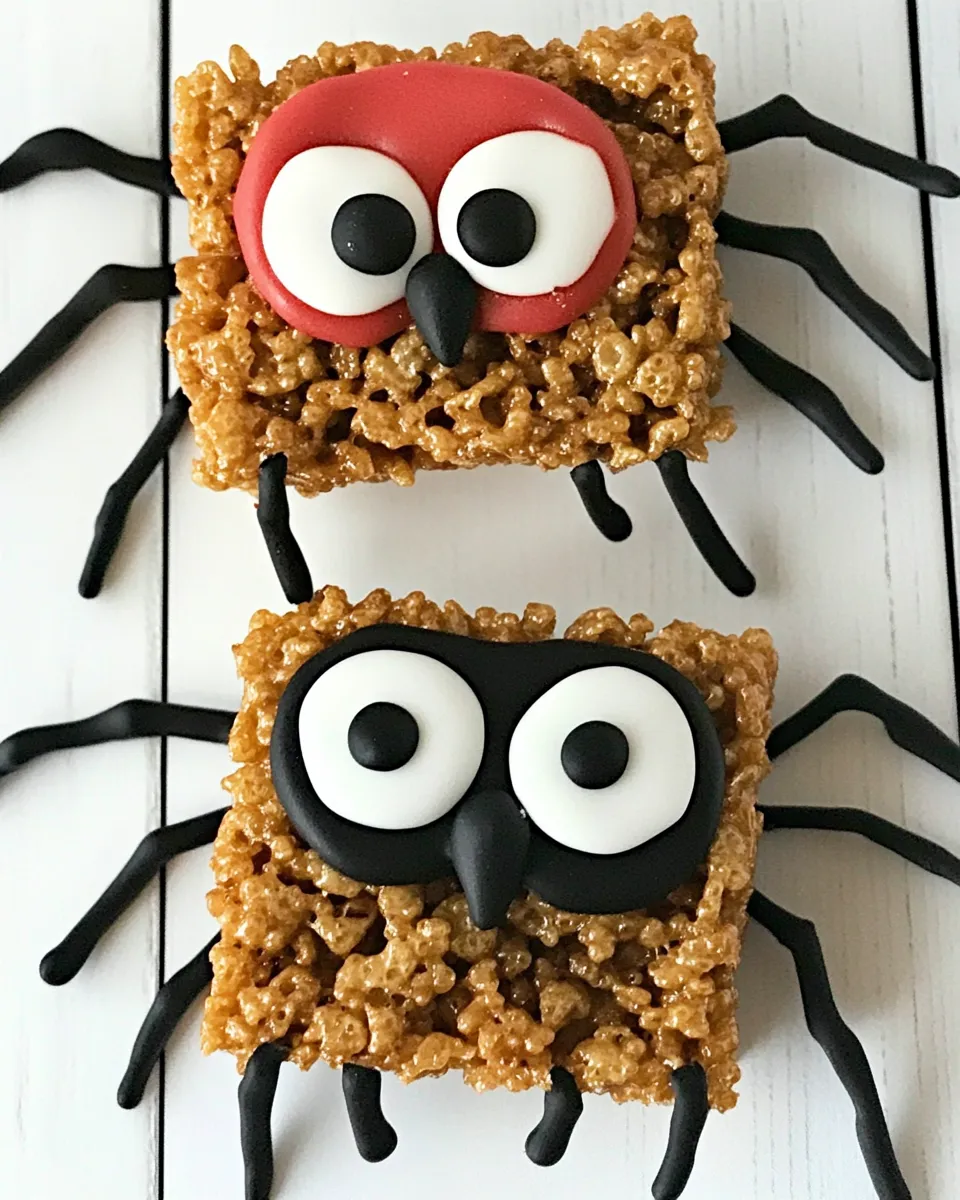
What sets these Spider and Owl Krispie Treats apart from the traditional rice crispy treat is the use of Cocoa Pebbles, which adds a rich chocolate flavor and a fun color that’s perfect for Halloween themes. The addition of pretzel sticks for the spider legs and the creative use of orange taffy or Tootsie Rolls to form the owl’s eyes gives these treats a unique charm. Plus, they’re easily customizable! You can let your imagination run wild while decorating, making each treat a personal masterpiece.
Gather These Ingredients
- 6 cups Cocoa Pebbles – This chocolatey cereal will form the base of your treats.
- 1 (10.5 oz) bag of mini marshmallows – The gooey goodness that binds everything together.
- 1/4 cup butter – For that rich, buttery flavor.
- Garnishes:
- Pretzel sticks – Perfect for creating spider legs.
- Mini marshmallows – Use these for added decoration.
- Orange taffy or Tootsie Rolls – Great for making owl eyes or other cute features.
Prep & Cook Tools
- Large mixing bowl – For combining your ingredients.
- Large saucepan – To melt the butter and marshmallows together.
- Spatula – For mixing and transferring your treat mixture.
- 9×13 inch baking pan – To shape and set your Krispie treats.
- Wax paper or parchment paper – To press down the mixture evenly into the pan.
Build Spider and Owl Krispie Treats Step by Step
Step 1: Melt the Butter and Marshmallows
In a large saucepan over low heat, melt the butter. Once melted, add the mini marshmallows and stir continuously until they are completely melted and well combined with the butter. This mixture should be smooth and gooey.
Step 2: Add Cocoa Pebbles
Remove the saucepan from heat and immediately add the 6 cups of Cocoa Pebbles to the melted marshmallow mixture. Stir gently but quickly to coat the cereal evenly with the marshmallow mixture. It’s important to work fast to prevent the mixture from setting too soon.
Step 3: Transfer to the Baking Pan
Once the Cocoa Pebbles are well-coated, transfer the mixture to a greased 9×13 inch baking pan. Use a spatula or wax paper to press the mixture firmly and evenly into the pan. Be careful not to compress it too much; you want them to remain fluffy.
Step 4: Let It Set
Allow the Krispie treats to cool at room temperature for about 30 minutes or until they are firm enough to cut.
Step 5: Cut into Shapes
Once set, remove the treats from the pan and place them on a cutting board. Using a sharp knife, cut them into squares or rectangles for your basic treats, or get creative and cut them into owl or spider shapes.
Step 6: Decorate Your Treats
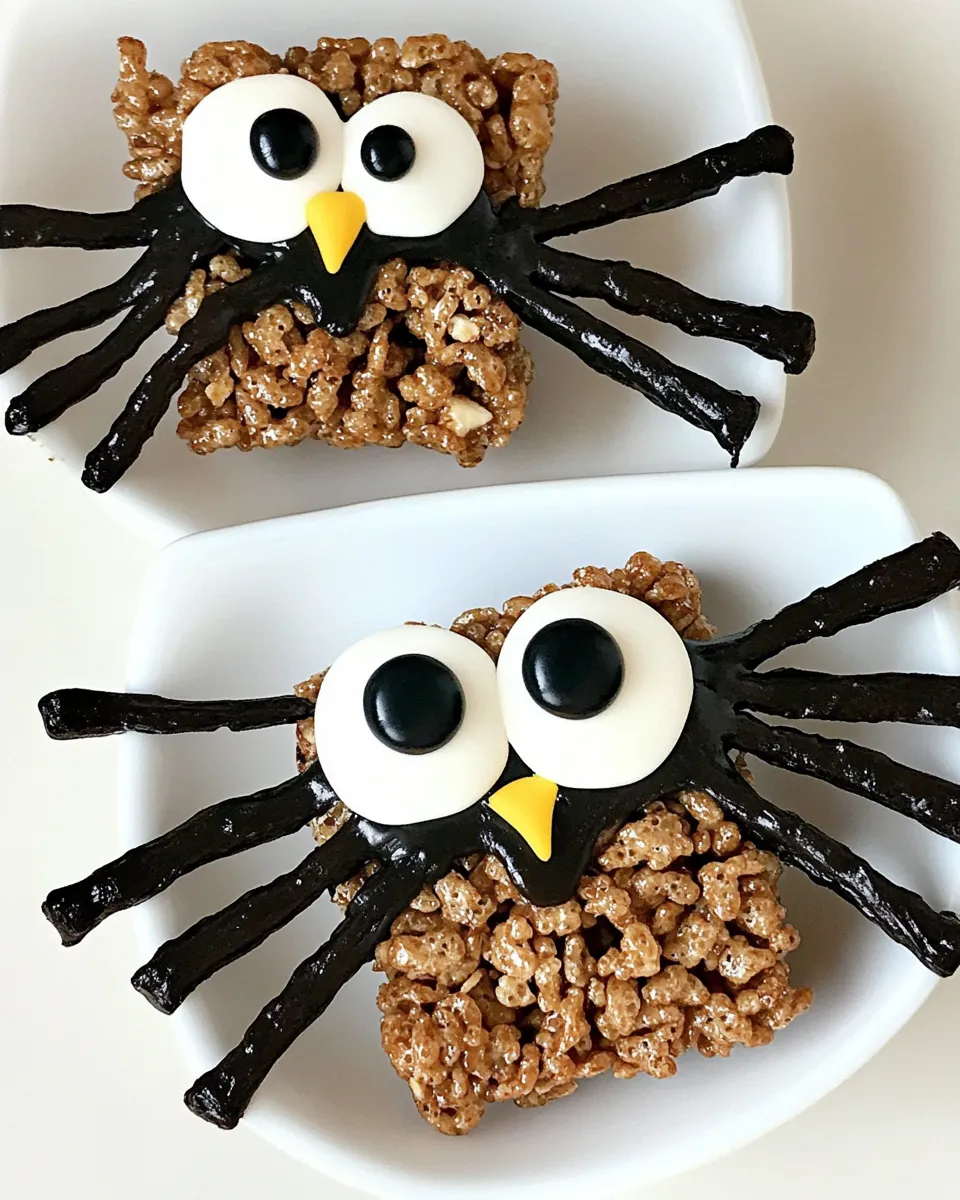
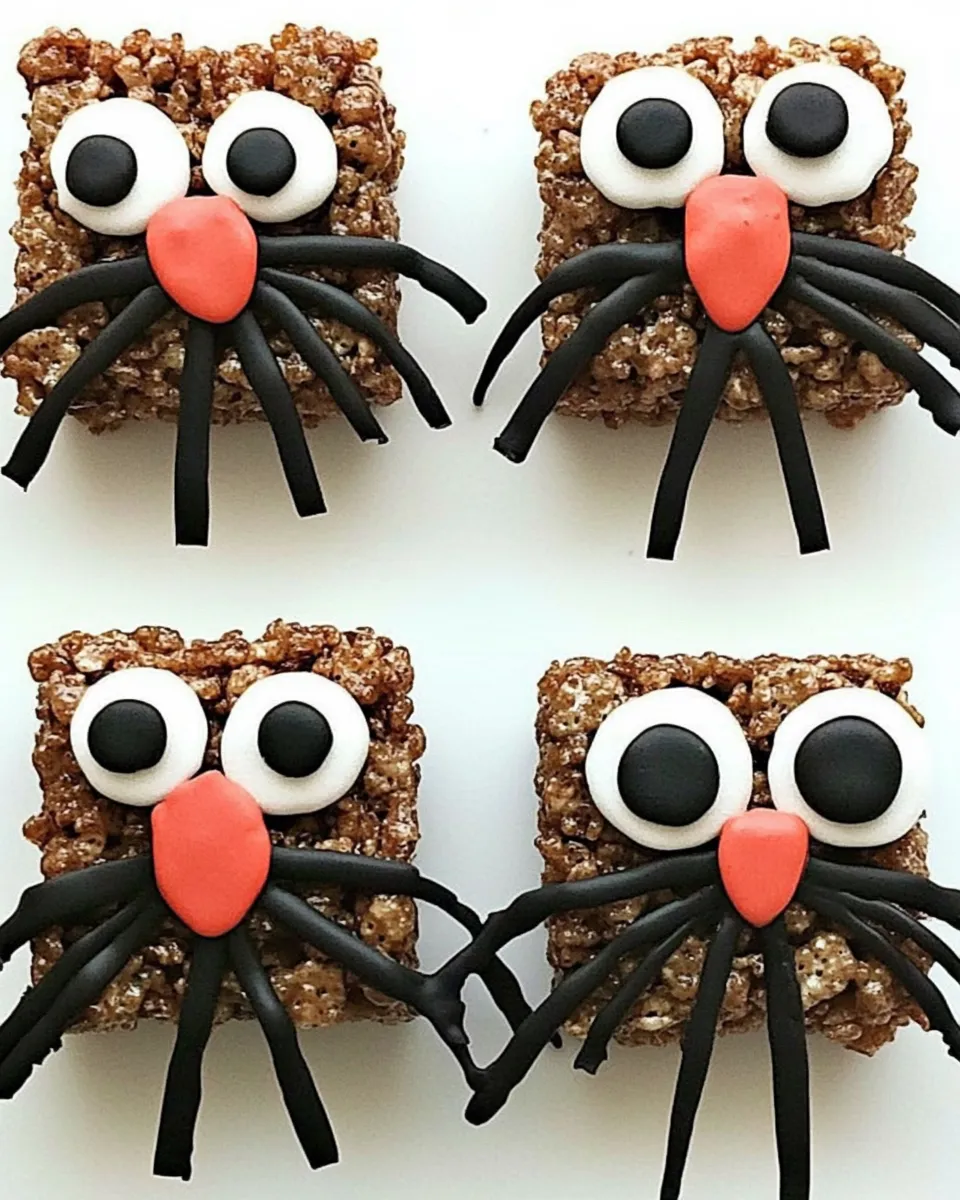
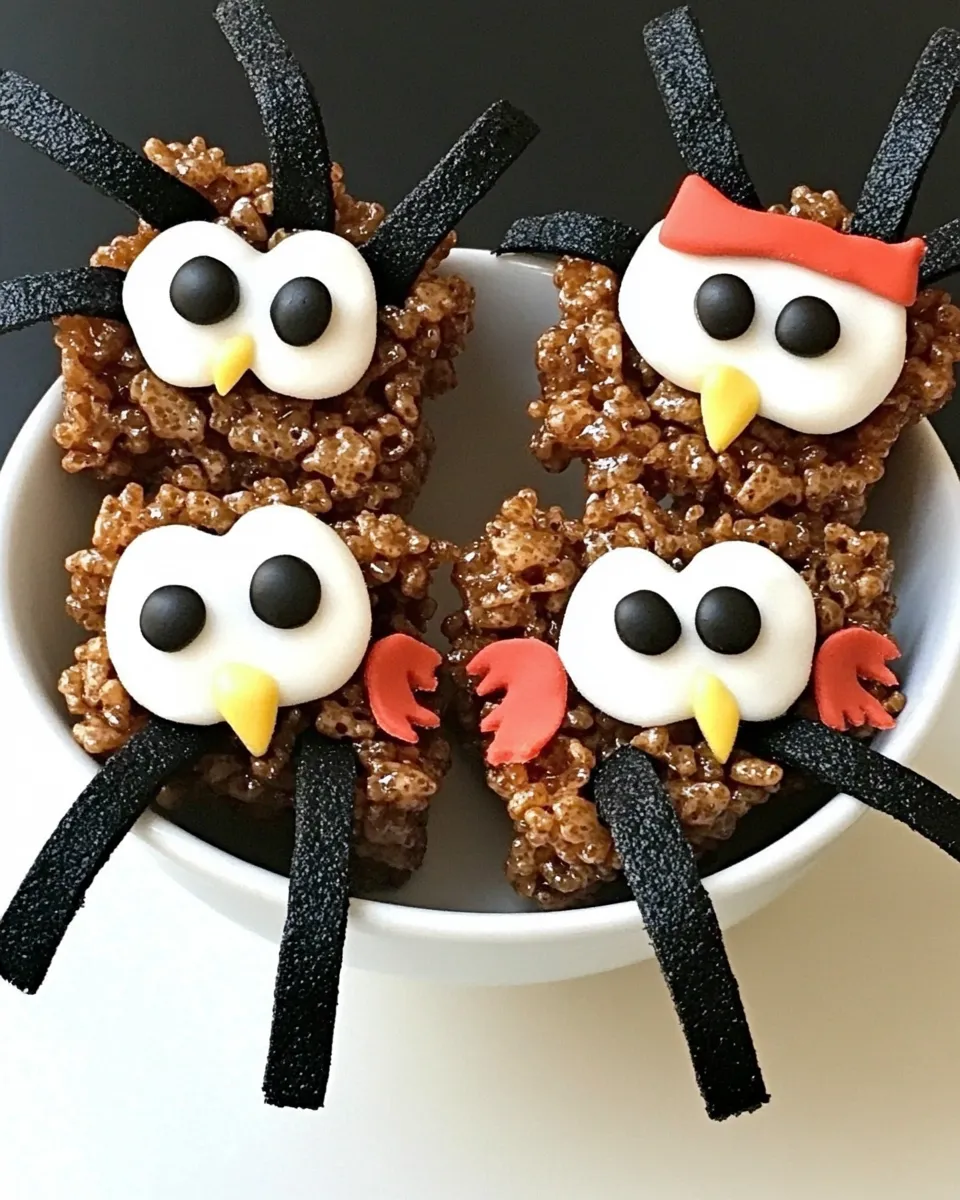
To create the spiders, take a piece of the treat and press down four pretzel sticks on each side for legs. For the head, place a mini marshmallow on top and use a bit of melted chocolate or icing to attach two mini marshmallows as eyes.
To make the owls, use the orange taffy or Tootsie Rolls to form large eyes on top of the treat. You can also use smaller pieces of candy to create beaks or wings. Let your creativity flow!
Seasonal Adaptations
- For Thanksgiving, use brown chocolate melts and candy corn for decorations.
- For Christmas, use red and green candies to create festive designs.
- For Easter, replace the Cocoa Pebbles with fruity cereal and use pastel-colored candies.
- For birthdays, use colorful sprinkles and a variety of candies to match the theme.
Mistakes That Ruin Spider and Owl Krispie Treats
- Not melting the marshmallows enough can result in a dry and crumbly mixture.
- Overheating the butter and marshmallows can make the mixture too sticky and hard to work with.
- Pressing the mixture too firmly into the pan can lead to dense treats that aren’t fluffy.
- Not allowing enough time for the treats to cool can make cutting them difficult and messy.
Make Ahead Like a Pro
These Spider and Owl Krispie Treats can be made ahead of time! Just store them in an airtight container at room temperature for up to a week. If you want to make them even earlier, consider wrapping individual pieces in plastic wrap to keep them fresh. Just add your decorative touches right before serving to keep them looking their best!
Quick Q&A
Can I use a different type of cereal?
Absolutely! While Cocoa Pebbles give a delicious chocolatey flavor, you can use any crispy rice cereal or even fruity cereals for a different taste and look.
How can I make these treats vegan?
To make these treats vegan, you can substitute the butter with a plant-based alternative and use vegan marshmallows.
Can I freeze the Krispie treats?
Yes, you can freeze them! Wrap the treats tightly in plastic wrap and place them in a freezer bag. They will keep well for about a month. Just thaw them at room temperature before serving.
What if I don’t have pretzel sticks?
No worries! You can use chocolate-covered pretzels or even candy sticks as a fun alternative for spider legs.
Bring It Home
Creating these Spider and Owl Krispie Treats is not just about making a fun snack; it’s about spending time together, being creative, and enjoying the process. Whether you’re hosting a Halloween party, celebrating a birthday, or just looking for a fun kitchen activity, these treats are a perfect choice. With their playful designs and delicious chocolatey flavor, they are sure to bring smiles to everyone’s faces. So grab your ingredients, gather your little helpers, and get ready to whip up a batch of these delightful treats!
There’s something so satisfying about crafting your own treats, and we hope you enjoy making these Spider and Owl Krispie Treats as much as we do! Happy decorating and enjoy every crispy, gooey bite!
Spider and Owl Krispie Treats
Equipment
- Large Mixing Bowl
- Large saucepan
- Spatula
- 9x13 inch baking pan
- Wax paper or parchment paper
Ingredients
- 6 cups Cocoa Pebbles chocolatey cereal
- 10.5 oz mini marshmallows
- 1/4 cup butter
Garnishes
- Pretzel sticks for spider legs
- Mini marshmallows for decoration
- Orange taffy or Tootsie Rolls for owl eyes or other features
Instructions
Build Spider and Owl Krispie Treats Step by Step
- In a large saucepan over low heat, melt the butter. Once melted, add the mini marshmallows and stir continuously until they are completely melted and well combined with the butter. This mixture should be smooth and gooey.
- Remove the saucepan from heat and immediately add the 6 cups of Cocoa Pebbles to the melted marshmallow mixture. Stir gently but quickly to coat the cereal evenly with the marshmallow mixture. It’s important to work fast to prevent the mixture from setting too soon.
- Once the Cocoa Pebbles are well-coated, transfer the mixture to a greased 9x13 inch baking pan. Use a spatula or wax paper to press the mixture firmly and evenly into the pan. Be careful not to compress it too much; you want them to remain fluffy.
- Allow the Krispie treats to cool at room temperature for about 30 minutes or until they are firm enough to cut.
- Once set, remove the treats from the pan and place them on a cutting board. Using a sharp knife, cut them into squares or rectangles for your basic treats, or get creative and cut them into owl or spider shapes.
- To create the spiders, take a piece of the treat and press down four pretzel sticks on each side for legs. For the head, place a mini marshmallow on top and use a bit of melted chocolate or icing to attach two mini marshmallows as eyes.
- To make the owls, use the orange taffy or Tootsie Rolls to form large eyes on top of the treat. You can also use smaller pieces of candy to create beaks or wings. Let your creativity flow!
Notes
- Store treats in an airtight container at room temperature for up to a week to keep fresh.
- Use any crispy rice or fruity cereal to customize flavors and colors.
- Press mixture gently into the pan to keep treats fluffy, not dense.
- Substitute vegan butter and marshmallows to make a vegan version.