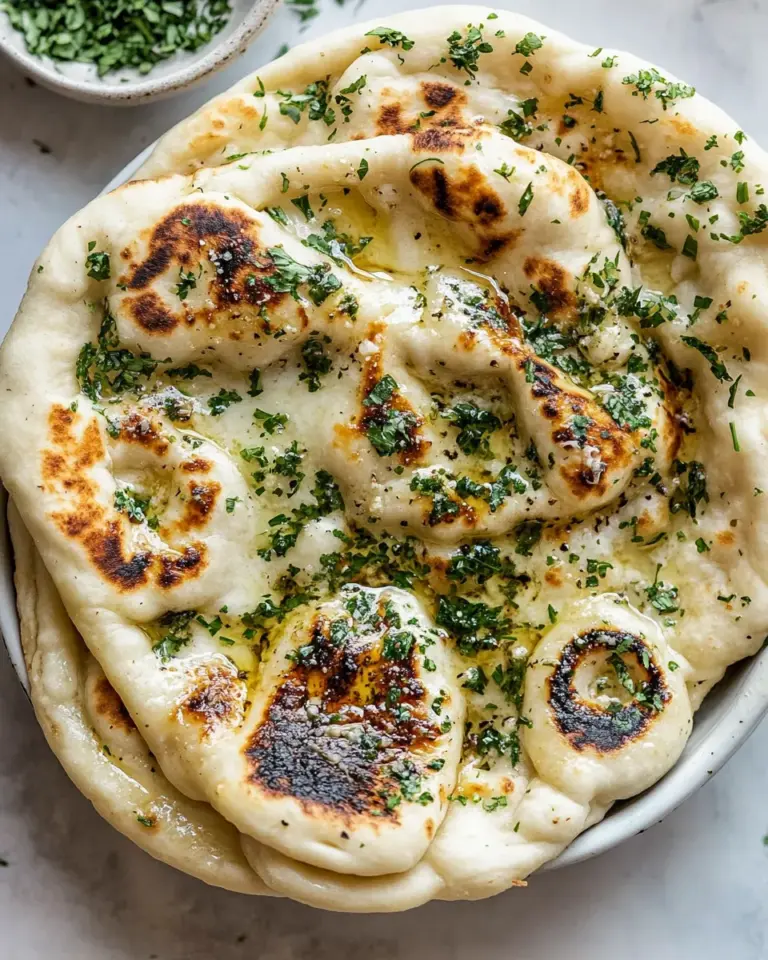
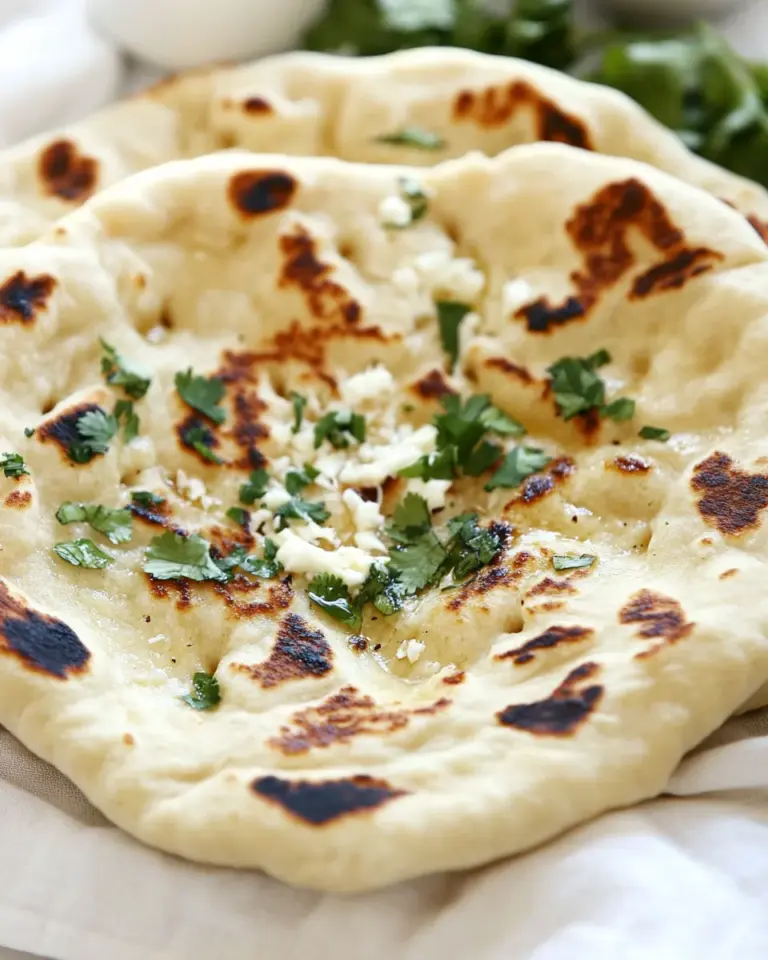
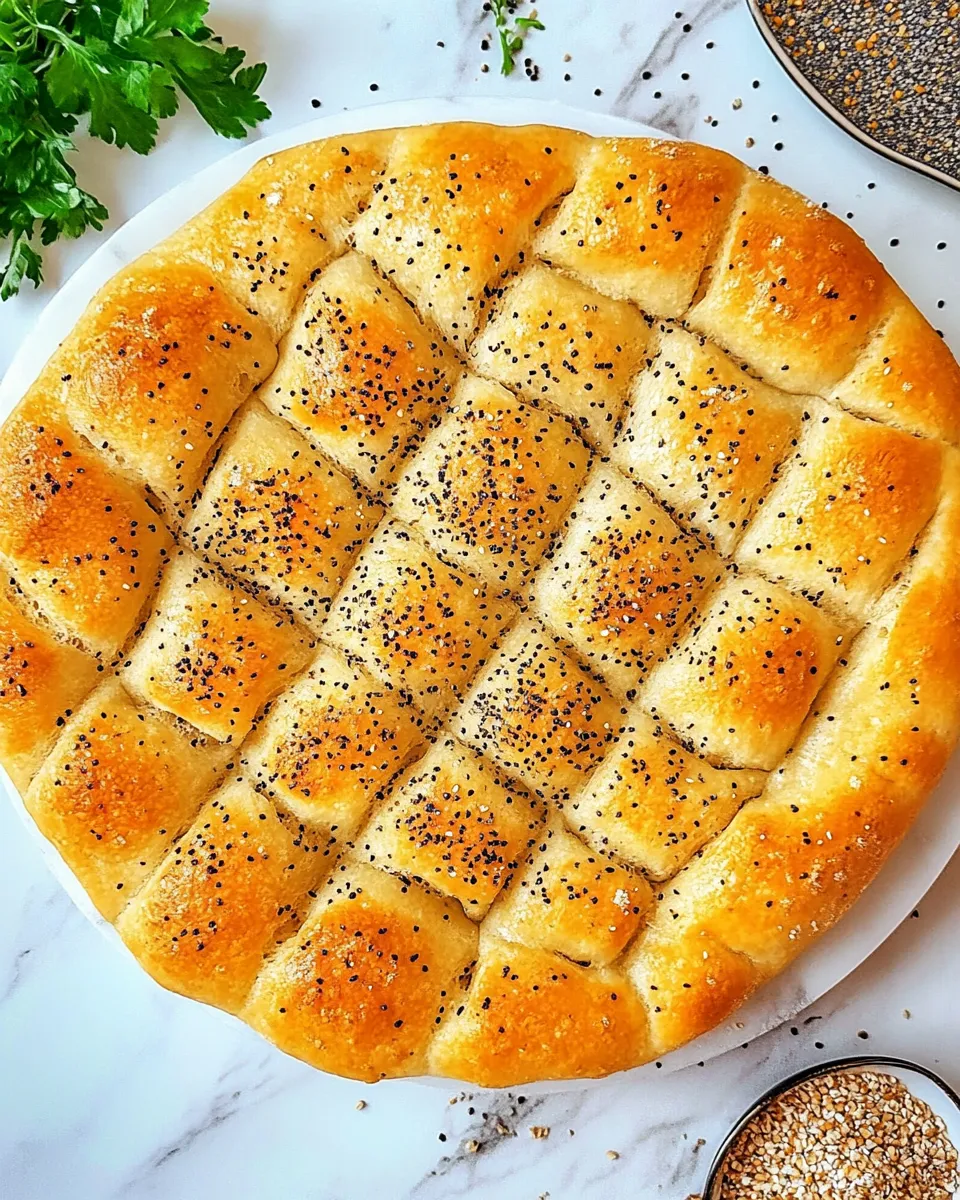
I fell in love with this bread the first time I pressed those dimples into the surface, sprinkled sesame seeds, and watched the crust take on a golden hue in the oven. It’s approachable and forgiving, and it rewards simple, steady technique with warm, fragrant loaves that hold up to slicing and dipping. No fancy equipment, just patience and a few clear steps.
This version uses a short starter to kick off flavor and rise, a gentle resting process instead of heavy kneading, and a flour-and-egg wash that gives the crust a subtle sheen and helps the seeds stick. The steam created by the hot water in the roasting pan is the quiet trick behind the crust’s chew and shine.
If you want a practical, everyday loaf that works for sandwiches, table bread, or alongside mezze, this is the one to keep in your rotation. I’ll walk you through what’s in the bowl, the exact steps to follow, and how to avoid the common pitfalls so your first batch — and the fiftieth — turns out reliably great.
What’s in the Bowl
At a glance this bread is just flour, water, yeast, salt, and a little egg for the wash. But the way those elements are introduced matters. The starter (a small mix of yeast, water, and a little flour) bubbles up and gives the dough a mild tang and lift early on. Then the bulk of the flour and water are combined with salt, rested, and folded rather than aggressively kneaded; this builds structure without exhausting the dough.
The wash — a simple blend of flour, water, and egg — adds color and a delicate crust texture, while sesame seeds bring aroma and a toasty finish. Steam in the oven encourages a good oven-spring and keeps the crust from hardening too quickly so the interior can expand.
Ingredients
- 2¼ teaspoons active dry yeast — the leavening agent; proof briefly in warm water to wake it up.
- ¾ cup warm water — used to dissolve the yeast for the starter; should be pleasantly warm, not hot.
- 1 cup all-purpose flour — mixed into the starter to begin fermentation and flavor development.
- 1 cup warm water — added later to build dough hydration and bring the recipe to full water content.
- 3 cups all-purpose flour — the bulk of the dough; provides structure and crumb.
- 1 teaspoon salt — balances flavor and strengthens the gluten network.
- ⅓ cup warm water — combined with flour and egg to make the wash; helps color and texture.
- 1½ tablespoons all-purpose flour — part of the wash; thickens it so it adheres to the dough.
- 1 egg — in the wash for shine and color; also helps sesame seeds stick.
- 2 tablespoons sesame seeds — for flavor and classic appearance; toast lightly if you like extra aroma.
Turkish Bread — Do This Next
- In a large bowl, sprinkle the 2¼ teaspoons active dry yeast over ¾ cup warm water and stir to dissolve. Add 1 cup all-purpose flour and mix until smooth. Cover the bowl with plastic wrap and let rest 20 minutes.
- Remove the plastic wrap and check the starter: it should be bubbly and have increased in volume.
- Stir in the remaining 1 cup warm water. Add 3 cups all-purpose flour and 1 teaspoon salt. Stir with a wooden spoon or spatula until the mixture forms a shaggy dough with no large lumps.
- Cover the bowl again with plastic wrap and let the dough rest another 20 minutes.
- Generously flour your work surface. Turn the rested dough onto the floured surface and sprinkle more flour on top as needed. Using a bench scraper or floured hands, fold/turn the dough over itself about 6–8 times to develop structure, then shape it into a smooth ball.
- Preheat the oven to 375°F. Place a roasting pan on the bottom oven rack and pour in about 2 inches of hot water. Line a large baking sheet with parchment paper and set it aside.
- Divide the dough into 2 equal pieces. Flatten each piece into an oval or round about ¾ inch thick and place them on the prepared baking sheet, leaving room between them.
- Cover the shaped loaves with plastic wrap and let them rest/proof for 20 minutes.
- While the loaves rest, make the egg/flour wash: in a small bowl whisk together 1½ tablespoons all-purpose flour, ⅓ cup warm water, and 1 egg until smooth.
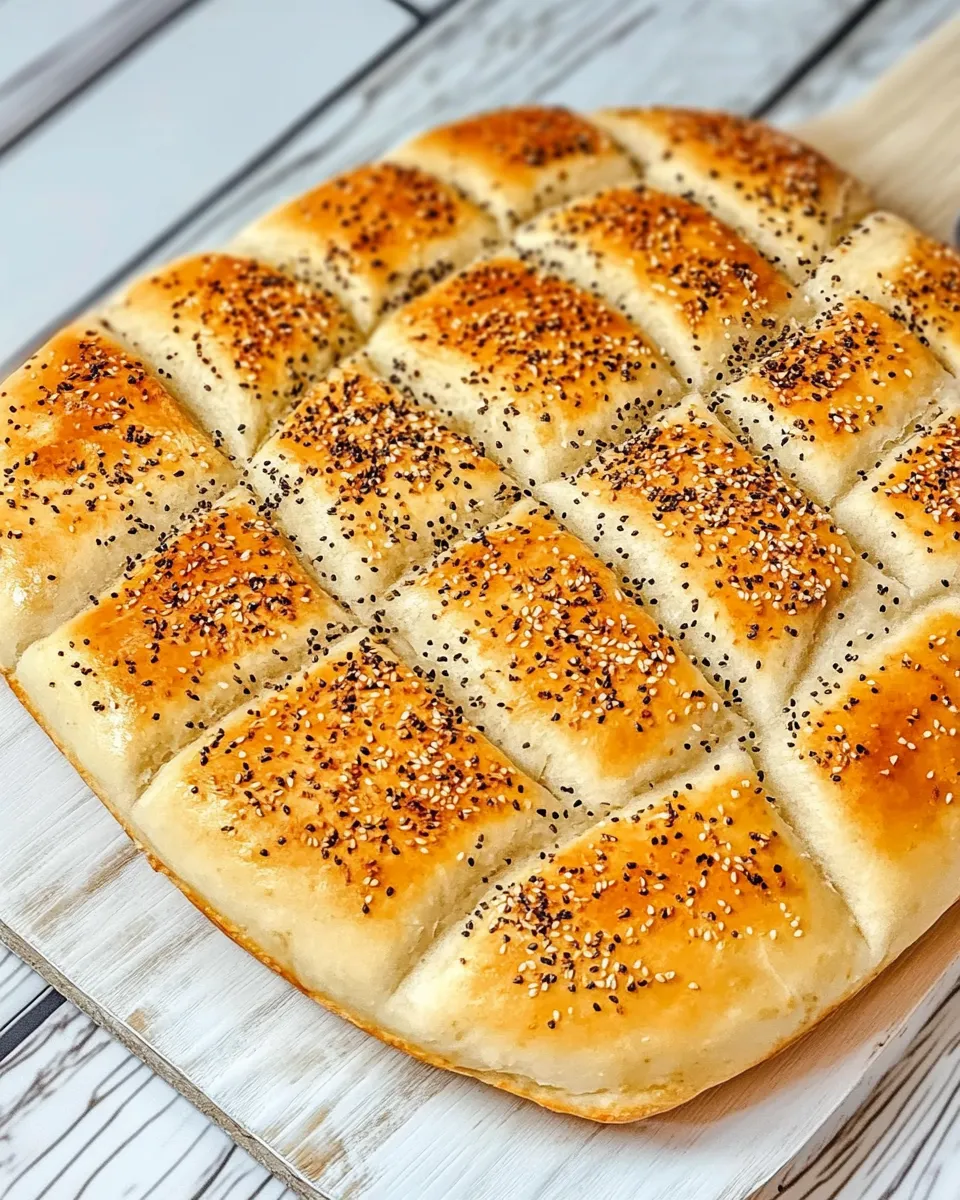
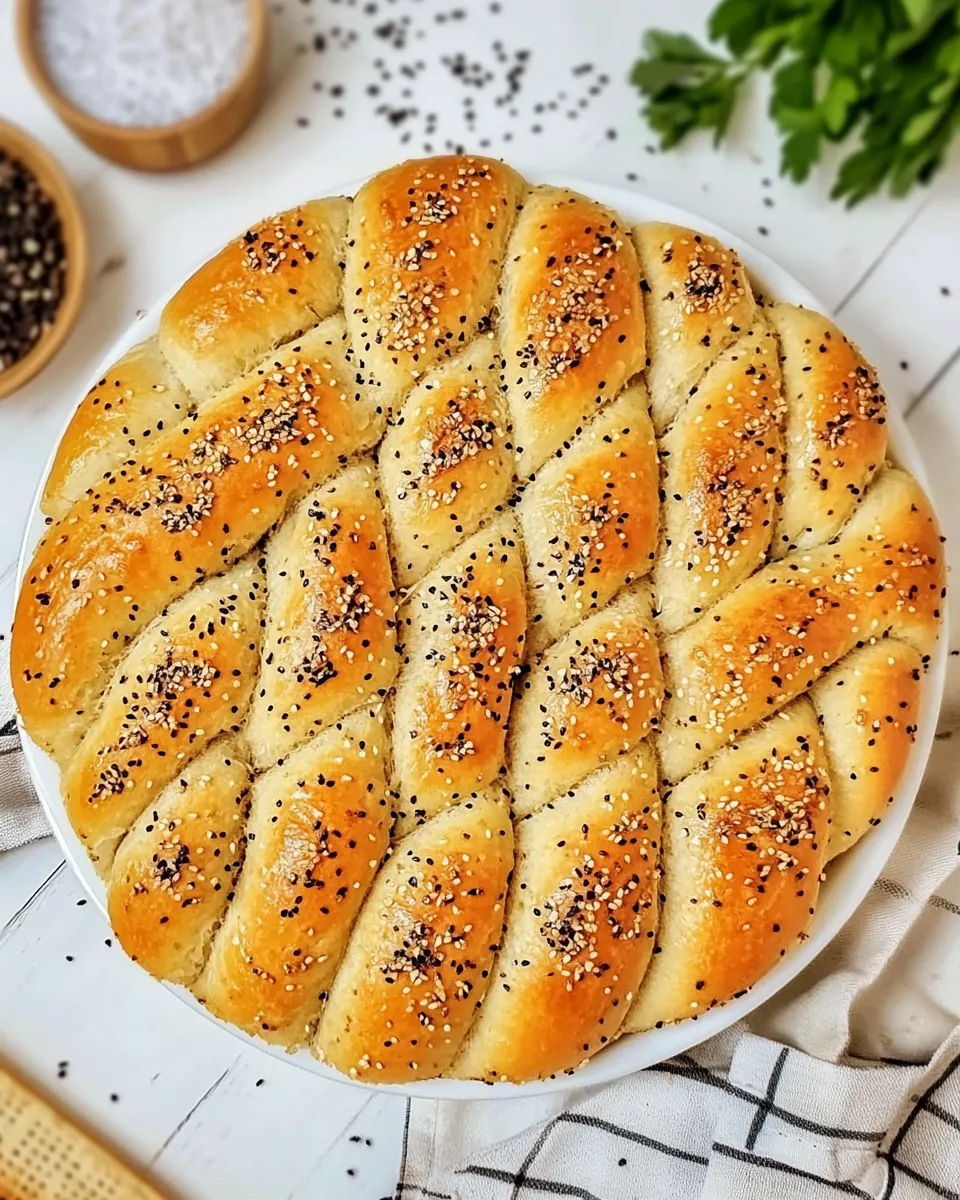
- Remove the plastic wrap. Brush the wash evenly over each loaf. Use your fingers to press dimples into the dough surface, then sprinkle each loaf with the 2 tablespoons sesame seeds.
- Place the baking sheet on a middle rack in the oven (with the roasting pan of water remaining on the bottom rack) and bake 30–35 minutes, until the loaves are golden brown.
- Remove the bread from the oven and cool on a rack or a clean surface before slicing.
What Sets This Recipe Apart
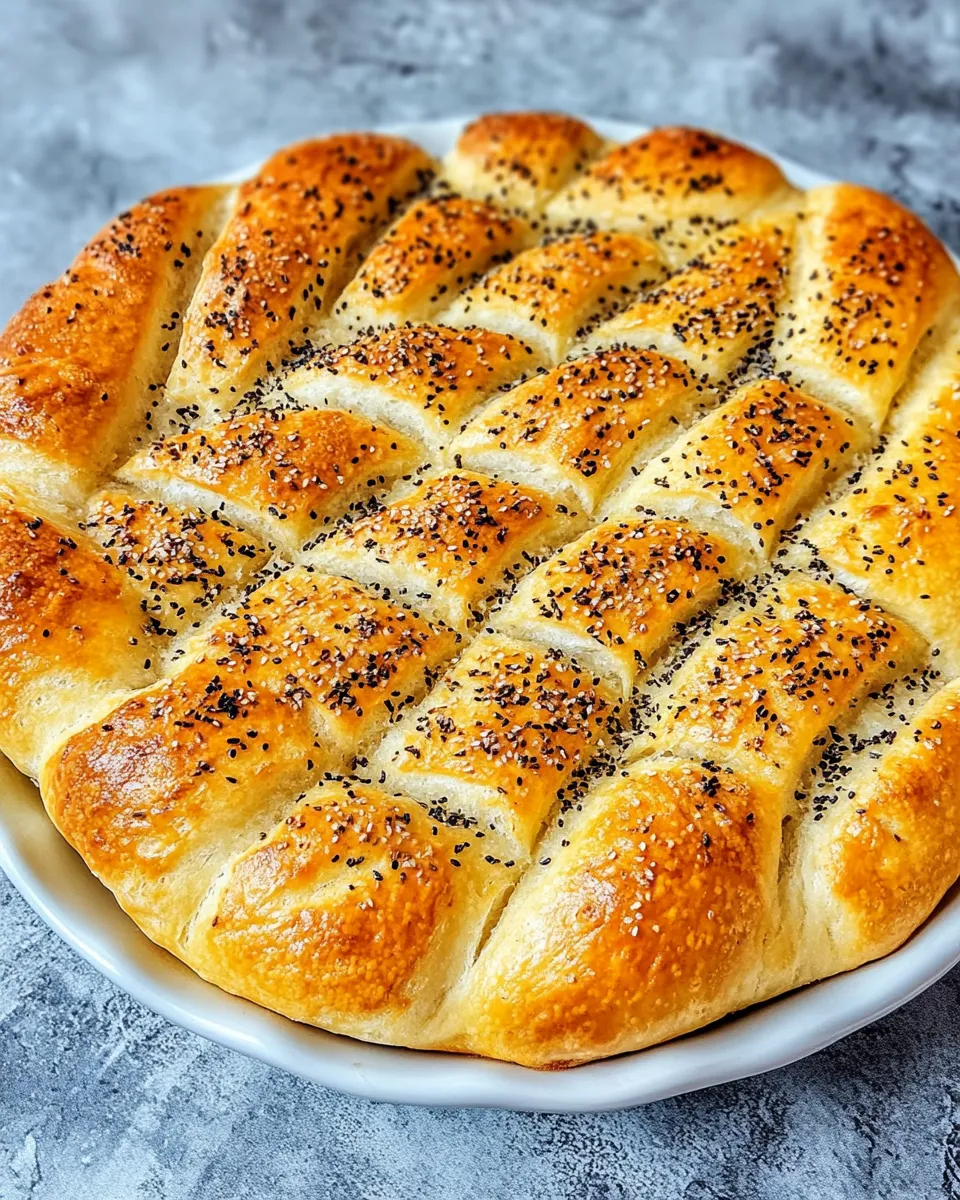
This recipe relies on a short starter and short rests rather than long bulk fermentation or heavy kneading. That starter jump-starts flavor and fermentation so you get depth without an overnight schedule. The fold-and-rest method develops enough gluten for structure while keeping the dough soft and easy to shape. Using a flour-and-egg wash instead of just egg gives a subtle matte sheen and slightly different crust texture that many find appealing. Finally, the steam introduced by the roasting pan of hot water creates a moist oven environment that promotes oven-spring and a tender crust instead of a cracker-hard top.
Allergy-Friendly Substitutes
If you have dietary restrictions, here are sensible swaps and caveats to keep in mind.
- Egg (wash) — Replace with aquafaba (liquid from a can of chickpeas) or a 1:1 mixture of milk and oil for sheen. Aquafaba whisks glossy and helps seeds stick; use about 3 tablespoons aquafaba to replace 1 egg in the wash.
- Gluten-free — This method depends on gluten for structure. For a gluten-free option, use a tested blend formulated for yeast breads and follow that blend’s hydration guidance. Expect different handling and a denser crumb.
- Sesame seeds — Omit if allergic or substitute with toasted sunflower seeds, poppy seeds, or nigella seeds for a different flavor profile.
- Yeast sensitivity — If you prefer to avoid commercial yeast, this exact timing and rise won’t translate to sourdough starter without adjusting fermentation times and quantities.
Tools & Equipment Needed
- Large mixing bowl — for starter and dough mixing.
- Plastic wrap — to cover and rest the starter and dough.
- Wooden spoon or spatula — for stirring the shaggy dough.
- Bench scraper or floured hands — to fold and shape the dough.
- Baking sheet and parchment paper — to bake the loaves; parchment prevents sticking and makes transfer easier.
- Roasting pan — placed on the bottom oven rack and filled with hot water to create steam.
- Small bowl and whisk — for the wash.
- Basting brush or clean hand — to apply the wash and press dimples.
- Cooling rack — for the bread to cool evenly after baking.
Pitfalls & How to Prevent Them
I’ve baked this recipe many times; here are the problems I see most often and how to stop them.
- Starter not bubbling — Water that’s too hot kills yeast; too cool and yeast stays dormant. Aim for warm (about 100–110°F / 38–43°C). If the starter shows no activity after 30–40 minutes, the yeast may be old — start fresh.
- Dough too sticky to fold — Generously flour the surface and your hands, but resist adding large amounts of extra flour into the dough. Lightly dust and fold; the dough will firm up as it rests.
- Flat loaves — Overproofing will cause collapse; follow the short timings in the recipe and shape with a gentle but confident touch. Also, make sure your oven is fully preheated before baking.
- Crust too hard or pale — Check that the water in the roasting pan is hot (not cold) when you put the loaves in; steam improves crust color. Also ensure the wash is mixed and applied evenly.
Spring to Winter: Ideas
This bread is adaptable. In spring and summer, slice it thin for light sandwiches with fresh herbs, cucumber, and labneh. Add a smear of olive oil and chopped basil for a casual snack. Through autumn and winter, use thicker slices for robust grilled cheese, or serve warm with slow-simmered stews and braises.
Topping ideas change the personality of the loaves quickly: try za’atar or a mix of sesame and nigella seeds before baking. For a breakfast twist, split and toast slices, then top with soft-boiled eggs, lemony yogurt, and chives.
Chef’s Rationale
Short rests and folding favor a tender, open crumb without laborious kneading. The starter creates a flavor baseline and predictable rise; it’s a small commitment with a big payoff. The egg-and-flour wash gives a controlled sheen and helps seeds adhere without burning them, and the steam bath keeps the crust from setting too quickly so the interior can expand. Every step aims for balance: flavor, texture, and reliable results with minimal fuss.
Prep Ahead & Store
You can prepare the starter and complete the first 20-minute rest ahead of time, then refrigerate the bowl covered for an hour or two if you need a pause. Bring it back to room temperature before proceeding with the remaining water and flour. Once baked and fully cooled, store the bread in a loosely closed paper bag or wrapped in a kitchen towel at room temperature for up to 2 days. For longer storage, slice and freeze in an airtight bag; toast slices straight from the freezer.
Common Questions
- Can I use instant yeast instead of active dry? Yes. If using instant yeast, sprinkle it directly into the flour rather than proofing. You may reduce the initial proofing time slightly, but the starter step in this recipe is designed for active dry to build flavor.
- What if my kitchen is cold? Allow slightly more proofing time for the starter and final rest. A warm but not hot spot — such as inside an oven with the light on — will speed things up.
- Can I make one large loaf instead of two? Yes, but baking time may increase. Watch for a deep golden crust and check doneness by tapping the bottom (it should sound hollow) or using an instant-read thermometer; around 190–200°F internal is a good target for a fully baked loaf.
- How do I get those dimples evenly? Use your fingertips and press gently across the surface in a patterned way, aiming for consistent depth without tearing the dough.
Final Thoughts
This Turkish Bread is one of those recipes that sits comfortably between weekday and special meal: straightforward enough for a quick afternoon bake, but nuanced enough to impress at a dinner. The starter and steam trick give it a character you’ll come back to. Take your time with the rests, trust your hands during the folds, and don’t skip the wash — those small choices are what give the loaves their charm.
Try a batch this weekend. Make one for immediate use and freeze one for later. I promise the dimples and sesame-topped crust will become a small, consistent joy in your kitchen.
Turkish Bread
Equipment
- Large Bowl
- Plastic Wrap
- Wooden Spoon or Spatula
- bench scraper or hands
- Roasting Pan
- Baking Sheet
- Parchment Paper
- Small Bowl
- Whisk
- Oven
- Cooling rack
Ingredients
Ingredients
- 2 1/4 teaspoonsactive dry yeast
- 3/4 cupwarm water
- 1 cupall-purpose flour
- 1 cupwarm water
- 3 cupsall-purpose flour
- 1 teaspoonsalt
- 1/3 cupwarm water
- 1 1/2 tablespoonsall-purpose flour
- 1 egg
- 2 tablespoonssesame seeds
Instructions
Instructions
- In a large bowl, sprinkle the 2¼ teaspoons active dry yeast over ¾ cup warm water and stir to dissolve. Add 1 cup all-purpose flour and mix until smooth. Cover the bowl with plastic wrap and let rest 20 minutes.
- Remove the plastic wrap and check the starter: it should be bubbly and have increased in volume.
- Stir in the remaining 1 cup warm water. Add 3 cups all-purpose flour and 1 teaspoon salt. Stir with a wooden spoon or spatula until the mixture forms a shaggy dough with no large lumps.
- Cover the bowl again with plastic wrap and let the dough rest another 20 minutes.
- Generously flour your work surface. Turn the rested dough onto the floured surface and sprinkle more flour on top as needed. Using a bench scraper or floured hands, fold/turn the dough over itself about 6–8 times to develop structure, then shape it into a smooth ball.
- Preheat the oven to 375°F. Place a roasting pan on the bottom oven rack and pour in about 2 inches of hot water. Line a large baking sheet with parchment paper and set it aside.
- Divide the dough into 2 equal pieces. Flatten each piece into an oval or round about ¾ inch thick and place them on the prepared baking sheet, leaving room between them.
- Cover the shaped loaves with plastic wrap and let them rest/proof for 20 minutes.
- While the loaves rest, make the egg/flour wash: in a small bowl whisk together 1½ tablespoons all-purpose flour, ⅓ cup warm water, and 1 egg until smooth.
- Remove the plastic wrap. Brush the wash evenly over each loaf. Use your fingers to press dimples into the dough surface, then sprinkle each loaf with the 2 tablespoons sesame seeds.
- Place the baking sheet on a middle rack in the oven (with the roasting pan of water remaining on the bottom rack) and bake 30–35 minutes, until the loaves are golden brown.
- Remove the bread from the oven and cool on a rack or a clean surface before slicing.
Notes
If you don’t have sesame seeds, you can use other seeds like poppy or nigella for a different flavor profile.
The roasting pan with water in the oven helps create a steamy environment, crucial for a crispier crust.
You can double the recipe to make more loaves.