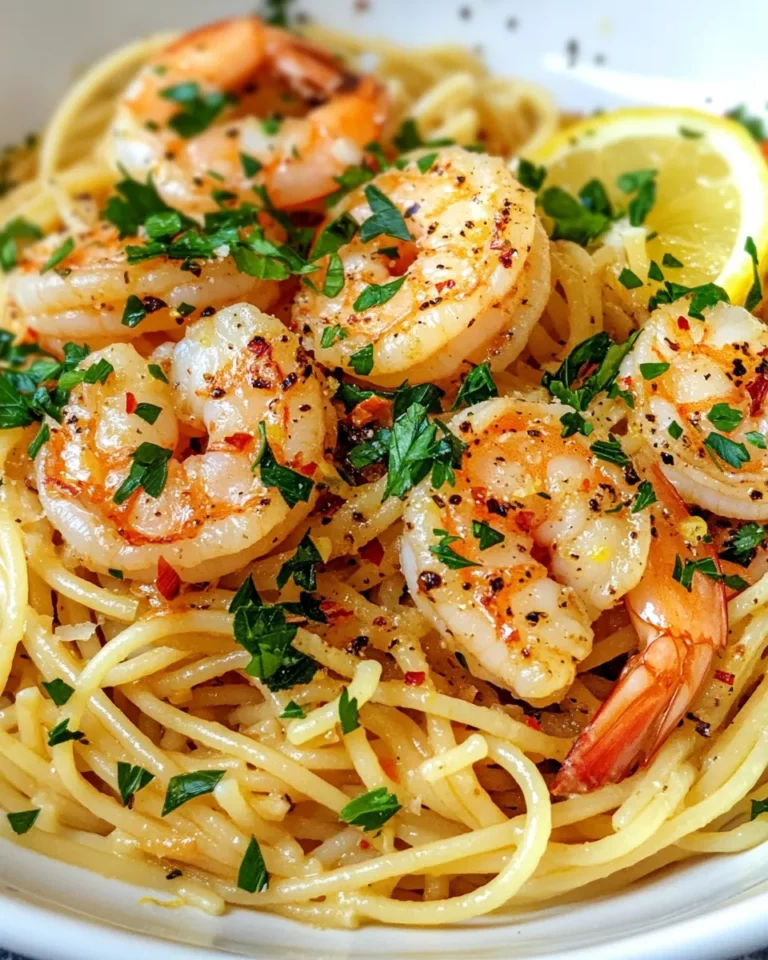
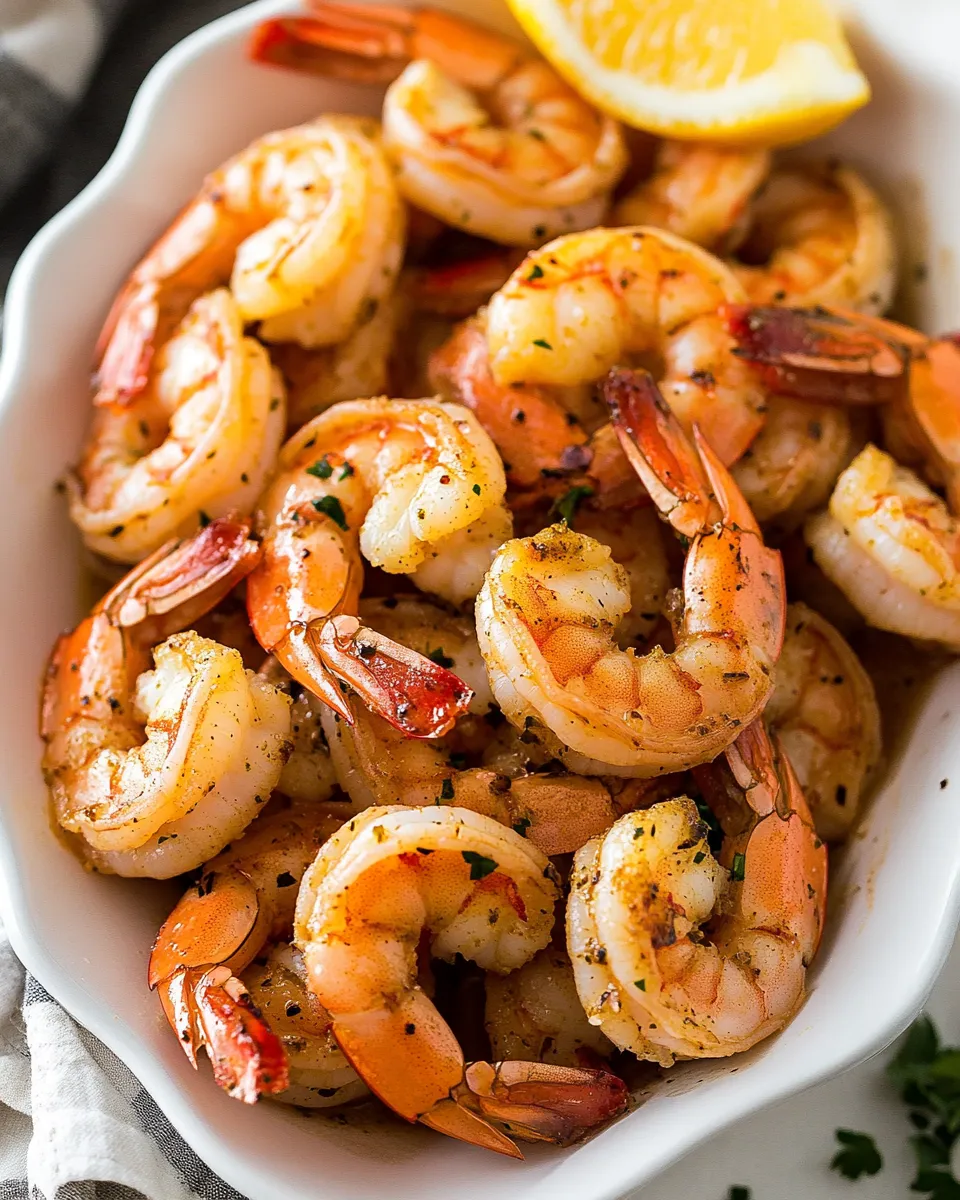
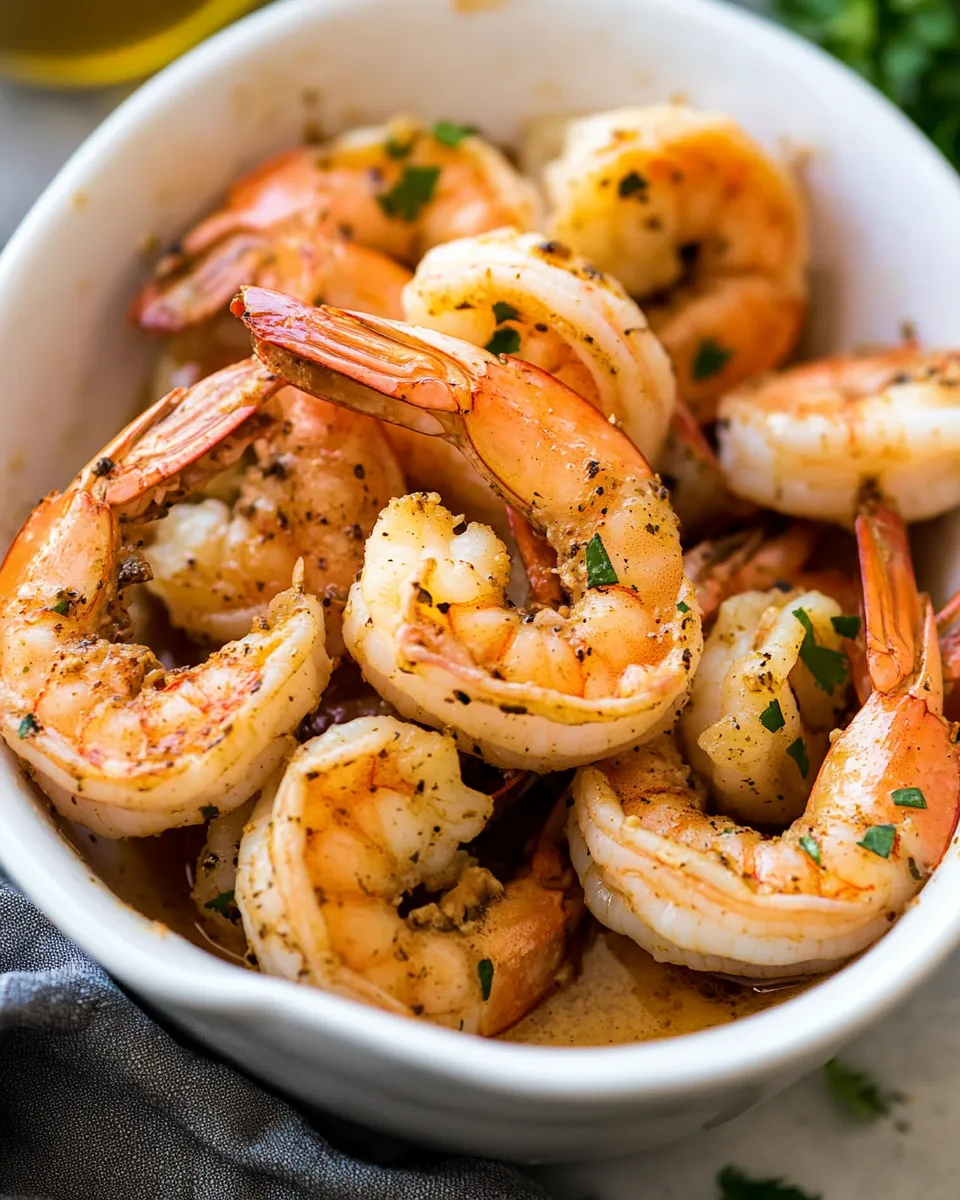
I love shrimp for Weeknight Dinner Magic: quick, flavorful, and impossibly satisfying. This air fryer version strips the process down to the essentials—good shrimp, a touch of oil, garlic powder, and salt—with a result that’s crisp on the outside and tender inside. It’s the kind of recipe that makes you proud without demanding time or fuss.
There are no complicated marinades here, no long waits. You get big flavor from two pantry staples and a rapid blast of hot air. If you want a sauce or a squeeze of citrus at the end, go for it. The method below focuses on technique so your shrimp come out consistent every time.
Whether you’re cooking for one, feeding a family, or putting together a quick appetizer, this recipe is built to be reliable. Read through the notes and tips for simple swaps, troubleshooting, and ways to keep the texture spot on. Let’s get cooking.
Ingredient List
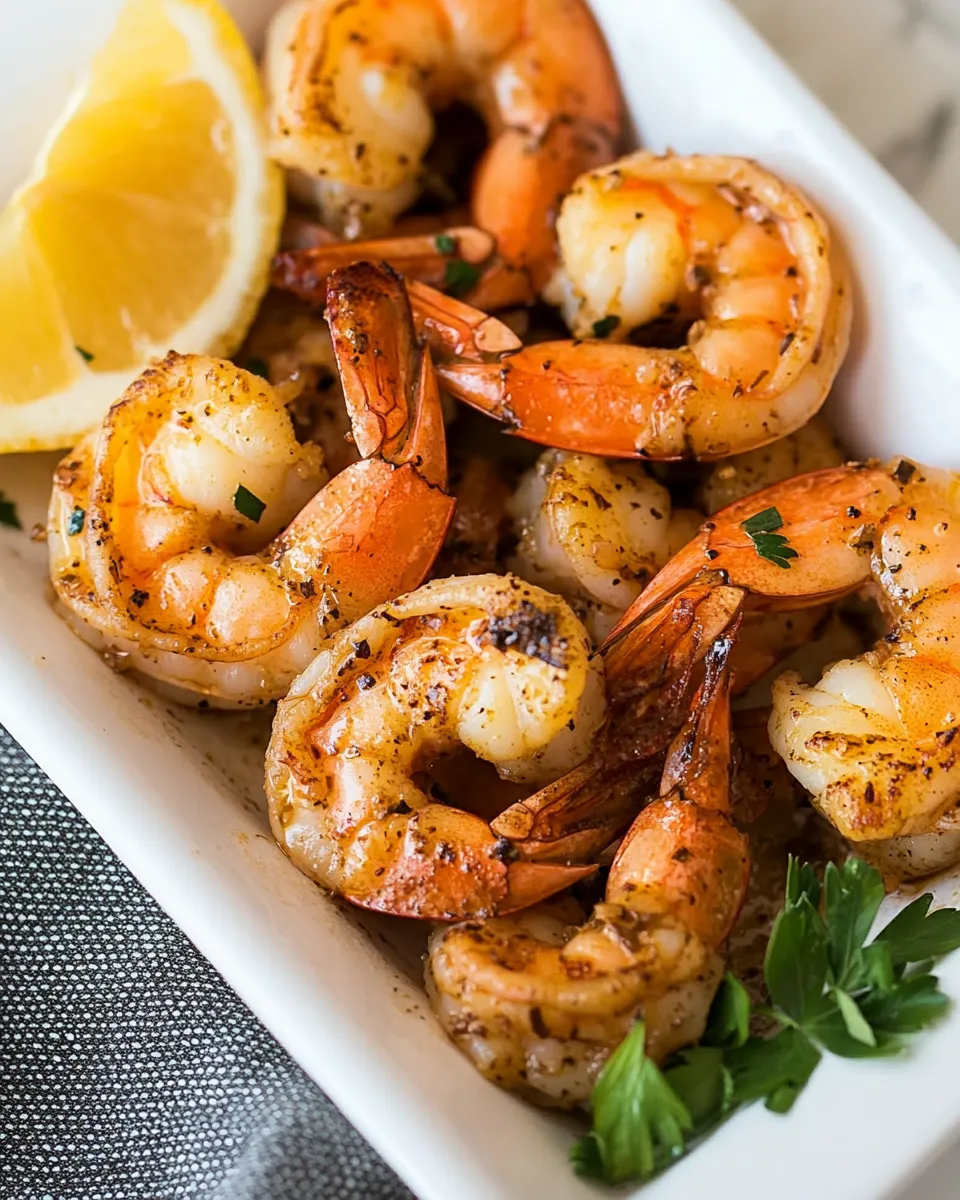
- 1 lb raw shrimp, large, defrosted, peels removed, tails optional — The protein. Make sure shrimp are fully defrosted and patted dry so they crisp instead of steaming.
- 1 tsp avocado oil — Adds a light coating for even browning; avocado oil has a high smoke point but any neutral oil can work if needed.
- 1 tsp garlic powder — Provides focused garlic flavor without risking burned fresh garlic in the air fryer.
- ¼ tsp salt — Seasoning baseline. Adjust to taste if your shrimp were pre-salted.
- ⅛ tsp black pepper — A mild bite that rounds out the seasonings.
From Start to Finish: Air Fryer Garlic Shrimp
- Ensure the 1 lb shrimp are fully defrosted, peeled (tails optional), and drained. Pat the shrimp dry with paper towels on a plate.
- Place the dried shrimp in a mixing bowl. Add 1 tsp avocado oil, 1 tsp garlic powder, 1/4 tsp salt, and 1/8 tsp black pepper.
- Toss the shrimp in the bowl until they are evenly and lightly coated with the oil and seasonings.
- Preheat the air fryer to 360°F (if your model recommends preheating) for 2–3 minutes.
- Arrange the seasoned shrimp in a single, even layer in the air fryer basket (do not overcrowd).
- Cook at 360°F for 6 minutes, turning or shaking the shrimp halfway through (about at 3 minutes). Cook until shrimp are opaque and firm.
Why You’ll Love This Recipe
Speed: It takes minutes from pan to plate. A true dinner-rescue recipe when time is tight.
Simplicity: A tiny list of ingredients that you probably already have. Minimal cleanup and maximum flavor.
Consistency: The air fryer gives predictable results—crispy edges and tender interiors—without hovering over a hot skillet. Turn once and the shrimp finish quickly and evenly.
Versatility: Use the shrimp as a main with rice or salad, toss in pasta, or pile into tacos. The seasoning is a blank canvas for sauces and garnishes.
Texture-Safe Substitutions
- Oil swap — If you don’t have avocado oil, use any neutral oil with a similar smoke point (light olive oil, grapeseed). The quantity remains 1 tsp; don’t add more or the shrimp will steam, not crisp.
- Garlic options — Garlic powder keeps things even and avoids burning. If you prefer fresh garlic, mince very finely and toss with the oil, but use sparingly (about 1 small clove) and watch closely for browning.
- Shrimp size — The recipe uses large shrimp. If you use very small or extra-large shrimp, reduce or increase cook time by 1–2 minutes accordingly and check for opacity and firmness.
- Tail preference — Tails off for easier eating in salads and bowls; tails on for presentation and finger food. Either choice doesn’t affect cooking time much.
Appliances & Accessories
Air fryer: Any basket-style air fryer works. If you have a drawer-style or small countertop model, do not overcrowd—cook in batches.
Mixing bowl: For seasoning the shrimp evenly.
Paper towels: Essential to pat shrimp dry. Moisture is the enemy of crispness.
Tongs or a small spatula: For turning or removing shrimp without piercing them and losing juices.
Optional: An instant-read thermometer can help if you prefer checking doneness; shrimp are done at 120–140°F but visual cues (opaque, firm) are sufficient here.
Problems & Prevention
Problem: Shrimp are rubbery or overcooked.
Prevention: Follow the 6-minute total time and turn once at 3 minutes. Shrimp cook very quickly; remove them as soon as they’re opaque and slightly firm. Overcooking is the most common mistake.
Problem: Shrimp are soggy or steamed rather than crisp.
Prevention: Pat shrimp dry before seasoning. Use only 1 tsp oil—too much oil causes steaming. Don’t overcrowd the basket; air needs to circulate.
Problem: Seasoning is uneven.
Prevention: Toss shrimp in a bowl to coat evenly. If you see clumps of garlic powder, break them up with your fingers before adding.
Problem: Burned garlic flavor.
Prevention: Use garlic powder as directed. Fresh garlic can burn at high air-fryer temperatures. If using fresh, add it toward the end or lower the temp slightly and watch carefully.
Fresh Takes Through the Year
Spring: Toss the finished shrimp with a little lemon zest and chopped chives, then serve over a bed of baby greens for a bright, light meal.
Summer: Chop fresh tomatoes, cucumber, and avocado and make a quick salsa to serve on top. Shrimp tacos with cilantro and lime are another no-fuss option.
Fall: Add a pinch of smoked paprika and a squeeze of orange for a slightly smoky, autumnal twist that pairs well with roasted sweet potatoes.
Winter: Stir in a small knob of butter and a splash of white wine after cooking for a quick pan sauce; serve with warm grains or crusty bread.
Cook’s Commentary
I rely on this method for last-minute guests because it’s forgiving and quick. The mild garlic profile is intentional; it lets the shrimp shine and pairs beautifully with stronger components added afterward—think a drizzle of chili oil, a spoonful of herb butter, or a bright chimichurri.
One habit I recommend: always pat the shrimp dry and season them in a bowl, not on the plate you used to defrost them. It keeps flavors consistent and prevents accidental water transfer into the air fryer.
Also, listen to the shrimp. Visual cues—opaque flesh and a firm, springy texture—will tell you when they’re perfect. I check them at the 5-minute mark if I’m using smaller shrimp.
Leftovers & Meal Prep
Storage: Cool shrimp to room temperature (no more than 2 hours at room temp), then refrigerate in an airtight container for up to 2 days. Shrimp texture softens with refrigeration, so plan accordingly.
Reheating: Reheat briefly in the air fryer at 325°F for 2–3 minutes to revive crispness. Avoid the microwave if you want the texture to stay pleasant; it makes shrimp rubbery.
Meal prep ideas: Cooked shrimp are excellent cold in salads, mixed into grain bowls, or folded into a chilled pasta salad. If prepping for the week, store the shrimp separately from wet dressings to keep them from getting soggy.
Handy Q&A
- Can I use frozen shrimp straight from the freezer? — No. The recipe requires fully defrosted shrimp. Cooking frozen shrimp straight through leads to uneven cooking and excess moisture.
- What if my air fryer doesn’t recommend preheating? — If your model doesn’t need preheat, skip that step; just follow the 6-minute cook time and check for doneness at the halfway mark.
- Can I add extra spices? — Yes. Add them in the mixing bowl with the garlic powder, but keep total dry seasoning light so you don’t mask the shrimp. Start small and taste after the first batch.
- How can I make a sauce to serve with it? — A simple lemon-garlic butter or a yogurt-dill sauce pairs beautifully. Add the sauce after cooking rather than during, to preserve texture.
Save & Share
If this Air Fryer Garlic Shrimp became your new weeknight go-to, save the page or bookmark it for fast access. Share it with friends who love quick dinners or post your photo—tag with season and swap ideas. Small tweaks lead to big favorites, and I love hearing what you tried and what became your signature twist.
Happy cooking, and don’t forget to pat those shrimp dry—you’ll notice the difference in the first bite.

Air Fryer Garlic Shrimp Recipe
Equipment
- Air Fryer
- Mixing Bowl
- Paper Towels
- air fryer basket
Ingredients
Ingredients
- 1 lb.raw shrimp large, defrosted, peels removed, tails optional
- 1 tspavocado oil
- 1 tspgarlic powder
- 1/4 tspsalt
- 1/8 tspblack pepper
Instructions
Instructions
- Ensure the 1 lb shrimp are fully defrosted, peeled (tails optional), and drained. Pat the shrimp dry with paper towels on a plate.
- Place the dried shrimp in a mixing bowl. Add 1 tsp avocado oil, 1 tsp garlic powder, 1/4 tsp salt, and 1/8 tsp black pepper.
- Toss the shrimp in the bowl until they are evenly and lightly coated with the oil and seasonings.
- Preheat the air fryer to 360°F (if your model recommends preheating) for 2–3 minutes.
- Arrange the seasoned shrimp in a single, even layer in the air fryer basket (do not overcrowd).
- Cook at 360°F for 6 minutes, turning or shaking the shrimp halfway through (about at 3 minutes). Cook until shrimp are opaque and firm.
Notes
*This recipe is for large shrimp. If using jumbo, you may need to cook longer. If using smaller, you will not have to cook as long. Check after 3 minutes and keep cooking until shrimp is pink and cooked through.
WHY SO MUCH SODIUM?
I get this question a lot with seafood recipes. Shrimp live in
salt water, making them naturally high in sodium
. Feel free to remove the added salt to the recipe if desired.