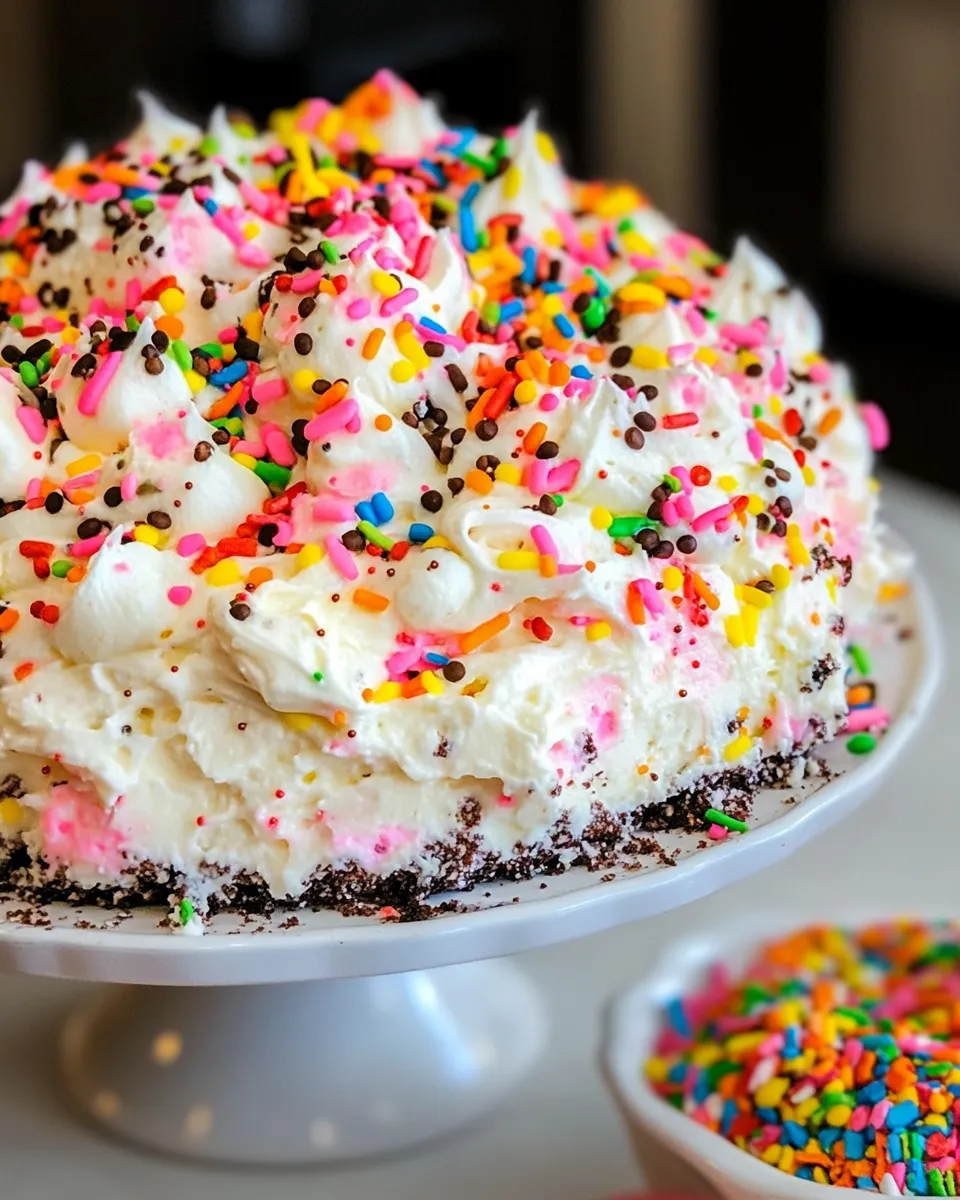
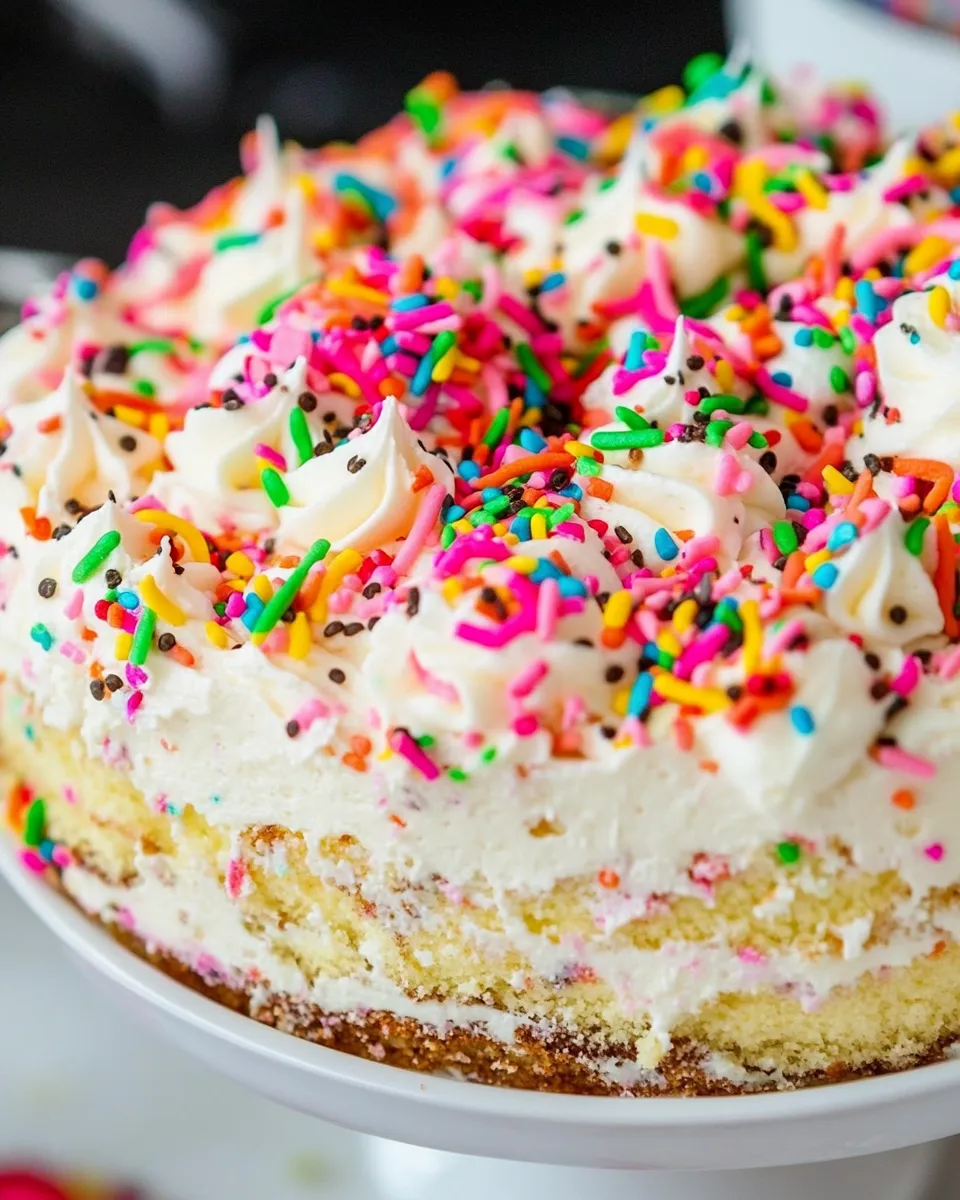
If you’re looking for a dessert that perfectly captures the essence of a birthday celebration, look no further than Birthday Cake Lush! This layered delight features a creamy filling, a crunchy crust, and, of course, all the fun flavors of birthday cake. With birthday cake-flavored Oreo cookies as the star ingredient, this no-bake treat is easy to whip up and is sure to impress your guests. Whether it’s for a special occasion or just a sweet craving, Birthday Cake Lush is guaranteed to bring a smile to your face!
Top Reasons to Make Birthday Cake Lush
- Easy to Prepare: With no baking required, you can assemble this dessert in a matter of minutes.
- Make-Ahead Friendly: This dessert can be prepared in advance, making it perfect for parties.
- Appealing Presentation: The layers of color and texture are not only delicious but also visually stunning.
- Customizable: You can easily modify the recipe to fit dietary preferences or to include your favorite flavors.
- Kid-Friendly: With its fun flavors and sprinkles, this dessert is a hit with both kids and adults alike.
What You’ll Need
- 22 birthday cake-flavored Oreo cookies
- 4 tablespoons butter, melted
- 1 (3.4-ounce) box vanilla instant pudding mix
- 1/3 cup dry Funfetti cake mix
- 1 cup milk
- 1 (16-ounce) Cool Whip, divided
- 1/3 cup sprinkles, plus extra for sprinkling on top
Kitchen Gear Checklist
- 9×13-inch baking dish – for layering the dessert.
- Mixing bowls – for preparing the crust and filling.
- Spatula – for spreading the layers evenly.
- Whisk – for mixing the pudding and milk.
- Measuring cups and spoons – for accurate ingredient measurements.
Birthday Cake Lush: How It’s Done

Step 1: Prepare the Crust
Start by crushing the birthday cake-flavored Oreo cookies in a mixing bowl. You want them to be fine crumbs, so a food processor works great if you have one. Once crushed, pour in the melted butter and mix until everything is thoroughly combined. The mixture should resemble wet sand.
Step 2: Assemble the Crust
Press the Oreo mixture firmly into the bottom of a 9×13-inch baking dish. Make sure it’s even and compact for a sturdy base. Place the dish in the refrigerator while you prepare the filling.
Step 3: Make the Filling
In a separate mixing bowl, combine the vanilla instant pudding mix and dry Funfetti cake mix. Whisk them together for a few seconds. Next, add the milk and whisk until the mixture is smooth and thickened, about 2 minutes.
Step 4: Fold in the Cool Whip
Gently fold in half of the Cool Whip (8 ounces) into the pudding mixture. Be careful not to deflate the whipped cream too much; you want to keep the filling light and airy.
Step 5: Layer the Filling
Spread the pudding and Cool Whip mixture evenly over the crust in your baking dish. Smooth it out with a spatula to ensure it’s even.
Step 6: Add More Cool Whip
Top the pudding layer with the remaining Cool Whip (8 ounces). Spread it out gently to create a beautiful top layer.
Step 7: Finish with Sprinkles
Sprinkle the 1/3 cup of sprinkles evenly over the top layer of Cool Whip. For an extra festive touch, feel free to add more sprinkles if you’d like!
Step 8: Chill and Serve
Cover the baking dish with plastic wrap and refrigerate for at least 4 hours, or overnight for the best results. Once chilled, cut into squares and serve. Enjoy your delicious Birthday Cake Lush!
Better Choices & Swaps
- Use gluten-free Oreo cookies for a gluten-free version of this dessert.
- Swap the vanilla pudding mix for a sugar-free option to reduce calories.
- Try using whipped coconut cream instead of Cool Whip for a dairy-free alternative.
- For a lower-sugar option, consider using a sugar-free cake mix and pudding.
Pro Tips & Notes
- For best results, allow the Birthday Cake Lush to chill overnight. This helps the flavors meld and the dessert to set properly.
- If you want a stronger cake flavor, consider adding a splash of vanilla extract to the pudding mixture.
- Feel free to experiment with different flavored Oreo cookies for a unique twist on this dessert.
- Using a sharp knife will help you cut clean squares for a prettier presentation.
Keep It Fresh: Storage Guide
Store any leftovers in an airtight container in the refrigerator. Birthday Cake Lush is best enjoyed within 3-4 days for optimal freshness. However, be mindful that the sprinkles may start to lose their color over time.
Birthday Cake Lush Q&A
Can I make Birthday Cake Lush ahead of time?
Absolutely! In fact, it’s recommended to prepare it a day in advance. This allows the layers to set and the flavors to develop fully.
What can I use instead of Cool Whip?
You can use whipped heavy cream or whipped coconut cream as a substitute for Cool Whip. Just make sure to sweeten it slightly if desired.
Can I freeze Birthday Cake Lush?
While it’s best enjoyed fresh, you can freeze it for up to a month. Make sure to cover it well, and allow it to thaw in the refrigerator overnight before serving.
How do I make it more festive for a party?
Add additional toppings like colorful candy, edible glitter, or even a drizzle of chocolate sauce to elevate the Birthday Cake Lush for special occasions!
Final Bite
Birthday Cake Lush is more than just a dessert—it’s a celebration in a dish! With its vibrant layers and delightful flavors, it brings joy to any occasion. Whether you’re celebrating a birthday or simply indulging in a sweet treat, this luscious dessert will surely be a crowd-pleaser. So gather your ingredients, follow the steps, and get ready to enjoy a slice of happiness. Your friends and family will thank you for this delightful addition to their dessert table!

Birthday Cake Lush
Equipment
- 9x13 inch Baking Dish
- Mixing Bowls
- Spatula
- Whisk
- Measuring cups and spoons
- Food Processor
Ingredients
- 22 birthday cake-flavored Oreo cookies
- 4 tablespoons butter melted
- 1 box vanilla instant pudding mix 3.4-ounce
- 1/3 cup dry Funfetti cake mix
- 1 cup milk
- 1 container Cool Whip 16-ounce, divided
- 1/3 cup sprinkles plus extra for sprinkling on top
Instructions
Prepare the Crust
- Start by crushing the birthday cake-flavored Oreo cookies in a mixing bowl until fine crumbs form.
- Pour in the melted butter and mix until the mixture resembles wet sand.
Assemble the Crust
- Press the Oreo mixture firmly into the bottom of a 9x13-inch baking dish, making an even, compact layer.
- Place the dish in the refrigerator while you prepare the filling.
Make the Filling
- In a mixing bowl, combine the vanilla instant pudding mix and dry Funfetti cake mix; whisk together briefly.
- Add the milk and whisk until smooth and thickened, about 2 minutes.
- Gently fold in half of the Cool Whip (8 ounces) into the pudding mixture, keeping it light and airy.
Layer the Dessert
- Spread the pudding and Cool Whip mixture evenly over the crust in the baking dish.
- Top with the remaining Cool Whip (8 ounces), spreading gently to create a smooth top layer.
- Sprinkle 1/3 cup of sprinkles evenly over the top layer of Cool Whip; add extra sprinkles if desired.
Chill and Serve
- Cover the baking dish with plastic wrap and refrigerate for at least 4 hours or overnight for best results.
- Cut into squares and serve chilled. Enjoy your delicious Birthday Cake Lush!
Notes
- For best flavor and texture, chill the Birthday Cake Lush overnight to allow layers to set.
- Try swapping Oreo cookies or pudding mix for dietary preferences like gluten-free or sugar-free.
- Use a sharp knife to cut clean squares for attractive presentation.