I love the crunch of a perfectly fried nugget slathered in bright, buttery hot sauce. These boneless wings hit that spot: crisp exterior, tender chicken inside, and a sauce that clings to every piece. No fuss, just a dependable method you can repeat on weeknights or for a crowd.
In this post I’ll walk you through exactly what’s in the bowl, how to fry and sauce the pieces, what to watch for, and how to keep them tasting fresh. Expect practical tips, little fixes for common problems, and serving ideas that make these feel like delivery-level wings at home.
Follow the steps as written and you’ll get consistent results. I tested timing and order so the coating sets, the oil stays at the right temperature, and the sauce finishes while the last batch fries. Let’s get to it.
What’s in the Bowl
Ingredients
- 1 cup all-purpose flour — the main coating that crisps up in the oil.
- 1 tablespoon ground paprika — adds color and a mild smoky warmth to the crust.
- 1 teaspoon ground cayenne pepper — provides heat in the dry mix; adjust by dusting less on the shards.
- 1½ teaspoons garlic powder — savory backbone for the coating.
- 1 teaspoon kosher salt — seasons the flour so the coating isn’t bland.
- ½ teaspoon ground black pepper — a gentle peppery lift.
- 1½ pounds boneless, skinless chicken breasts (cut into 2-inch nuggets) — the protein; cutting evenly helps cook consistently.
- Vegetable oil (for frying) — neutral oil with a high smoke point; you’ll heat it to 360°F.
- 1 cup unsalted butter (2 sticks) — the sauce base that gives richness and helps the hot sauce cling.
- ½ cup Frank’s RedHot hot sauce — primary sauce flavor and tang.
- 2 tablespoons brown sugar — balances the heat with a mild molasses sweetness.
- 2 tablespoons honey — adds sticky gloss and extra sweetness.
- 2 tablespoons white vinegar — brightens the sauce and cuts through the butter.
- ½ tablespoon Worcestershire sauce — deepens the sauce with umami.
- ½ teaspoon ground cayenne pepper — extra kick in the sauce; reduces or omit to lower heat.
- ½ teaspoon garlic powder — echoes the garlic note from the coating in the sauce.
Boneless Wings in Steps
- Cut the 1½ pounds boneless, skinless chicken breasts into 2-inch nuggets; set aside.
- In a large zip-top bag combine 1 cup all-purpose flour, 1 tablespoon ground paprika, 1 teaspoon ground cayenne pepper, 1½ teaspoons garlic powder, 1 teaspoon kosher salt, and ½ teaspoon ground black pepper. Seal and shake the bag until the dry ingredients are fully mixed.
- Working in batches of about 10 pieces, add chicken nuggets to the bag, seal, and shake to coat each piece evenly. Remove the coated pieces and place them on a parchment-lined baking sheet. Repeat until all chicken is coated. Refrigerate the baking sheet for 10–30 minutes to help the coating adhere.
- While the chicken chills, pour vegetable oil into a large stockpot or Dutch oven to a depth of about 3 inches and heat the oil to 360°F (use a deep-fry thermometer).
- Fry the coated chicken in batches (about 10 pieces per batch), taking care not to overcrowd the pot. Fry each batch for 10–15 minutes, or until the pieces are crispy, browned, and cooked through (internal temperature 165°F). Use a slotted spoon to transfer fried pieces to a paper towel–lined plate to drain. Keep cooked pieces warm and continue with remaining batches.
- As you start frying the last batch of chicken, make the sauce: in a saucepan over medium-high heat combine 1 cup unsalted butter, ½ cup Frank’s RedHot hot sauce, 2 tablespoons brown sugar, 2 tablespoons honey, 2 tablespoons white vinegar, ½ tablespoon Worcestershire sauce, ½ teaspoon ground cayenne pepper, and ½ teaspoon garlic powder. Heat until the mixture just bubbles, then reduce the heat to a simmer. Whisk often and simmer for about 10–15 minutes.
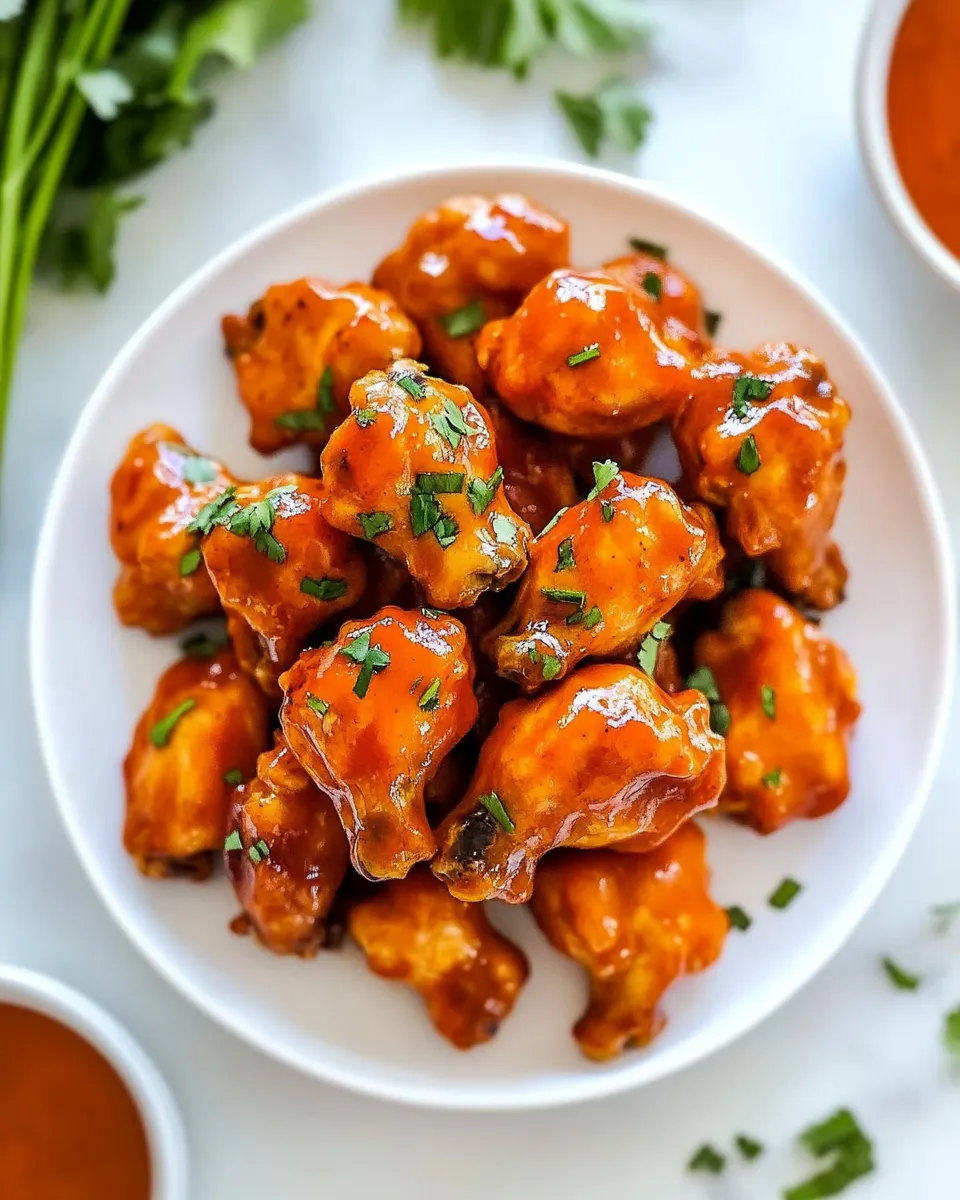
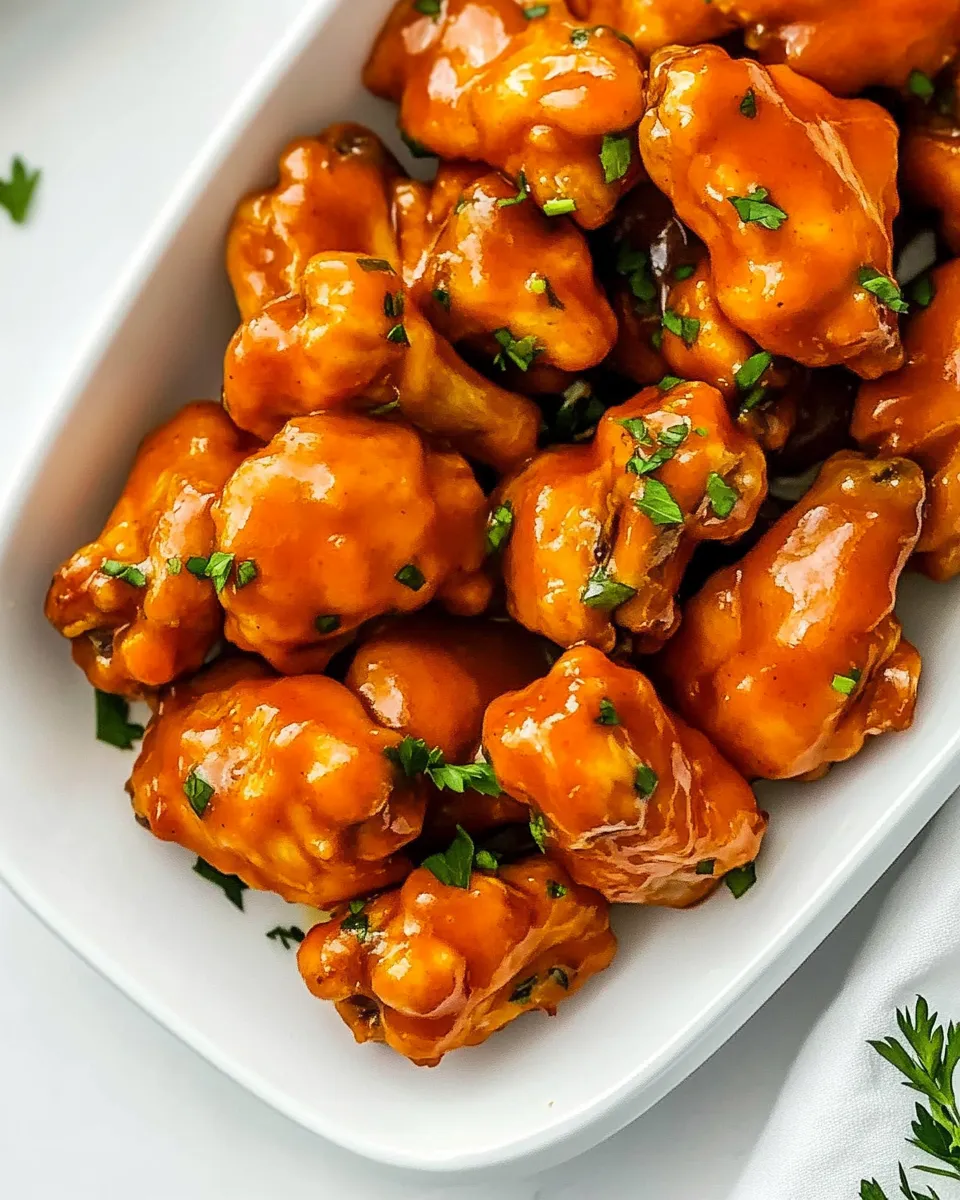
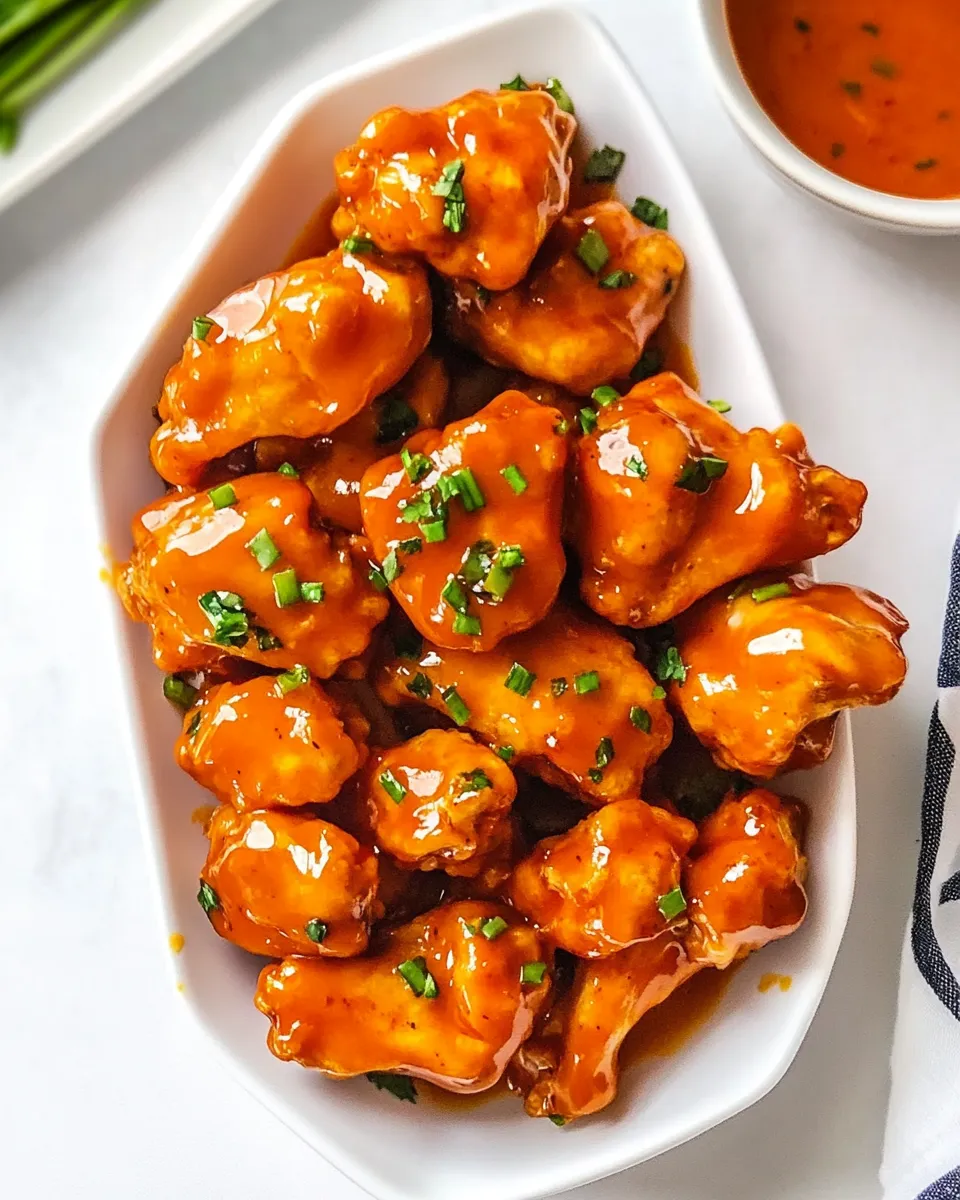
- Place all drained fried chicken in a large bowl. Pour the hot sauce over the chicken and toss until every piece is evenly coated.
- Serve the boneless wings immediately.
What Makes This Recipe Special

It’s the intersection of simple technique and timing. The dry flour mix flavors the crust while the brief chill helps it stick, so you don’t end up with clumps of coating falling off as you fry. Frying at a steady 360°F gives enough time for the interior to reach 165°F without burning the outside.
The sauce is cooked long enough to marry butter and hot sauce into a glossy, clingy finish. Simmering for 10–15 minutes concentrates flavors and gives the sugar and honey a chance to deepen without scorching. Tossing while hot ensures every nugget gets sauced evenly, so you get a balanced bite every time.
Texture-Safe Substitutions
- All-purpose flour — swap for a 1:1 gluten-free flour blend if you need gluten-free. Expect slightly different browning and crispness.
- Chicken breasts — use boneless skinless thighs for a juicier interior; cut into uniform pieces for even cooking.
- Vegetable oil — any neutral, high-smoke-point oil (like canola) works for frying.
- Frank’s RedHot — sub another vinegar-forward hot sauce to keep the same tang profile; adjust to taste.
- Unsalted butter — if you only have salted butter, reduce any additional salt in the dish and taste the sauce before serving.
Prep & Cook Tools
- Large zip-top bag — for mixing and coating the chicken without a mess.
- Parchment-lined baking sheet — holds coated pieces and lets them chill without sticking.
- Large stockpot or Dutch oven — deep enough for 3 inches of oil and steady frying.
- Deep-fry thermometer — essential for maintaining 360°F and consistent results.
- Slotted spoon or spider strainer — to remove pieces without carrying excess oil.
- Paper towels — for draining fried pieces between batches.
- Medium saucepan — for making the sauce while the last batch fries.
- Large mixing bowl — to toss the fried chicken with the hot sauce.
- Tongs — useful for transferring and arranging hot pieces.
Watch Outs & How to Fix
Soggy or flaking coating: If the coating slides off while frying, likely causes are too-wet chicken pieces or insufficient chilling. Fix it by patting the cut chicken dry before coating and allow the coated pieces to chill the full 10–30 minutes on the parchment-lined sheet. That rest helps the flour adhere.
Oil temperature too low: If the oil dips under 350°F when you add chicken, the pieces will absorb oil and become greasy. Fry fewer pieces per batch to prevent the temperature drop, and allow the oil to return to 360°F between batches.
Undercooked centers: Use an instant-read thermometer to check a few pieces; they should register 165°F. If the coating is dark but the interior is still under, lower the heat a bit and fry a touch longer so heat penetrates without burning the crust.
Thin or watery sauce: The sauce should simmer long enough to meld the butter and hot sauce. If it stays thin, keep simmering gently while stirring until it thickens slightly; remove from heat before it reduces too far.
Too spicy: Reduce the cayenne in the dry mix and the sauce. You can also balance heat with a touch more brown sugar or honey, but add tiny increments and taste as you go.
Seasonal Serving Ideas
Spring: Serve with a crisp slaw tossed in light vinaigrette and lemon wedges to brighten the richness.
Summer: Pair with grilled corn, a cucumber salad, and cold beer — the cool sides contrast nicely with the heat.
Fall: Add a warm roasted potato salad or maple-glazed root vegetables to play up the brown sugar and honey in the sauce.
Winter: Serve with creamy mashed potatoes or mac and cheese for a comforting, indulgent plate.
Recipe Notes & Chef’s Commentary
Make-ahead tips: You can coat the chicken and refrigerate it on the parchment-lined sheet for up to 2 hours before frying. Coated pieces held longer than that may become soggy as moisture migrates to the surface.
Batch frying rhythm: Start the sauce when you’re frying the last batch. That timing means the sauce will be ready to toss as soon as the final pieces drain. Keep finished pieces warm in a single layer on a baking sheet in a low oven (about 200°F) if you must hold them briefly.
Sauce texture: The butter-rich sauce is meant to be glossy and pourable. If you want a thicker glaze, reduce the sauce a little longer, but watch carefully to avoid breaking the butter. If the sauce does separate, whisk in a teaspoon of warm water off heat and re-emulsify gently.
Keep-It-Fresh Plan
Storage: Cool the wings to room temperature (no more than two hours), then place in an airtight container. Refrigerate for up to 3–4 days. The sauce will be absorbed into the crust over time, so expect softer coating on leftovers.
Freezing: For longer storage, freeze in a single layer on a tray until firm, then transfer to a freezer bag for up to 2 months. Reheat from frozen in a single layer on a baking sheet at 375°F until heated through and crisp again.
Reheating: Restore crispness by reheating in a 375°F oven or an air fryer for a few minutes. Microwave reheating will make them soft and is best only for a quick warm-up.
FAQ
Q: Can I bake these instead of frying?
A: You can, but the recipe as written is designed for deep frying to achieve the crispy crust and final texture. Baking will produce a milder, less uniformly crisp result. If you bake, spray the coated pieces with oil and bake on a preheated sheet at a high temperature, watching closely.
Q: Can I use drumettes or bone-in wings with this method?
A: This particular dredge and sauce approach works best with boneless nuggets for even cooking and consistent coverage. For bone-in wings, you’ll want a different frying time and possible double-fry technique to get the same exterior crunch.
Q: How can I make the sauce less spicy?
A: Reduce or omit the cayenne from both the dry mix and the sauce. Taste as the sauce simmers and add a bit more brown sugar or honey to balance heat if needed.
Q: Is it okay to use salted butter?
A: Yes, but cut back on any additional salt in the rest of the recipe and taste the sauce before serving. Salted butter will edge the sauce saltier than unsalted.
Ready to Cook?
Get your mise en place: chicken cut, coating mixed, thermometer and oil ready. Follow the steps in order, and you’ll have golden, sauced boneless wings that are crispy, saucy, and crowd-pleasing. Make a small batch first to dial in oil temperature and timing for your equipment. When you nail it, it becomes your go-to for game day, weeknight dinners, or feeding a hungry group.
When you make these, tell me how you adjusted the heat or what you served alongside them — I love hearing practical tweaks that work in real kitchens.
Boneless Wings
Equipment
- Baking Sheet
- Dutch Oven
- Deep Fry Oil Thermometer
Ingredients
Ingredients
- 1 cupall-purpose flour
- 1 tablespoonground paprika
- 1 teaspoonground cayenne pepper
- 1 1/2 teaspoonsgarlic powder
- 1 teaspoonkosher salt
- 1/2 teaspoonground black pepper
- 1 1/2 poundsboneless skinless chicken breasts(cut into 2-inch nuggets)
- Vegetable oil for frying
- 1 cupunsalted butter 2 sticks
- 1/2 cupFrank’s RedHot hot sauce
- 2 tablespoonsbrown sugar
- 2 tablespoonshoney
- 2 tablespoonswhite vinegar
- 1/2 tablespoonWorcestershire sauce
- 1/2 teaspoonground cayenne pepper
- 1/2 teaspoongarlic powder
Instructions
Instructions
- Cut the 1½ pounds boneless, skinless chicken breasts into 2-inch nuggets; set aside.
- In a large zip-top bag combine 1 cup all-purpose flour, 1 tablespoon ground paprika, 1 teaspoon ground cayenne pepper, 1½ teaspoons garlic powder, 1 teaspoon kosher salt, and ½ teaspoon ground black pepper. Seal and shake the bag until the dry ingredients are fully mixed.
- Working in batches of about 10 pieces, add chicken nuggets to the bag, seal, and shake to coat each piece evenly. Remove the coated pieces and place them on a parchment-lined baking sheet. Repeat until all chicken is coated. Refrigerate the baking sheet for 10–30 minutes to help the coating adhere.
- While the chicken chills, pour vegetable oil into a large stockpot or Dutch oven to a depth of about 3 inches and heat the oil to 360°F (use a deep-fry thermometer).
- Fry the coated chicken in batches (about 10 pieces per batch), taking care not to overcrowd the pot. Fry each batch for 10–15 minutes, or until the pieces are crispy, browned, and cooked through (internal temperature 165°F). Use a slotted spoon to transfer fried pieces to a paper towel–lined plate to drain. Keep cooked pieces warm and continue with remaining batches.
- As you start frying the last batch of chicken, make the sauce: in a saucepan over medium-high heat combine 1 cup unsalted butter, ½ cup Frank’s RedHot hot sauce, 2 tablespoons brown sugar, 2 tablespoons honey, 2 tablespoons white vinegar, ½ tablespoon Worcestershire sauce, ½ teaspoon ground cayenne pepper, and ½ teaspoon garlic powder. Heat until the mixture just bubbles, then reduce the heat to a simmer. Whisk often and simmer for about 10–15 minutes.
- Place all drained fried chicken in a large bowl. Pour the hot sauce over the chicken and toss until every piece is evenly coated.
- Serve the boneless wings immediately.
Notes
Always chill the chicken before frying to help set the breading.
I recommend using a deep-frying or instant-read thermometer to monitor the oil temperature. If it is too cold, the wings will turn greasy. Too hot, and the breading will burn while the meat stays raw.
Always let the oil return to temp between batches for the best results.
Keep cooked wings on a wire rack set over a baking sheet in a 250°F oven until all batches are done. They stay hot, crisp, and ready for sauce.
Let the wings rest on a wire rack or paper towels for 1-2 minutes before tossing them in the sauce. This helps lock drain excess grease, locking in crispness.
Use a good quality unsalted butter (European-style is best if you have it) for a silky sauce that clings to the wings instead of pooling at the bottom of the bowl.
Feel free to use any wing sauce you like on these boneless wings! If you’re not feeling the buffalo, try mylemon pepper wing sauce.
The spice level depends on the type of hot sauce you use and how much of it you add to the honey butter mixture.To make the wings spicier, add more hot sauce.To make them sweeter, add more honey.
To make the wings spicier, add more hot sauce.
To make them sweeter, add more honey.
Tobakethese wings, spray them lightly with nonstick spray or olive oil and bake in a 375°F oven for 30 minutes, flipping halfway.
Toair frythese wings, preheat your air fryer to 400°F and spray the basket with olive oil or nonstick spray. Arrange the wings in a single layer, spray with more oil, and air fry for 16 minutes, flipping halfway through.