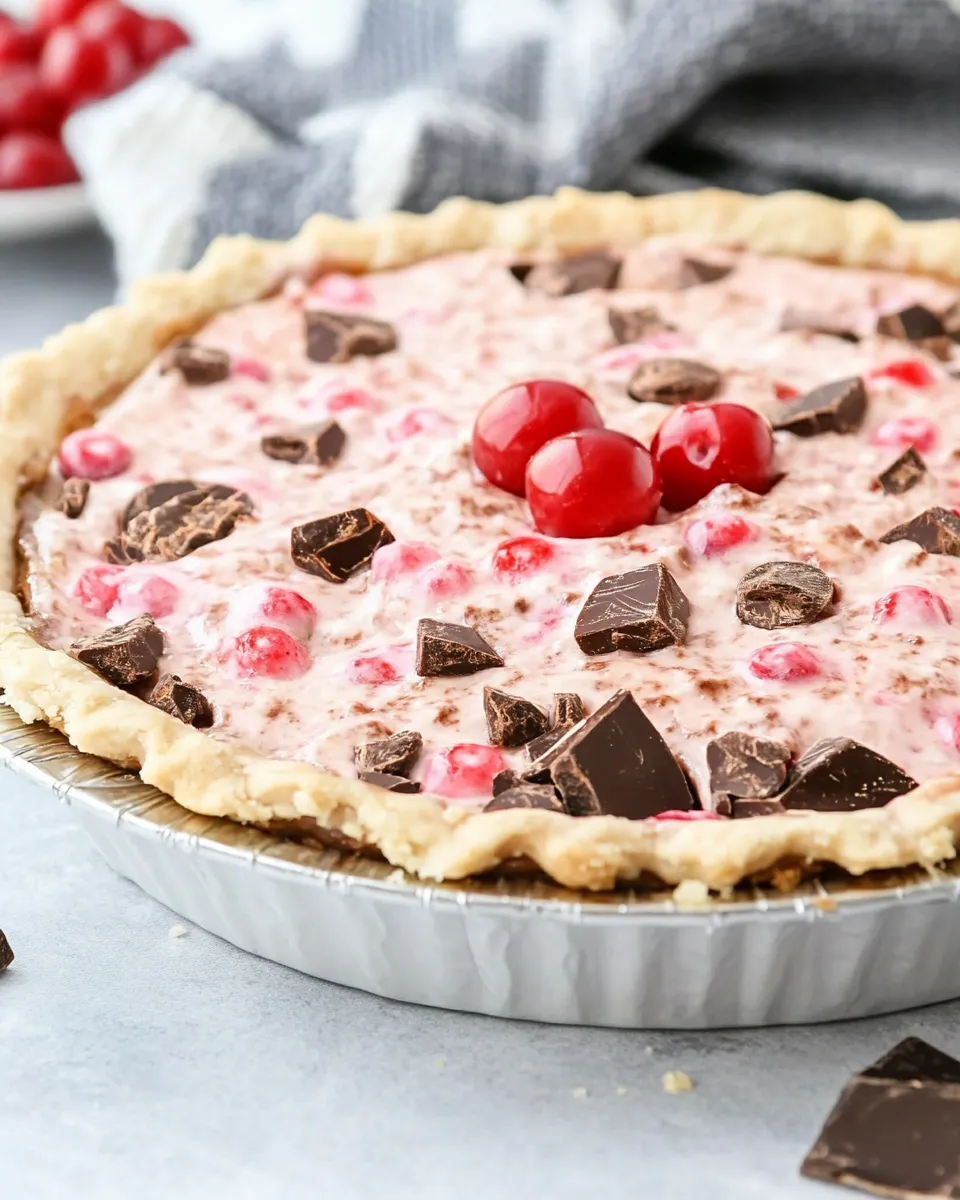
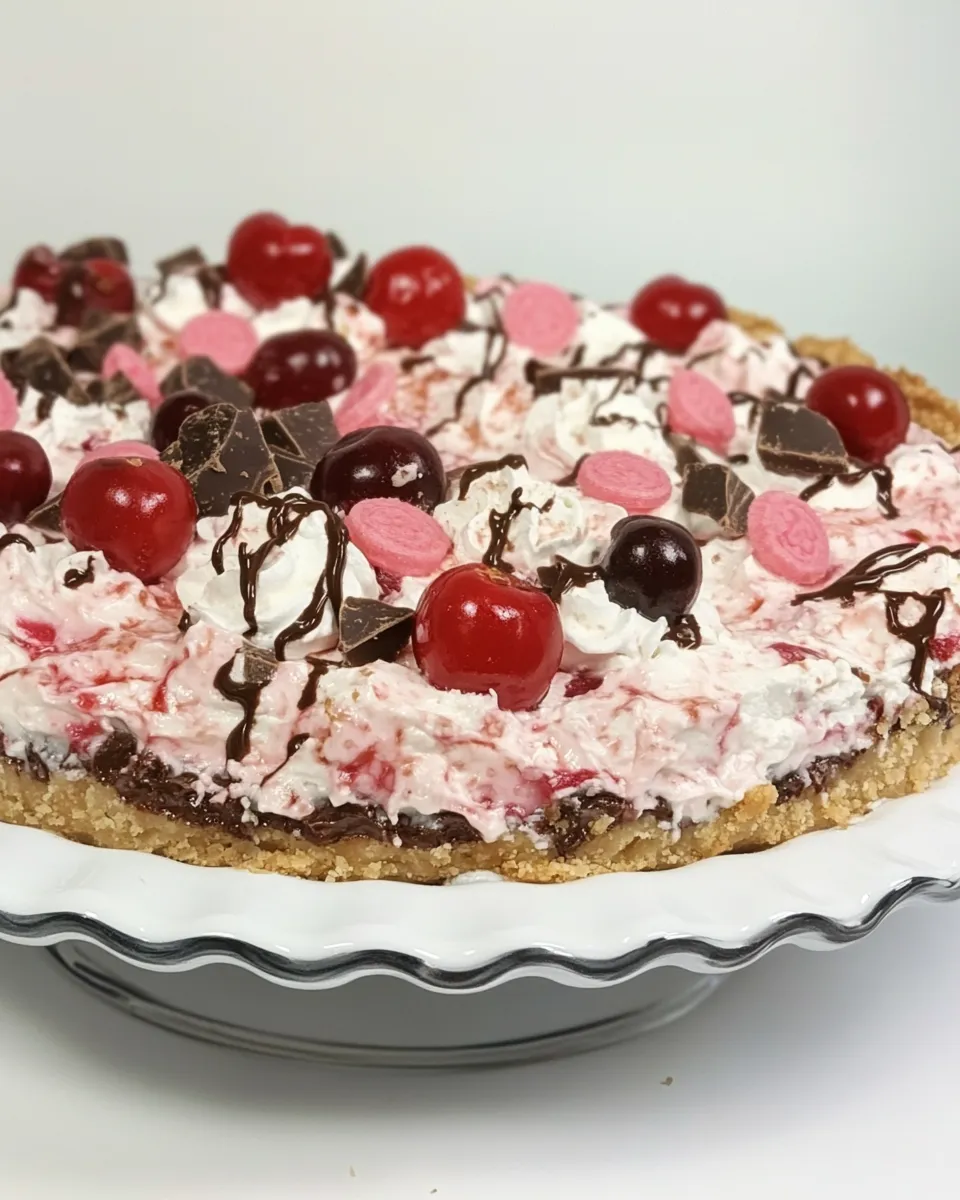
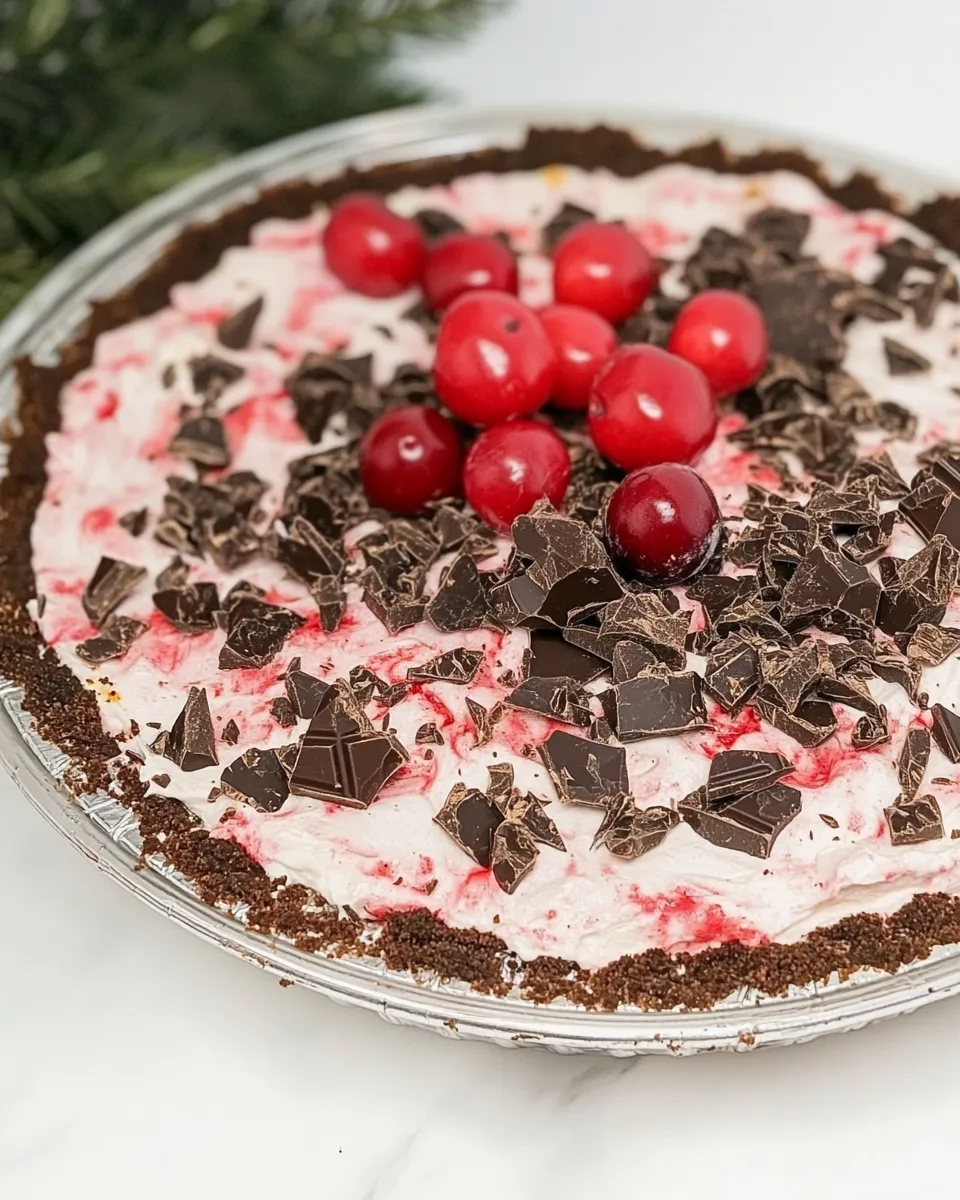
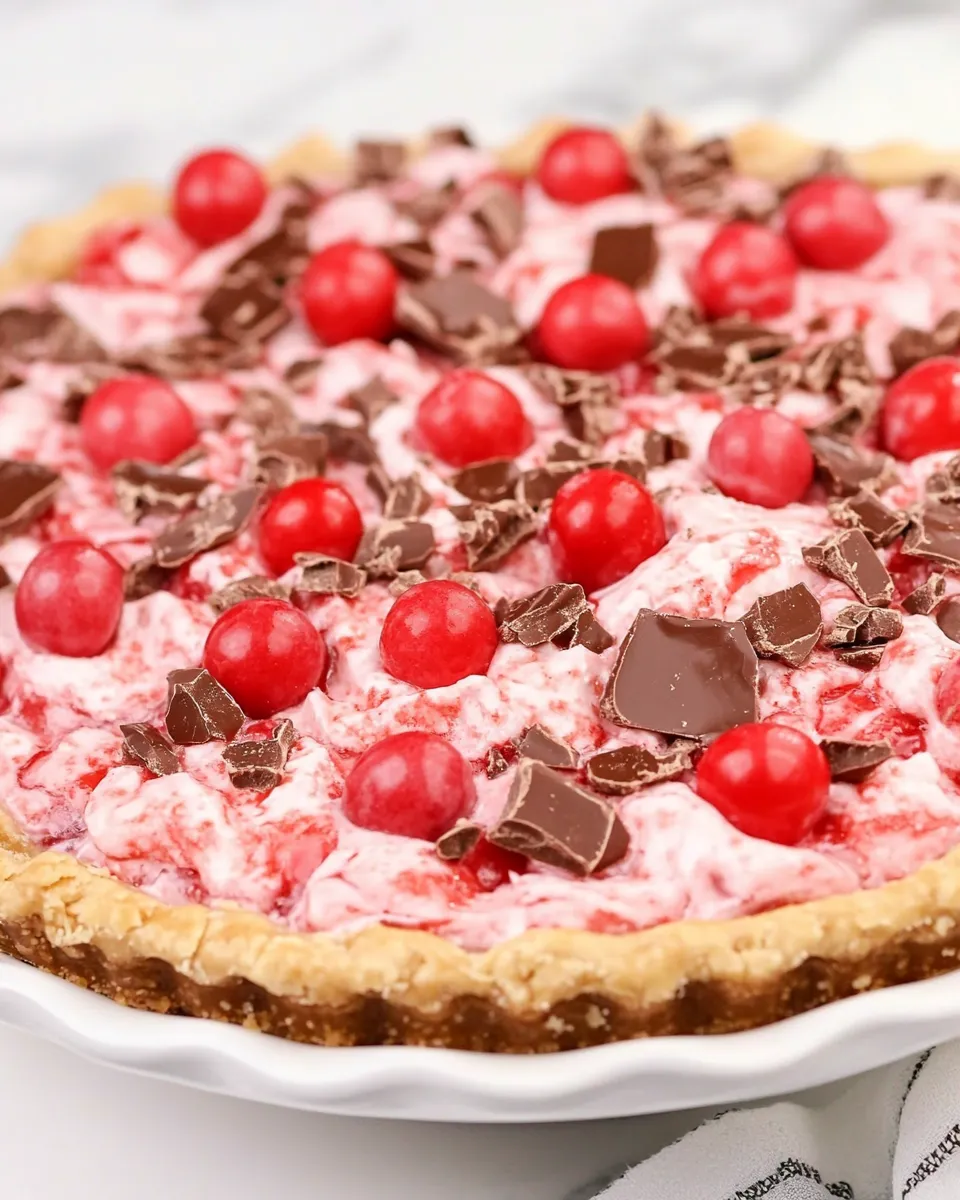
I love a dessert that looks like it took hours but really came together in minutes. This Chocolate Cherry Pie is exactly that: rich cream cheese blended with glossy cherry filling, folded into Cool Whip and studded with mini chocolate chips. It sits in a chocolate pie crust, chills until everything sets, and slices cleanly for a simple, celebratory finish.
There’s no baking required beyond the crust if you use a ready-made 9-inch chocolate pie crust, and the texture is creamy without being heavy. You can prep it the day before, which makes it a reliable go-to for dinners, potlucks, or weeknight treats.
Below I walk through the exact ingredients and the step-by-step method you should follow, plus practical swaps, the little things that can go wrong, and how to store leftovers so the pie keeps its best texture.
Shopping List
Gather everything before you start: one 9-inch chocolate pie crust, cream cheese softened to room temperature, powdered sugar, a 21-ounce can of cherry pie filling, Cool Whip, semi-sweet mini chocolate chips, and optional maraschino cherries for decoration. Read through the method once so you know when to reserve some chips for the top.
Ingredients
- 9inchchocolate pie crust — ready-made crust keeps this a no-bake recipe; pick a sturdy one so it supports the filling.
- 8ouncescream cheese(softened to room temperature) — gives the filling body and tang; soften until easily pierced with a finger for smooth mixing.
- 1cuppowdered sugar — sweetens and helps stabilize the cream cheese; sift if it’s clumpy.
- 21ouncecan of cherry pie filling — provides the fruity component and glossy color; drain a little if your filling seems overly watery.
- 8ouncesCool Whip(plus more for topping the pie) — lightens the mixture and makes it mousse-like; use thawed if frozen.
- 1½cupssemi-sweet mini chocolate chips(divided) — fold most into the filling and reserve 1/2 cup for a crunchy, chocolatey topping.
- Maraschino cherries(for optional decoration) — purely decorative and nostalgic; rinse and pat dry before placing on top so they don’t bleed into the Cool Whip.
Stepwise Method: Chocolate Cherry Pie
- In a medium mixing bowl, beat 8 ounces softened cream cheese and 1 cup powdered sugar with an electric mixer on medium speed until smooth and creamy, scraping down the sides as needed.
- Use a spatula to stir in the 21-ounce can of cherry pie filling until evenly combined.
- Gently fold 8 ounces Cool Whip into the cherry-and-cream cheese mixture with the spatula until no streaks remain.
- Reserve 1/2 cup of the 1½ cups semi-sweet mini chocolate chips for topping, then fold the remaining 1 cup of mini chips into the filling until evenly distributed.
- Spread the filling evenly into the 9-inch chocolate pie crust and smooth the top.
- Cover and refrigerate the pie for 3 to 4 hours, or until set.
- Before serving, top the pie with additional Cool Whip as desired, sprinkle with the reserved mini chocolate chips, and optionally garnish with maraschino cherries.
Why You’ll Keep Making It
This pie is forgiving and fast. There’s minimal prep, no heating of the oven, and the bulk of the flavor comes from pantry staples: cream cheese for richness, cherry pie filling for sweet-tart brightness, and chocolate chips for contrast. It hits multiple textures — creamy filling, soft crust, little chocolate bites — which keeps every forkful interesting.
I also love that it travels well. Make it for a gathering the night before and you’ll find it slices neatly and looks polished on a serving plate. It feels special without requiring special skills.
Swap Guide
- Crust: Swap the 9-inch chocolate pie crust for a graham cracker crust if you prefer a milder base, though the chocolate adds a nice counterpoint to the cherries.
- Cherry pie filling: If jarred cherry pie filling isn’t available, a thick cherry compote works — just cool it first.
- Chocolate chips: You can substitute mini chips with finely chopped chocolate bars for slightly larger chocolate pockets.
- Cool Whip: Use whipped heavy cream stabilized with a bit of powdered sugar if you want to avoid the store-bought topping; it will be lighter but more perishable.
Equipment at a Glance
- Medium mixing bowl — for beating the cream cheese and sugar.
- Electric mixer — speeds up getting the cream cheese smooth and lump-free.
- Spatula — for stirring in the cherry filling and folding in the Cool Whip and chips.
- 9-inch pie plate with chocolate pie crust — you can press into a store-bought crust or use a pre-baked one.
- Refrigerator space — the pie needs 3 to 4 hours to set, so clear a flat shelf.
Easy-to-Miss Gotchas
- Softening the cream cheese: If the cream cheese is cold, you’ll end up with lumps. Pull it out 30–60 minutes before starting so it mixes smooth.
- Reserving chips: Don’t forget to set aside the 1/2 cup of mini chips for the top. Folding them all in will leave you with a flat, less appealing finish.
- Overmixing Cool Whip: Fold gently. Vigorous mixing deflates the topping and gives a dense texture.
- Crust stability: Make sure your chocolate pie crust is intact and not cracked; a cracked crust can leak filling into the fridge and ruin presentation.
- Setting time: Cutting before the full 3 to 4 hours will make the slices sloppy. Give it time to firm up.
Dietary Swaps & Alternatives
- Dairy-free: Use a dairy-free cream cheese and a non-dairy stabilized whipped topping. Check that the pie crust is dairy-free as well.
- Lower sugar: There’s powdered sugar and sweet cherry filling in the recipe. You can try a reduced-sugar cherry filling, but texture and taste will differ.
- Gluten-free: Choose a certified gluten-free chocolate pie crust or make one from gluten-free cookies.
- Nut-free: This recipe is nut-free as written, but always check labels if serving to someone with severe allergies.
Author’s Commentary
I first started making this because I wanted an easy, make-ahead dessert that felt a little festive. Chocolate and cherry are a classic pair, and folding in mini chips rather than sprinkling chocolate on top keeps the texture consistent throughout the slice. The cream cheese gives just enough tang to prevent the pie from tasting flat or overly sweet.
Make it your own with small touches: a little shaved chocolate across the top for a refined look, or a scattering of toasted almonds if you want crunch. For family meals, I skip the fancy plating and let people help themselves; for company, take an extra minute to pipe a rim of Cool Whip and place maraschino cherries on each slice.
Storing Tips & Timelines
- Refrigerator: Store the pie covered tightly for up to 3 days. The filling will soften the crust slightly over time but remain tasty.
- Freezer: You can freeze the pie before topping with extra Cool Whip for up to 1 month. Thaw overnight in the fridge and add fresh Cool Whip and chips before serving.
- After slicing: Keep leftover slices in an airtight container in the fridge for up to 3 days.
- Avoid long room-temperature storage: Because the recipe contains Cool Whip and cream cheese, don’t leave the pie out more than 2 hours total.
Your Top Questions
- Can I make this without Cool Whip? — Yes. Whip 1 cup heavy cream with 1–2 tablespoons powdered sugar until soft peaks form, and gently fold it in. The texture will be slightly denser.
- Can I bake the pie crust? — If you’re using an unbaked chocolate crust, blind-bake according to the crust’s instructions before filling. Most store-bought chocolate crusts are ready-to-use.
- Will the pie be too sweet? — The cream cheese adds balance. If you prefer less sweetness, reduce the powdered sugar slightly, but pour a taste test after step 2 and adjust carefully.
- Can I use fresh cherries? — You can make a quick cherry compote with fresh cherries and some sugar, reduce it until thick, cool it, then use in place of the canned filling.
Ready to Cook?
Line up the ingredients, soften the cream cheese, and pre-chill a shelf in your fridge. Follow the steps exactly for a reliably glossy, creamy pie: beat, fold, reserve chips, chill, then finish with a flourish of Cool Whip and reserved chips. It’s one of those recipes that delivers both comfort and a little wow factor—without the fuss.
Chocolate Cherry Pie
Equipment
- Mixing Bowl
- Electric Mixer
- Spatula
- Refrigerator
Ingredients
Ingredients
- 9 inchchocolate pie crust
- 8 ouncescream cheese softened to room temperature
- 1 cuppowdered sugar
- 21 ouncecan of cherry pie filling
- 8 ouncesCool Whip plus more for topping the pie
- 1 1/2 cupssemi-sweet mini chocolate chips divided
- Maraschino cherries for optional decoration
Instructions
Instructions
- In a medium mixing bowl, beat 8 ounces softened cream cheese and 1 cup powdered sugar with an electric mixer on medium speed until smooth and creamy, scraping down the sides as needed.
- Use a spatula to stir in the 21-ounce can of cherry pie filling until evenly combined.
- Gently fold 8 ounces Cool Whip into the cherry-and-cream cheese mixture with the spatula until no streaks remain.
- Reserve 1/2 cup of the 1½ cups semi-sweet mini chocolate chips for topping, then fold the remaining 1 cup of mini chips into the filling until evenly distributed.
- Spread the filling evenly into the 9-inch chocolate pie crust and smooth the top.
- Cover and refrigerate the pie for 3 to 4 hours, or until set.
- Before serving, top the pie with additional Cool Whip as desired, sprinkle with the reserved mini chocolate chips, and optionally garnish with maraschino cherries.
Notes
Make sure the cream cheese is softened and the Cool Whip is completely thawed so that the ingredients will combine smoothly and you don’t end up with lumps in the pie.
Place your crust in the foil pie pan inside a glass pie plate for added stability when transporting it to and from the fridge.