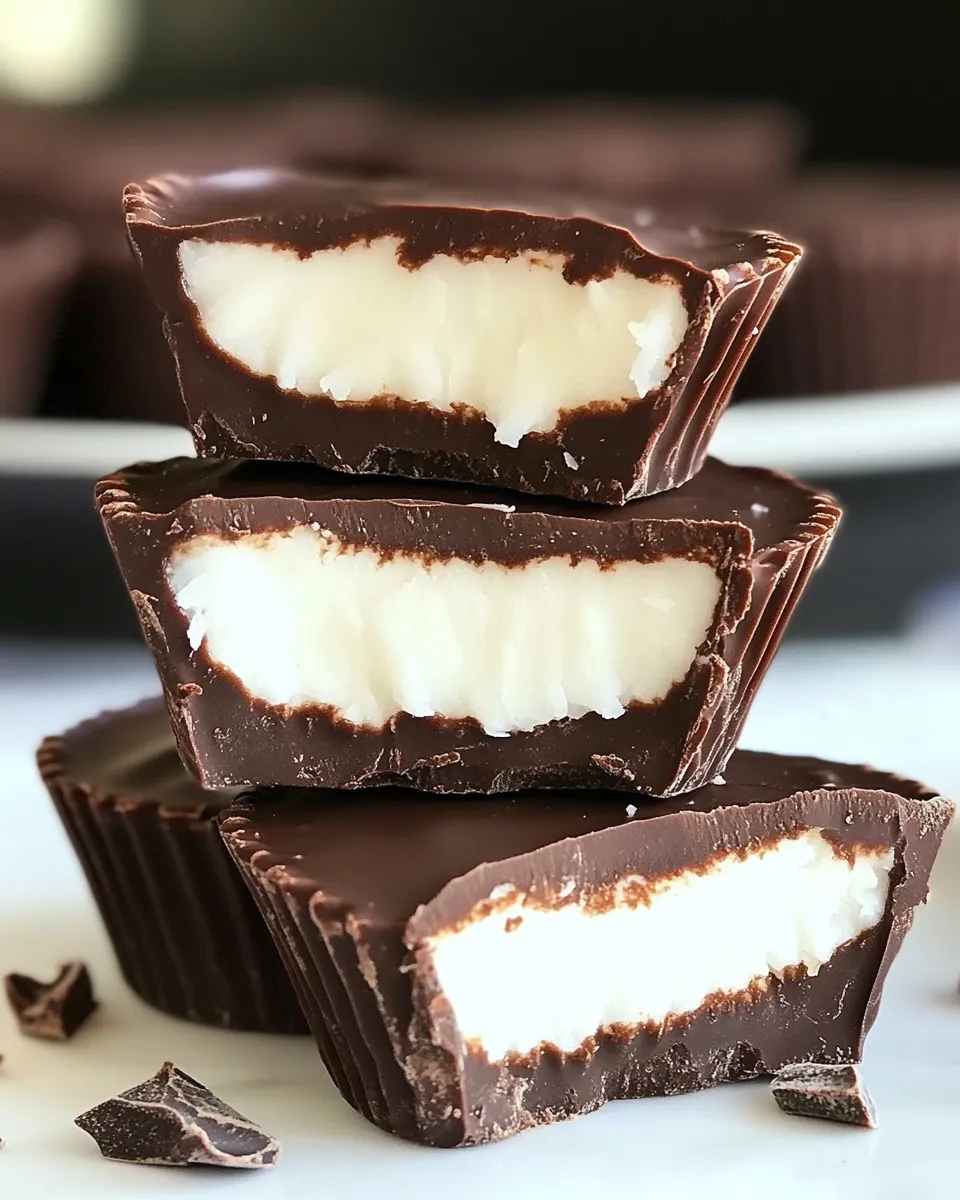
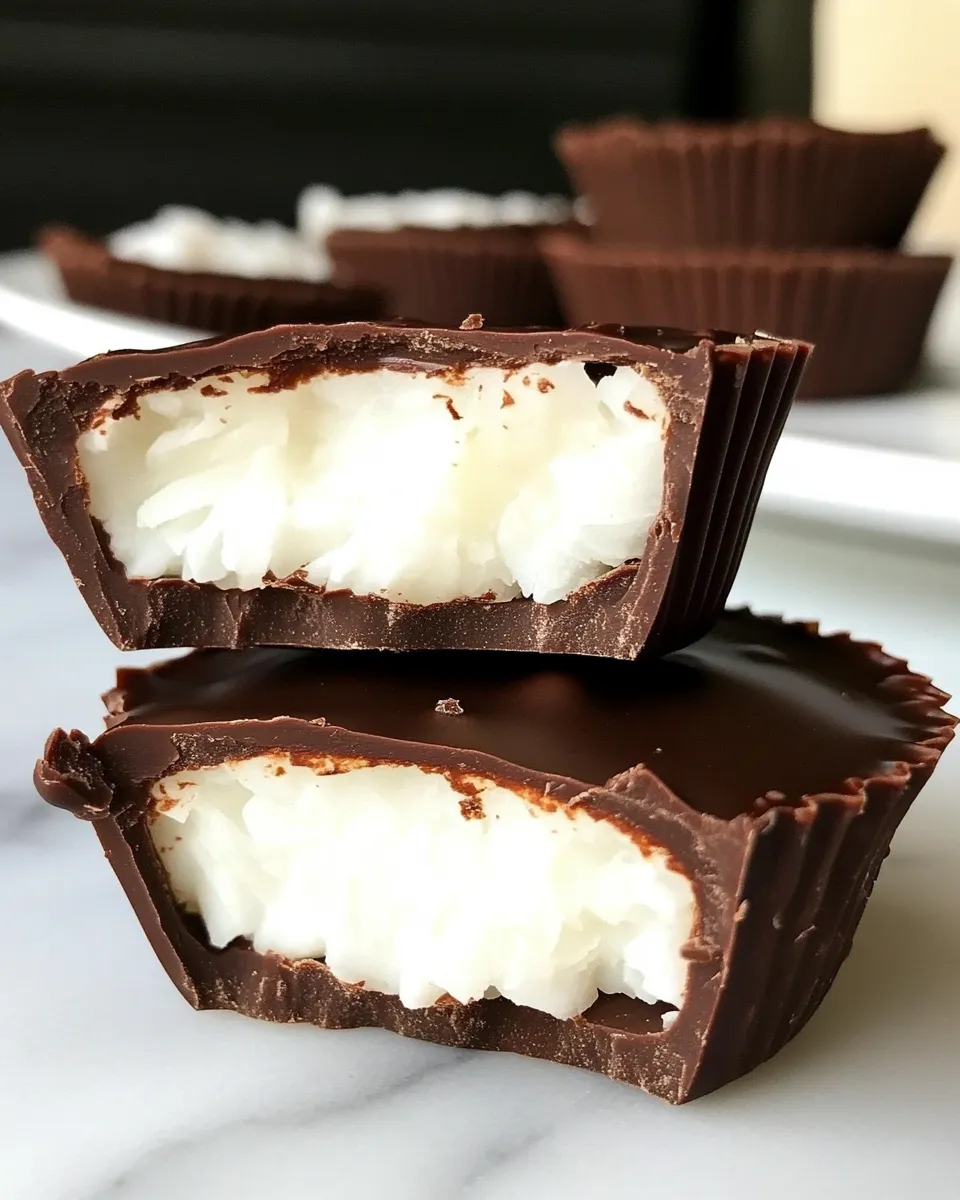
These little bites are one of my favorite make-ahead treats. They feel indulgent, but they’re simple to put together: a tender coconut filling bound with butter and powdered sugar, wrapped in a crisp layer of dark chocolate. No tempering, no fuss. Just a sensible microwave melt and a chill in the fridge.
I like to bake these when I want an easy homemade candy to give as gifts or to have on hand in the fridge for a quick sweet fix. They freeze well. They also give a satisfying mix of textures — the crisp chocolate shell and the slightly chewy coconut core — with a clean coconut-and-dark-chocolate flavor.
Below you’ll find a straightforward shopping guide, the exact ingredients and step-by-step method, troubleshooting tips, and storage advice. Read once, gather your tools and ingredients, then follow the steps in order. You’ll have a tray of pretty, reliable coconut cups in under an hour of active time.
Your Shopping Guide

When you shop, focus on a few quality points that make a big difference. Choose a good dark chocolate with a flavor you actually like; this is the outer shell, so it sets the tone. The recipe calls for dark chocolate in a specific weight — buy a bar or two rather than chips if you want cleaner melting and better texture.
For the filling, you don’t need exotic items. The list includes vanilla and coconut extracts, cream of coconut, and sweetened shredded coconut. A can of cream of coconut (not to be confused with coconut milk) is typically in the cocktail or baking aisle. If you spot refined coconut oil on the label you can use it in place of vegetable shortening — the recipe lists that option.
Finally, pick up some mini paper liners if you don’t already have them; they make removing the cups easy and keep the muffin tin clean. A small cookie scoop or a teaspoon will speed up assembly but they’re not strict requirements.
Ingredients
- ¼ cup (56.75g) unsalted butter, at room temperature — binds and gives a soft, buttery mouthfeel to the filling; room-temp makes it easy to beat.
- ½ teaspoon (0.5 teaspoon) vanilla extract — rounds the flavor and enhances the chocolate and coconut.
- ½ teaspoon (0.5 teaspoon) coconut extract — boosts coconut flavor; use sparingly because it’s concentrated.
- 2 tablespoons cream of coconut — adds creaminess and coconut sweetness to the filling (different from coconut milk).
- pinch of salt — balances sweetness and brightens flavor.
- 1½ cups (180g) powdered sugar — sweetens and helps firm the filling when combined with butter.
- 1 cup (90g) sweetened shredded coconut — provides texture and the coconut element inside the cups.
- 24 ounces (680.39g) dark chocolate, finely chopped — the coating; pick a quality chocolate you enjoy eating.
- ¼ cup (51.25g) vegetable shortening, or refined coconut oil — smooths the melted chocolate so it pours and sets with a glossy finish.
Dark Chocolate Coconut Cups: From Prep to Plate
- Line a mini-muffin tin with paper liners and line a baking sheet with parchment paper; set both aside.
- In a mixing bowl, beat the room-temperature butter on medium speed until smooth.
- Add the vanilla extract, coconut extract, cream of coconut, and a pinch of salt to the butter and beat until combined.
- With the mixer running slowly, add the powdered sugar a little at a time until fully incorporated and the mixture is smooth. Stir in the shredded coconut until evenly distributed. Set the coconut filling aside.
- Place the chopped dark chocolate and the vegetable shortening (or refined coconut oil) in a microwave-safe bowl. Microwave at 50% power in 30-second increments, stirring thoroughly after each increment, until the chocolate mixture is completely melted and smooth.
- Using a small cookie scoop or 1–2 teaspoons, spoon some melted chocolate into the bottom of each lined mini muffin cup so the bottom is covered; tap the tin lightly on the counter to level the chocolate if needed.
- Use a heaping teaspoon to scoop portions of the coconut filling onto the prepared parchment-lined baking sheet, shaping each scoop into a flat patty roughly the size needed to sit on top of the chocolate in a muffin cup. When finished, place the muffin tin and the baking sheet with the coconut patties in the refrigerator for about 30 minutes to firm.
- Remove the muffin tin and the patties from the refrigerator. Place one chilled coconut patty on top of the chocolate layer in each muffin cup.
- Spoon additional melted chocolate over and around each coconut patty to fully cover the filling and smooth the top. If the melted chocolate has firmed up while assembling, reheat it in the microwave at 50% power for 30 seconds and stir until smooth before using.
- Refrigerate the assembled cups for about 30 minutes, or until the chocolate is set.
- Store the finished dark chocolate coconut cups in the refrigerator or freezer for up to 1 month.
Why It Works Every Time

This recipe balances structure and flavor. The butter, powdered sugar, and cream of coconut form a dense, cohesive filling that holds together when chilled. Powdered sugar absorbs moisture and firms the mixture without the grittiness you’d get from granulated sugar.
The vegetable shortening (or refined coconut oil) in the melted chocolate makes the coating glossy and easier to pour. It thins the chocolate slightly so it spreads smoothly into the mini cups and re-hardens with a pleasant snap after chilling. Chilling the coconut patties before assembling prevents them from sinking or melting into the chocolate during the final coating. Follow the chilling steps and the assembly becomes predictable.
Swap Guide
There’s one explicit swap in the ingredient list: the vegetable shortening can be replaced with refined coconut oil. That keeps the flavor profile coconut-forward and still gives a smooth, shiny coating.
If you want a deeper chocolate note without changing the process, choose a higher-percentage dark chocolate. The method stays exactly the same; only your chocolate flavor changes.
What’s in the Gear List
- Mini-muffin tin and paper liners — shape and easy removal.
- Baking sheet and parchment paper — space to shape the coconut patties and prevent sticking.
- Mixing bowl and electric mixer — to beat the butter and incorporate powdered sugar smoothly.
- Microwave-safe bowl or double boiler — for melting chocolate with shortening safely.
- Small cookie scoop or teaspoons — for portion control and even-sized cups.
- Refrigerator — for chilling the patties and setting the chocolate.
Problems & Prevention
- Chocolate seizes or becomes grainy: Stir gently after each microwave interval and use 50% power. If moisture gets in, add a small amount of the vegetable shortening or refined coconut oil and stir until smooth.
- Filling too soft while assembling: Make sure the coconut patties are chilled firmly before placing them on the chocolate layer. If needed, return them to the fridge for extra time.
- Cups leak or filling shifts: Don’t overfill the cups with chocolate on the base layer. A thin, even base helps the patties sit level. Work efficiently when the chocolate is perfectly fluid; if it firms too much, warm briefly.
- Chocolate dulls or blooms: Keep the finished cups cold; rapid temperature swings can cause fat bloom. Store consistently in the refrigerator or freezer.
Customize for Your Needs
Want a firmer or softer filling? The texture is controlled by how much butter and powdered sugar you work in; this recipe is formulated for a firm, scoopable filling. If you prefer a chewier interior, be sure to use fully sweetened shredded coconut (as listed) and chill the patties well.
If you prefer a stronger coconut flavor, using the coconut extract as listed gives a clear coconut note without changing texture. And if you want the cups to be extra glossy, make sure the melted chocolate is smooth and fluid before you pour; a touch of shortening or refined coconut oil will help.
Cook’s Commentary
I make this recipe when I want a homemade candy that’s fast enough to prepare on a weeknight but pretty enough to gift. The steps are forgiving. If your timing is off and the chocolate firms, a short reheat at 50% power gets you back on track without risking scorch.
One small assembly trick I use: after you drop the chocolate base, tap the tin once on the counter to level the chocolate and remove air bubbles. It makes the finished cups look neater and helps the coconut patty sit flat.
Save for Later: Storage Tips
Store the finished dark chocolate coconut cups in an airtight container in the refrigerator for everyday snacking. For longer storage, place them in the freezer; the recipe notes they keep for up to 1 month in the refrigerator or freezer. If frozen, let them sit at room temperature for 5–10 minutes before serving so the chocolate softens slightly.
Layer pieces of parchment between stacked layers to prevent sticking. Bring to serving temperature directly from the refrigerator for a pleasantly firm bite, or allow a few minutes at room temperature for a softer texture.
Popular Questions
- Can I freeze these? Yes. The instructions state they can be stored in the refrigerator or freezer for up to 1 month.
- What do I do if the chocolate thickens while I’m assembling? Reheat it at 50% power in the microwave for 30 seconds and stir until smooth, as the directions recommend.
- How firm should the coconut patties be before assembly? Firm enough to pick up and transfer without deforming — chilling about 30 minutes should be sufficient.
- Do I need to temper the chocolate? No. The recipe uses a small amount of shortening or refined coconut oil to keep the chocolate glossy without tempering.
Hungry for More?
If you enjoyed these, keep them in rotation for easy gifts or a make-ahead treat. Once you get comfortable with the assembly rhythm, you’ll find them fast and reliable: melt, base layer, chill, top, and set. A few simple steps, a gorgeous result.
Dark Chocolate Coconut Cups
Equipment
- Mini Muffin Tin
- Paper liners
- Baking Sheet
- Parchment Paper
- Mixing Bowl
- Hand Mixer or Stand Mixer
- Microwave-safe Bowl
- Microwave
- small cookie scoop or teaspoon
- Refrigerator
Ingredients
Ingredients
- 1/4 cup 56.75 gunsalted butter, at room temperature
- 1/2 teaspoon 0.5 teaspoonvanilla extract
- 1/2 teaspoon 0.5 teaspooncoconut extract
- 2 tablespoonscream of coconut
- pinchof salt
- 1 1/2 cups 180 gpowdered sugar
- 1 cup 90 gsweetened shredded coconut
- 24 ounces 680.39 gdark chocolate, finely chopped
- 1/4 cup 51.25 gvegetable shortening, or refined coconut oil
Instructions
Instructions
- Line a mini-muffin tin with paper liners and line a baking sheet with parchment paper; set both aside.
- In a mixing bowl, beat the room-temperature butter on medium speed until smooth.
- Add the vanilla extract, coconut extract, cream of coconut, and a pinch of salt to the butter and beat until combined.
- With the mixer running slowly, add the powdered sugar a little at a time until fully incorporated and the mixture is smooth. Stir in the shredded coconut until evenly distributed. Set the coconut filling aside.
- Place the chopped dark chocolate and the vegetable shortening (or refined coconut oil) in a microwave-safe bowl. Microwave at 50% power in 30-second increments, stirring thoroughly after each increment, until the chocolate mixture is completely melted and smooth.
- Using a small cookie scoop or 1–2 teaspoons, spoon some melted chocolate into the bottom of each lined mini muffin cup so the bottom is covered; tap the tin lightly on the counter to level the chocolate if needed.
- Use a heaping teaspoon to scoop portions of the coconut filling onto the prepared parchment-lined baking sheet, shaping each scoop into a flat patty roughly the size needed to sit on top of the chocolate in a muffin cup. When finished, place the muffin tin and the baking sheet with the coconut patties in the refrigerator for about 30 minutes to firm.
- Remove the muffin tin and the patties from the refrigerator. Place one chilled coconut patty on top of the chocolate layer in each muffin cup.
- Spoon additional melted chocolate over and around each coconut patty to fully cover the filling and smooth the top. If the melted chocolate has firmed up while assembling, reheat it in the microwave at 50% power for 30 seconds and stir until smooth before using.
- Refrigerate the assembled cups for about 30 minutes, or until the chocolate is set.
- Store the finished dark chocolate coconut cups in the refrigerator or freezer for up to 1 month.
Notes
Nutritional values are based on one cup