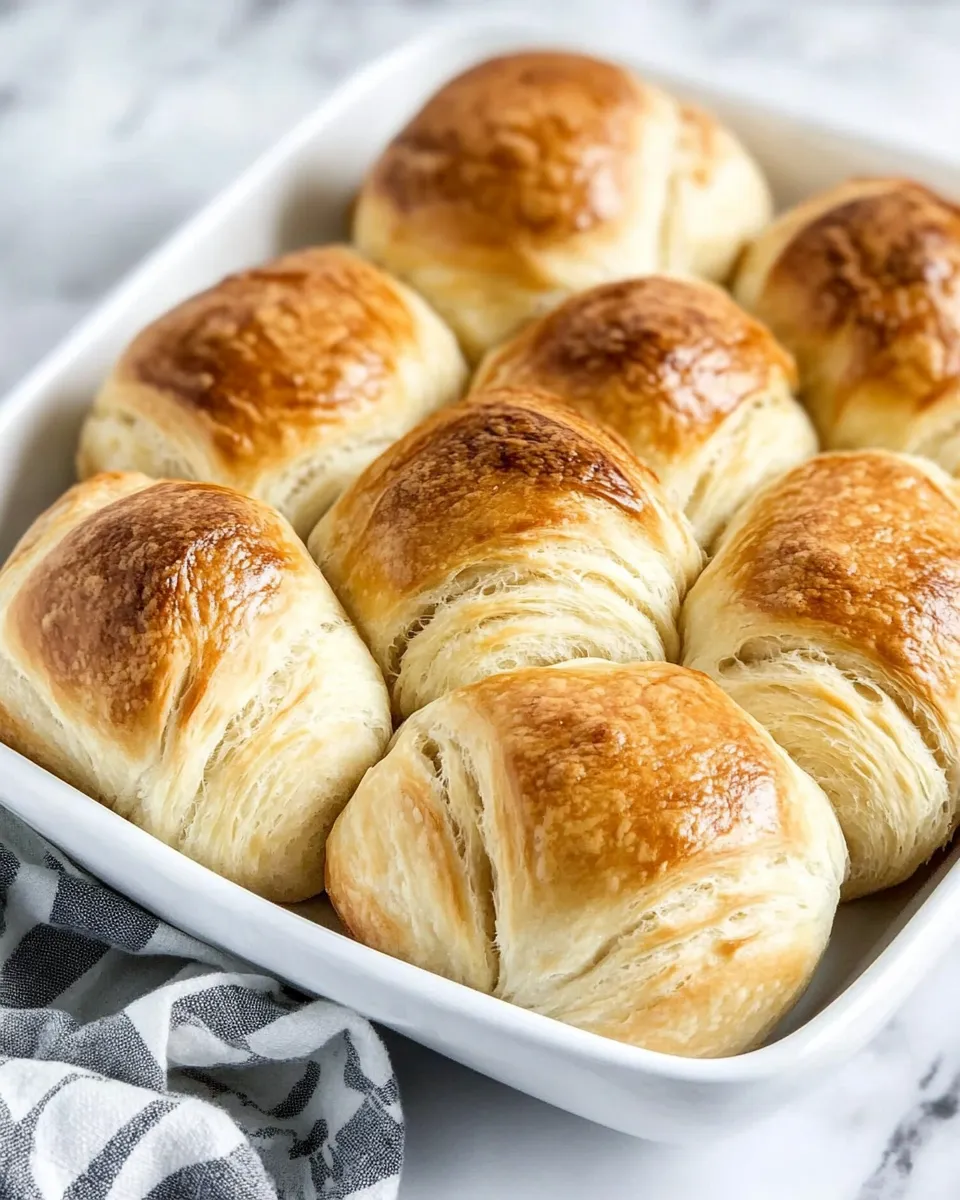
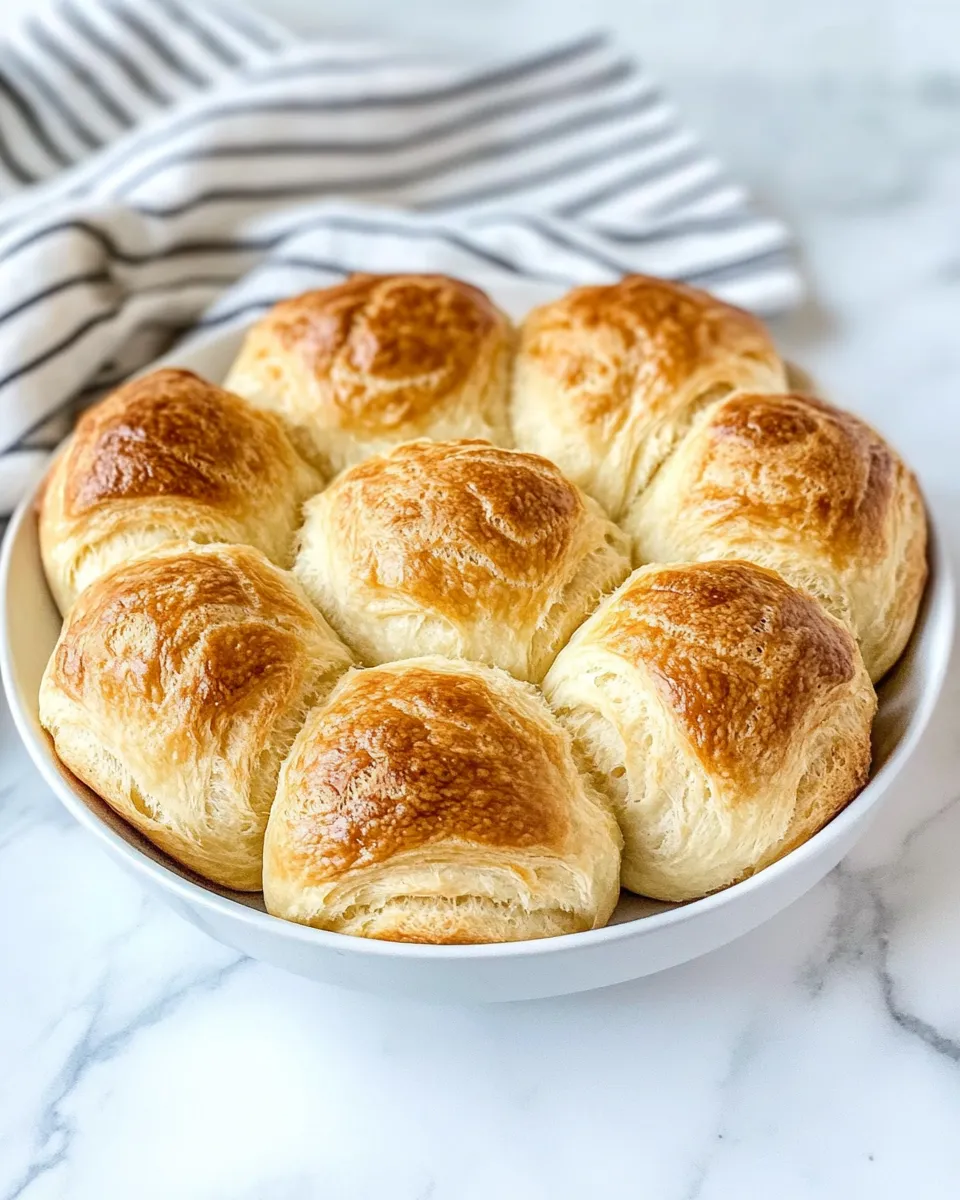
These flaky dinner rolls are exactly the kind of recipe I come back to when I want soft, layered bread without the intimidation. The method mixes a simple enriched dough with a couple of letter-folds and short freezes to build layers. The result: tender, buttery rolls with an almost croissant-like flakiness that still pull apart easily for sandwiches or a plain smear of butter.
I keep this recipe on rotation because it’s reliable and forgiving. You don’t need fancy flour or a pro-level mixer—just a little patience during the folds and a warm spot for the final rise. The steps are straightforward and listed in the exact order I follow every time, so you’ll know what comes next before you start.
Below you’ll find the ingredient list (with quick notes), the exact process, tools that matter, and practical tips for troubleshooting or scaling. Read through once, then bake. These rolls reward small, simple details: correct milk temperature, a tight jelly-roll roll, and a warm draft-free rise.
What You’ll Gather
Ingredients
- 1 cup warm milk (100 to 110°F) — can use skim, 2% or whole; this temperature wakes the yeast without killing it.
- 3 tablespoons granulated white sugar — feeds the yeast and adds a touch of sweetness for browning.
- One.25-ounce envelope active dry yeast (2¼ teaspoons) — leavening; verify freshness for reliable rise.
- 3 cups all purpose flour, divided — structure; some is added up front, the rest as needed while kneading.
- ¾ teaspoon salt — balances flavor and strengthens gluten.
- 3 tablespoons butter, at room temperature — folded into layers for flakiness and buttery flavor.
- cooking spray — prevents sticking in the muffin tin and helps the rolls brown evenly.
Cooking (Flaky Dinner Rolls): The Process
- Warm the milk to 100–110°F. Pour the warm milk into a large bowl, add the sugar and the yeast, stir to dissolve, and let sit 5 minutes until foamy.
- Add 2 3/4 cups of the flour and the salt to the yeast mixture. Stir until a rough dough forms.
- Turn the dough out onto a lightly floured surface. Knead until smooth, about 5 minutes. Add the remaining flour, 1 tablespoon at a time, only as needed to keep the dough from sticking to your hands—the dough should still feel slightly sticky.
- Shape the dough into a ball, cover with plastic wrap, and let it rest 10 minutes.
- Lightly flour a work surface (or the back of a baking sheet). Roll the dough into a roughly 12 x 10-inch rectangle.
- Spread the 3 tablespoons of room-temperature butter evenly over the rectangle.
- With a long side nearest you, fold the bottom third of the dough up toward the center, then fold the top third down over it (a letter fold) so you have a smaller rectangle. Cover with plastic wrap and place in the freezer for 10 minutes.
- Remove the dough from the freezer and remove the plastic wrap. Lightly flour the surface if needed and roll the dough again to a 12 x 10-inch rectangle.
- Repeat the butterless letter fold: fold the bottom third up, fold the top third down over it to form a smaller rectangle. Cover with plastic wrap and return to the freezer for 10 minutes.
- Remove the dough from the freezer and the plastic wrap. Roll the dough (still on the floured surface or baking sheet) into a 12 x 8-inch rectangle.
- Starting at a long side, roll the dough up jelly-roll style into a tight log. Pinch the seam to seal; do not seal the ends. Using a serrated knife, cut the log into 12 equal slices.
- Coat a 12-cup muffin tin with cooking spray. Place each slice, cut side up, into a muffin cup. Lightly spray the tops of the dough slices with cooking spray. Cover the muffin tin and let the rolls rise in a warm, draft-free place (about 85°F) until doubled in size, about 45 minutes.
- When the rolls have risen, preheat the oven to 375°F.
- Bake the rolls at 375°F for 20 minutes or until golden brown. Remove the rolls from the pan and cool on a wire rack for 5 minutes. Serve warm.
Why It’s My Go-To

This recipe sits in my regular rotation because it delivers layered texture without laminated dough techniques like multiple butter layers or long rests. Two short letter folds and a quick freeze create enough layering to give the rolls a delicate flake while still being soft inside. The process is brief compared to pastries that require hours of chilling.
It’s also adaptable. The dough is forgiving with milk fat; using skim versus whole changes richness but not structure. The final product still has enough buttery flavor to be special, and the muffin-tin approach means even browning and consistent shape—easy to serve and store.
International Equivalents
- United States — Known simply as dinner rolls; baked in a muffin tin here for evenly sized buns.
- France — Not a true “croissant,” but the letter-fold method yields a similarly flaky interior, like a simplified viennoiserie.
- United Kingdom — Comparable to soft tea rolls; softer crumb and richer than standard bread rolls.
- Scandinavia — Related in technique to some enriched buns, though those often use cardamom; you can add spices if you want a regional twist.
Essential Tools for Success
- Instant-read thermometer — To check the milk temperature (100–110°F). Critical: too hot kills yeast; too cool delays rise.
- Serrated knife — Cuts the roll log cleanly without squashing the layers.
- 12-cup muffin tin — Ensures even, uniform rolls as specified in the recipe.
- Rolling pin — For consistent rectangles; a floured work surface also helps.
- Plastic wrap — Keeps the dough from drying during short freezes and rises.
Common Errors (and Fixes)
Before Baking
- Milk too hot — If yeast doesn’t foam after step 1, milk may have been too hot. Start over or let it cool to 100–110°F and add fresh yeast.
- Dough too dry — If you add all the flour and it’s stiff, you can gently knead in a teaspoon of warm milk at a time to loosen it. The dough should stay slightly sticky.
During Folding/Rolling
- Butter melts or squeezes out — Work quickly and keep the butter at room temperature as directed; the brief freezes are there to firm things slightly. If butter oozes during rolling, chill the dough a few minutes until slightly firm.
- Roll isn’t tight — A loose jelly-roll will create uneven layers. Roll from the long side with moderate tension; pinch the seam to seal.
Proofing & Baking
- Rolls don’t puff — Check yeast freshness and the warm proofing spot. If your kitchen is cold, set the covered muffin tin in an oven with the light on or on top of a warm but turned-off appliance.
- Bottoms too brown — If the bottoms darken too quickly, reduce oven temperature by 10–15°F and extend baking by a few minutes until centers are done.
Season-by-Season Upgrades
- Spring — Add a light herb butter (chopped chives or parsley) brushed on right after baking for a fresh finish.
- Summer — Serve with chilled compound butters (lemon-herb or basil-garlic) for outdoor meals.
- Fall — Stir in a pinch of cinnamon or nutmeg to the dough for a warming touch; pair with roasted squash or stew.
- Winter — Brush with melted butter flavored with a bit of honey and salt right after baking for cozy sweetness.
Little Things that Matter
Small details change the final texture more than you’d expect. The milk temperature is the single most important control early on—100–110°F is the sweet spot for active dry yeast. Don’t be tempted to add all the flour at once; preserving slight stickiness gives a softer crumb. When you make the jelly-roll, keep a steady hand and apply even pressure so the layers stay uniform.
Another small but meaningful step: spraying the tops lightly with cooking spray before the final rise helps keep the surface from forming a skin and encourages a glossy, even crust rather than cracks.
Prep Ahead & Store
Make the dough through step 4, then cover and refrigerate for up to 24 hours for a slow, deeper flavor development. When ready, proceed with the folds, freezes, and roll shaping. If you want ready-to-bake rolls, prepare through step 11, place slices into sprayed muffin cups, cover, and refrigerate a few hours or overnight—bring them to room temperature and allow the final rise before baking.
Storage: Once baked and cooled, store rolls in an airtight container at room temperature for 2 days. For longer storage, freeze cooled rolls in a sealed bag for up to 2 months. Reheat at 300°F wrapped in foil for 10–15 minutes or microwave briefly from frozen.
Your Top Questions
Can I use instant yeast instead of active dry?
Yes. If using instant yeast, you can usually skip the 5-minute proof in warm milk and add it directly to the dry ingredients, though this recipe’s step of proofing in milk is gentle and effective—so if in doubt, follow the recipe as written.
Why the short freezes?
The 10-minute freezes chill the butter slightly and relax the dough between folds. This helps create distinct layers without a lengthy lamination process and keeps the butter from smearing out during rolling.
Can I make larger or smaller rolls?
Yes. For larger rolls, increase the slice thickness and use a larger pan, adjusting baking time upward slightly. For smaller sliders, cut thinner slices and reduce bake time. Keep an eye on color; golden brown is your cue.
Final Thoughts
These flaky dinner rolls bridge the line between simple bread and pastry. A few focused steps—timing the milk, preserving slight stickiness in the dough, two letter folds with brief chilling, and a tight jelly-roll—deliver a buttery, layered roll that’s easy to share. Follow the directions in order, and you’ll get consistent results.
Make a batch, serve them warm with butter, and take note of any tweaks you like for the next bake. Once you master the rhythm of rolling and folding, these become an effortless favorite for weeknight dinners and holiday spreads alike.
Flaky Dinner Rolls
Equipment
- Large Bowl
- Rolling Pin
- 12-cup muffin tin
- Plastic Wrap
- serrated knife
- Wire Rack
- Oven
- Freezer
Ingredients
Ingredients
- 1 cupwarm milk 100 to 110°F- can use skim, 2% or whole
- 3 tablespoonsgranulated white sugar
- One.25-ounce envelopeactive dry yeast 2 1/4 teaspoons
- 3 cupsall purpose flour divided
- 3/4 teaspoonsalt
- 3 tablespoonsbutter at room temperature
- cooking spray
Instructions
Instructions
- Warm the milk to 100–110°F. Pour the warm milk into a large bowl, add the sugar and the yeast, stir to dissolve, and let sit 5 minutes until foamy.
- Add 2 3/4 cups of the flour and the salt to the yeast mixture. Stir until a rough dough forms.
- Turn the dough out onto a lightly floured surface. Knead until smooth, about 5 minutes. Add the remaining flour, 1 tablespoon at a time, only as needed to keep the dough from sticking to your hands—the dough should still feel slightly sticky.
- Shape the dough into a ball, cover with plastic wrap, and let it rest 10 minutes.
- Lightly flour a work surface (or the back of a baking sheet). Roll the dough into a roughly 12 x 10-inch rectangle.
- Spread the 3 tablespoons of room-temperature butter evenly over the rectangle.
- With a long side nearest you, fold the bottom third of the dough up toward the center, then fold the top third down over it (a letter fold) so you have a smaller rectangle. Cover with plastic wrap and place in the freezer for 10 minutes.
- Remove the dough from the freezer and remove the plastic wrap. Lightly flour the surface if needed and roll the dough again to a 12 x 10-inch rectangle.
- Repeat the butterless letter fold: fold the bottom third up, fold the top third down over it to form a smaller rectangle. Cover with plastic wrap and return to the freezer for 10 minutes.
- Remove the dough from the freezer and the plastic wrap. Roll the dough (still on the floured surface or baking sheet) into a 12 x 8-inch rectangle.
- Starting at a long side, roll the dough up jelly-roll style into a tight log. Pinch the seam to seal; do not seal the ends. Using a serrated knife, cut the log into 12 equal slices.
- Coat a 12-cup muffin tin with cooking spray. Place each slice, cut side up, into a muffin cup. Lightly spray the tops of the dough slices with cooking spray. Cover the muffin tin and let the rolls rise in a warm, draft-free place (about 85°F) until doubled in size, about 45 minutes.
- When the rolls have risen, preheat the oven to 375°F.
- Bake the rolls at 375°F for 20 minutes or until golden brown. Remove the rolls from the pan and cool on a wire rack for 5 minutes. Serve warm.
Notes
*It’s best to bake these rolls in a muffin tin, which will help them keep their shape. They’ll flatten out more if baked on a baking sheet.
*If you don’t have a warm place for rising, use your oven if it’s available. Give it a 60 second heat-up, and then turn it OFF. Turn on the oven light and use the inside of the oven for your rising.
*These are easy to warm up, and they’re still great as leftovers a day or two after baking.