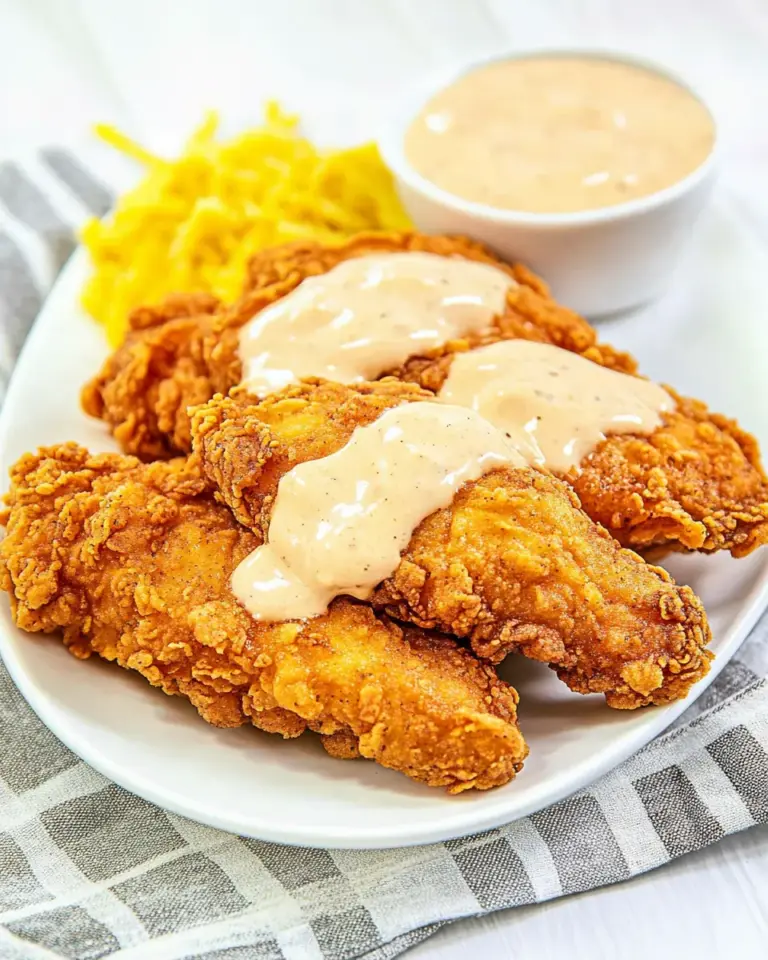
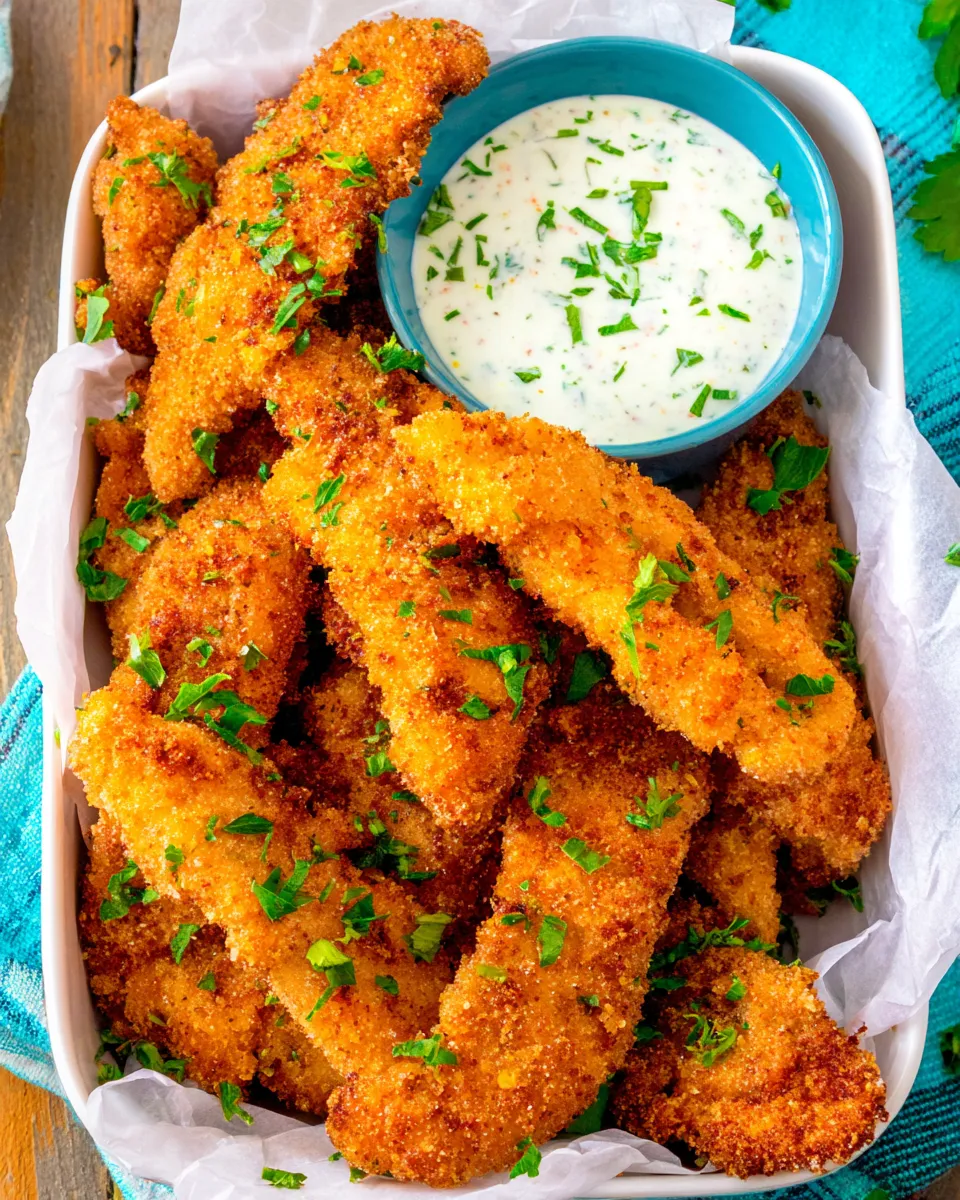
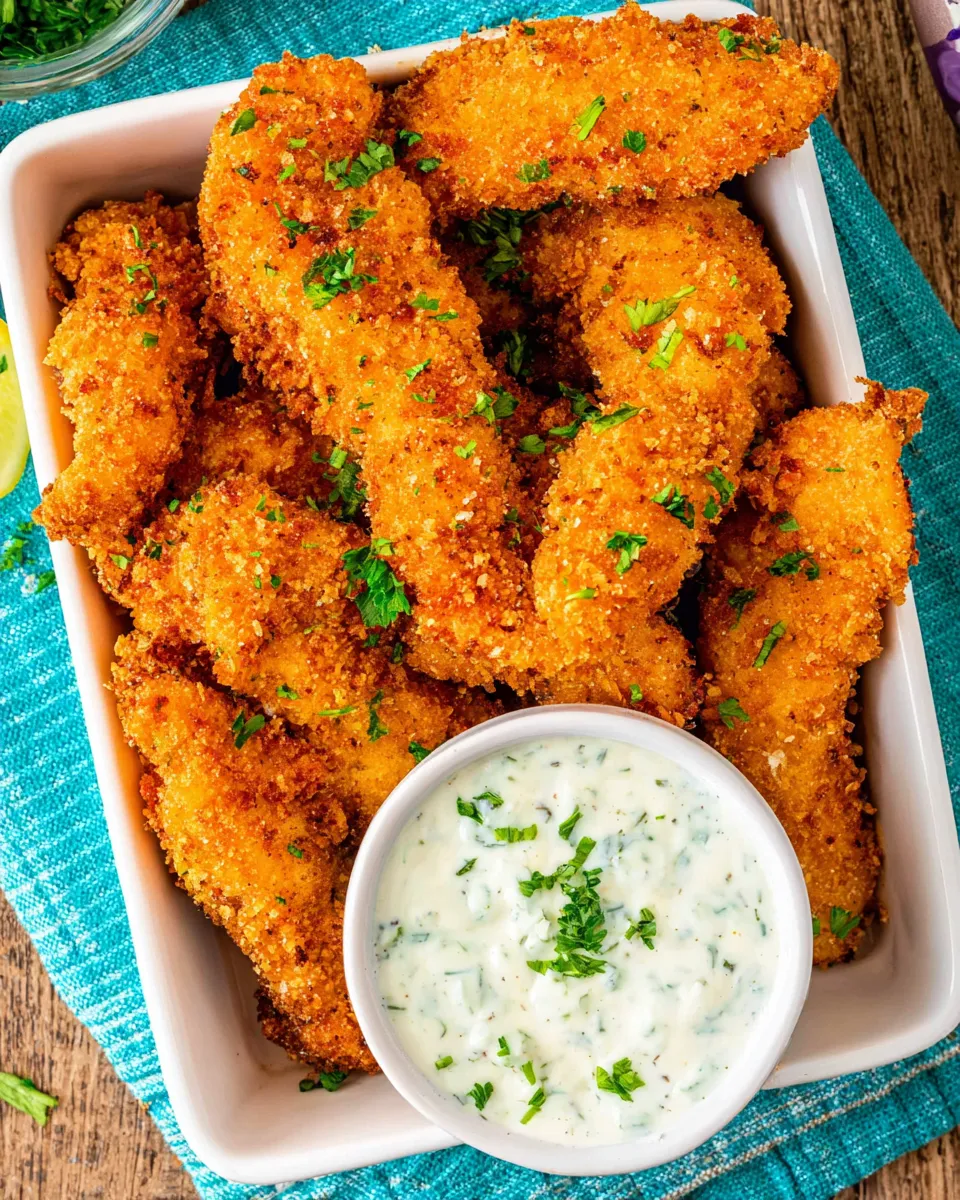
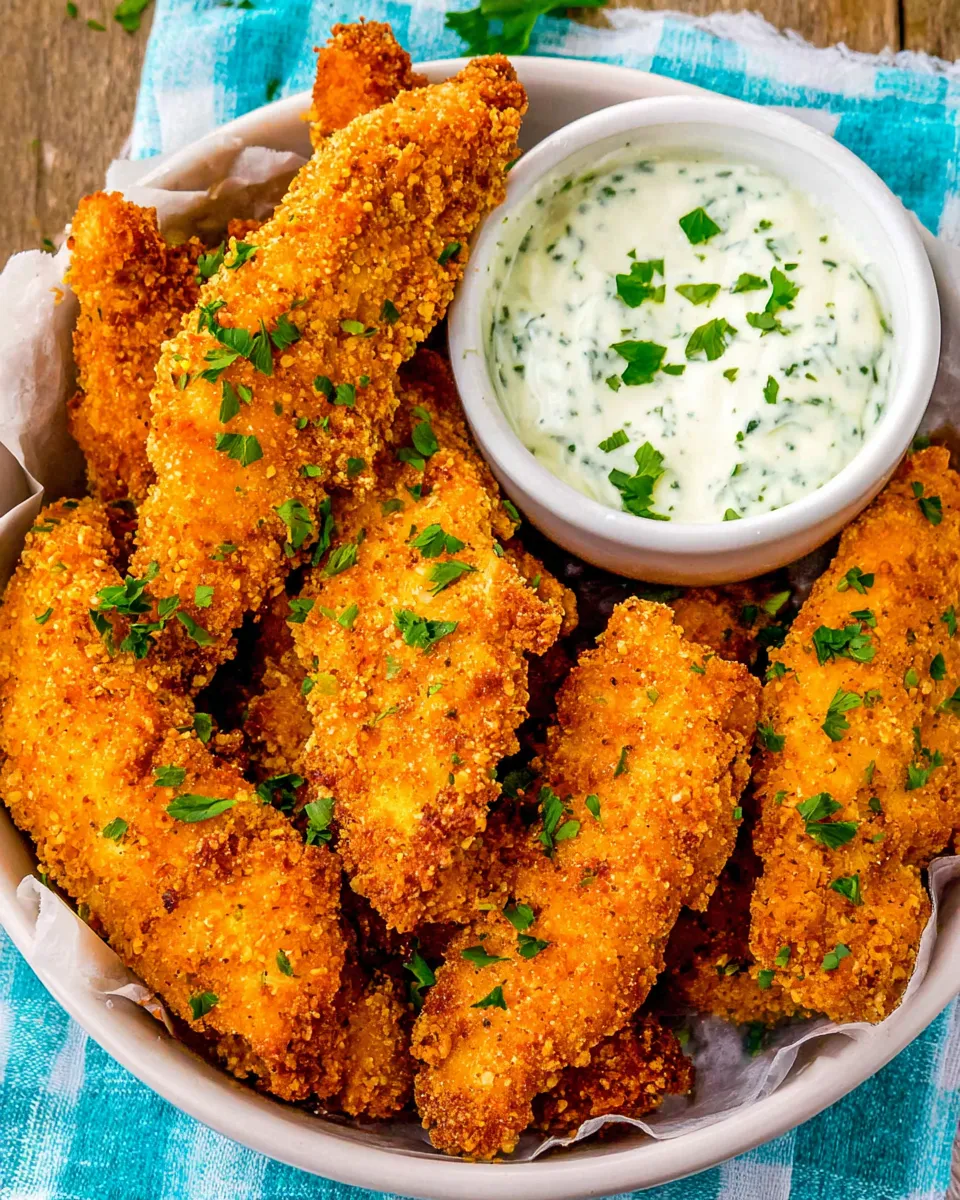
There’s something undeniably comforting about golden, crunchy chicken fingers with a punchy ranch flavor. This version turns simple pantry staples into a crave-worthy snack or meal that’s perfect for weeknight dinners, game-day spreads, or a kid-approved lunchbox. With a crisp panko crust and a seasoned flour dredge, these Ranch Chicken Fingers are juicy on the inside and satisfyingly crunchy on the outside. The recipe is straightforward, uses common ingredients, and comes together quickly—exactly the kind of recipe you’ll want to keep on rotation.
Why you’ll love this recipe
- Quick prep: Minimal ingredients and a short assembly time mean dinner is doable on busy nights.
- Textural contrast: A seasoned flour layer plus panko creates extra-crispy chicken fingers that stay tender inside.
- Family-friendly: Mild but flavorful, these are a hit with kids and adults alike.
- Flexible serving: Serve with your favorite dipping sauce, tucked into wraps, or alongside a bright salad.
Ingredients
Use the ingredient list below exactly as written for the best result. Quantities are precise for consistent cooking.
- 1 1/4 pounds chicken tenders
- 1 packet Ranch seasoning mix, I use Hidden Valley
- 1/2 cup flour, plus 1/3 cup flour
- 1 cup Panko crumbs
- 1/2 teaspoons salt
- 2 eggs
- 2 tablespoons water
- Peanut or Vegetable oil
Equipment
- Three shallow bowls or pie plates for dredging
- Large skillet or frying pan
- Tongs or a fork for flipping
- Paper towels and a wire rack (optional) for draining
Prep and planning notes
Before you start, choose a neutral oil with a high smoke point like peanut or vegetable oil for frying. Measure each flour amount separately: 1/2 cup and 1/3 cup are both needed for different steps in the coating. The packet of ranch seasoning brings the bold flavor—use the brand you prefer. If you prefer to bake instead of pan-fry, you can bake at a moderate temperature, but for authentic crunch and quick results, pan-frying is recommended.
Step-by-step instructions

Follow these steps to make perfectly crisp Ranch Chicken Fingers. I’ve rewritten the original directions into clear, numbered steps while keeping the ingredient amounts and order intact.
- Get your dredging stations ready. Place 1/2 cup flour in the first shallow bowl. In a second shallow bowl, crack the 2 eggs and add the 2 tablespoons water; whisk until smooth. In the third shallow bowl, combine the 1 cup Panko crumbs, the 1 packet Ranch seasoning mix (I use Hidden Valley), and the 1/2 teaspoons salt. Stir the panko mixture so the seasoning is evenly distributed.
- Prepare an additional flour portion for a double-dredge. Put the 1/3 cup flour into a small bowl or plate. This extra flour will be used in the sequence outlined below to help the egg and panko adhere better and create a sturdier crust.
- Dry the chicken tenders. Pat the 1 1/4 pounds chicken tenders dry with paper towels. Drying them removes excess moisture so the coatings adhere and the crust crisps properly.
- First flour coat. Working one piece at a time, dredge each chicken tender in the 1/2 cup flour from the first bowl. Shake off any excess flour. The goal is a light, even dusting—not a heavy paste.
- Egg wash. Dip the floured chicken tender into the egg and water mixture, fully coating it. Allow any excess egg to drip back into the bowl.
- Second, light flour coat for better adhesion. After the egg dip, lightly dredge the chicken tender in the 1/3 cup flour. This additional light flour layer helps the panko stick and builds a crisp exterior.
- Panko coating. Press the chicken tender into the panko and ranch-salt mixture, coating evenly. Press gently so the crumbs adhere well and create a uniform crust. Place each coated tender on a clean plate or tray while you finish the rest.
- Heat the oil. Pour enough peanut or vegetable oil into a large skillet to reach about 1/4 inch depth—this is shallow frying. Heat the oil over medium heat until it shimmers but does not smoke. A drop of water flicked into the oil should sizzle immediately.
- Fry the chicken fingers. Carefully add the coated chicken tenders to the hot oil in a single layer without crowding the pan. Cook for approximately 3 to 4 minutes on the first side, or until the underside is golden brown. Flip and cook another 3 to 4 minutes on the second side, until the coating is evenly golden and the chicken registers 165°F (74°C) at the thickest part. Timing may vary slightly depending on tender size and oil temperature.
- Drain and rest. Use tongs to transfer the cooked chicken fingers to a plate lined with paper towels to absorb excess oil, or place them on a wire rack set over a baking sheet for crisper results. Let them rest for 2 to 3 minutes before serving so juices redistribute and the crust firms up.
- Repeat with remaining tenders. Continue frying the rest of the chicken fingers in batches, reheating the oil between batches if needed so the oil temperature remains steady.
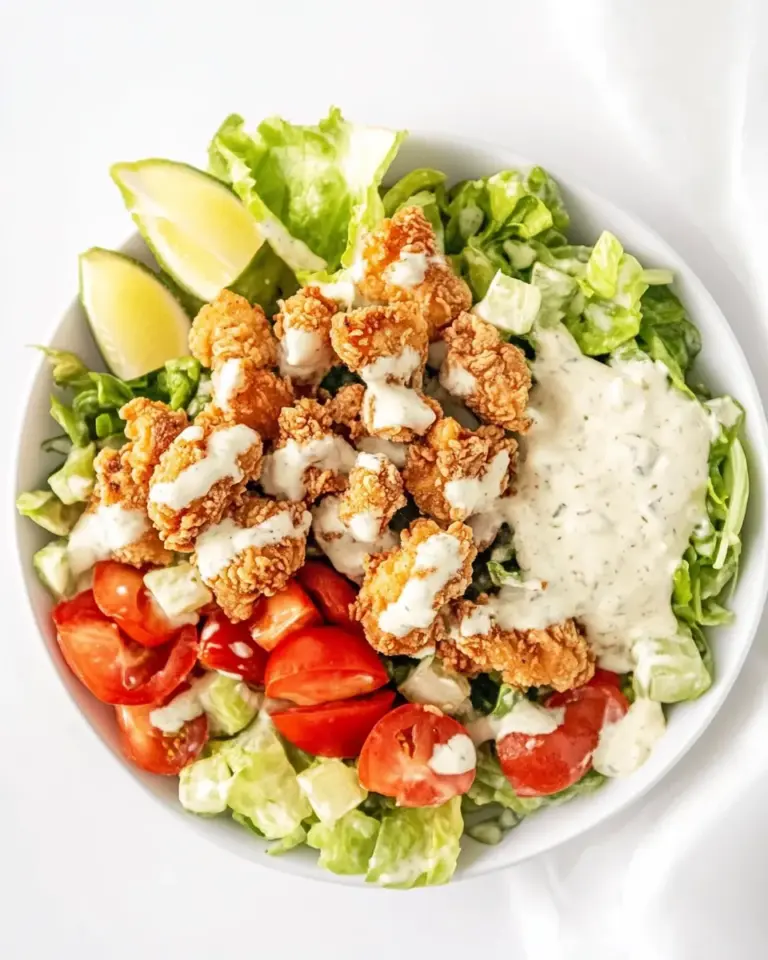
- Serve. Plate your Ranch Chicken Fingers with your favorite dipping sauces—ranch dressing, honey mustard, or a spicy ketchup are classic choices. They also pair well with a simple green salad, roasted vegetables, or fries.
Tips for success
- If you prefer an extra-crispy finish, finish the fried tenders on a wire rack in a 200°F oven for 5 minutes after frying. This helps maintain crispness without overcooking.
- Do not overcrowd the pan when frying. Crowding lowers the oil temperature and results in greasier chicken fingers.
- Keep an eye on oil temperature. If the oil browns too quickly, lower the heat slightly so the chicken cooks through without burning the crust.
- For a lighter version, you can bake the chicken fingers on a parchment-lined sheet at 425°F for 12–15 minutes, flipping halfway through, though the crust will be a bit less crisp than the pan-fried method.
- Swap Panko for finely crushed cornflakes for an alternative crunch that browns beautifully.
Make-ahead and storage
You can bread the chicken tenders up to a day ahead and keep them covered in the refrigerator on a baking sheet. Fry just before serving for optimal crispness. Leftover cooked chicken fingers store in an airtight container in the refrigerator for up to 3 days. Reheat in a 350°F oven on a wire rack until warmed through to preserve crunch.
Serving ideas
- Classic combo: Serve with a creamy ranch or tangy honey mustard and crisp celery sticks.
- Bowl meal: Slice the fingers and serve over a bed of mixed greens with cherry tomatoes, cucumber, and a drizzle of dressing.
- Wrap it up: Roll the chicken fingers in a flatbread with shredded lettuce, pickles, and a smear of sauce for a handheld lunch.
Flavor variations
While the packet of ranch seasoning gives these chicken fingers their signature taste, you can customize the crust for different flavor profiles:
- Add 1/2 teaspoon smoked paprika to the panko for a smoky note.
- Mix 2 teaspoons hot sauce into the egg wash for a subtle heat that meets the crunchy coating.
- Fold 2 tablespoons finely grated Parmesan into the panko for an extra savory bite.
Notes on ingredients
Stick to the ingredient quantities listed to preserve the balance of flavor and texture. The two-stage flour dredge—1/2 cup for the initial dusting and 1/3 cup after the egg—helps build a sturdy base for the panko to cling to. The packet of ranch seasoning mixes herbs, salt, and spices directly into the panko for an even distribution of flavor. Using panko rather than regular breadcrumbs is key to the light, crispy texture.
Final thoughts
These Ranch Chicken Fingers are that rare recipe that’s both comfortingly familiar and confidently flavorful. The technique is simple: a double flour step, an egg wash, and a well-seasoned panko crust create a crunchy exterior that locks in juicy chicken. Whether you’re feeding a crowd or making a quick weeknight meal, this recipe delivers dependable results and plenty of satisfaction in every bite. Keep the dipping sauces close—and get ready to enjoy the perfect tangy, crunchy finger food.
Ranch Chicken Fingers
Equipment
- 3 mixing bowls
- Dutch oven or deep skillet
- Tongs or slotted spoon
- Measuring cups and spoons
- Paper Towels
- Plate or Baking Sheet
Ingredients
- 1 1/4 pounds chicken tenders
- 1 packet ranch seasoning mix I use Hidden Valley
- 1/2 cup all-purpose flour for the first dredge
- 1/3 cup all-purpose flour for the breadcrumb mixture
- 1 cup Panko breadcrumbs
- 1/2 teaspoon salt
- 2 large eggs
- 2 tablespoons water
- peanut or vegetable oil for frying (about 2 inches in the pan)
Instructions
- Prepare three shallow bowls: in bowl 1 whisk together 1/2 cup flour and 2 teaspoons of the ranch seasoning; in bowl 2 mix 1/3 cup flour, 1 cup panko breadcrumbs, 2 teaspoons ranch seasoning, and 1/2 teaspoon salt; in bowl 3 beat 2 eggs with 2 tablespoons water.
- Pat the 1 1/4 pounds chicken tenders dry with paper towels.
- Heat about 2 inches of peanut or vegetable oil in a Dutch oven or deep skillet over medium-high heat until it reaches 360–375°F (use a thermometer if available).
- Dredge each tender first in the flour mixture, shaking off excess, then dip into the egg mixture, and finally press into the panko mixture to coat evenly.
- Fry 4–5 pieces at a time (do not overcrowd) for about 4 minutes per side, turning once, until golden brown and cooked through.
- Transfer cooked tenders to a paper towel–lined plate to drain briefly, then serve with ranch dressing.
Notes
- Do not overcrowd the pan to keep oil temperature steady.
- Use a thermometer for accurate frying temperature.
- Pat chicken dry for better adhesion of coating.
- Press breadcrumbs firmly to ensure an even crust.