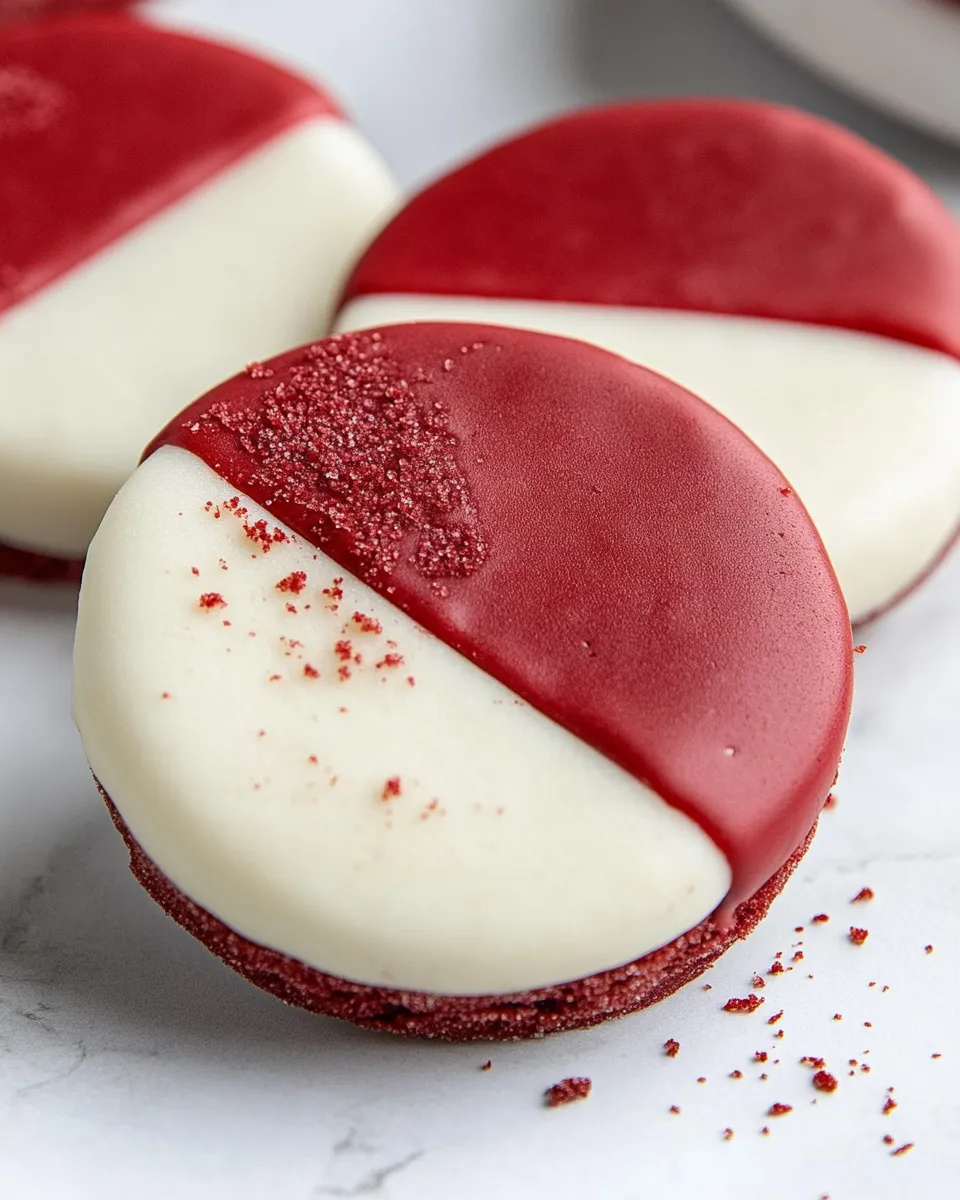
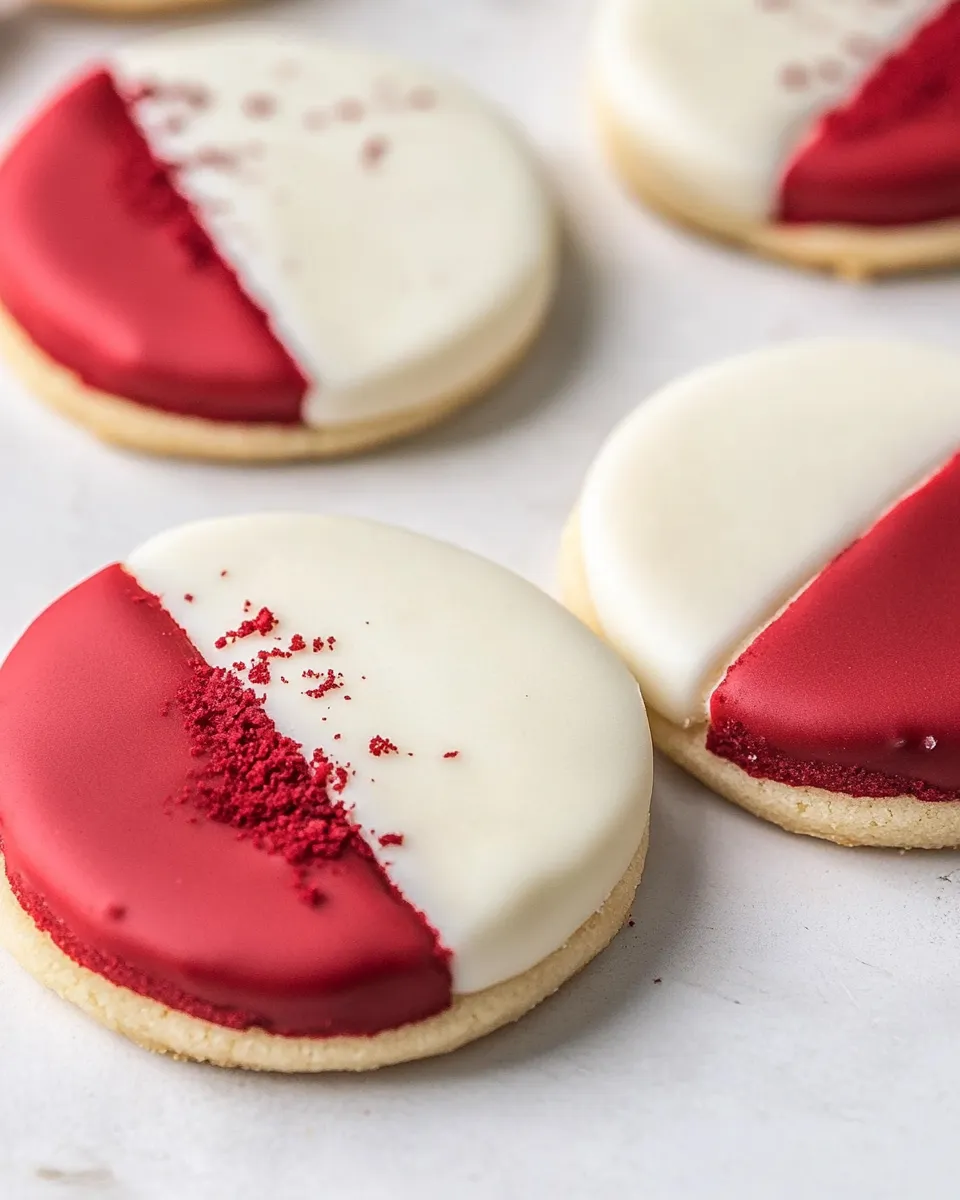
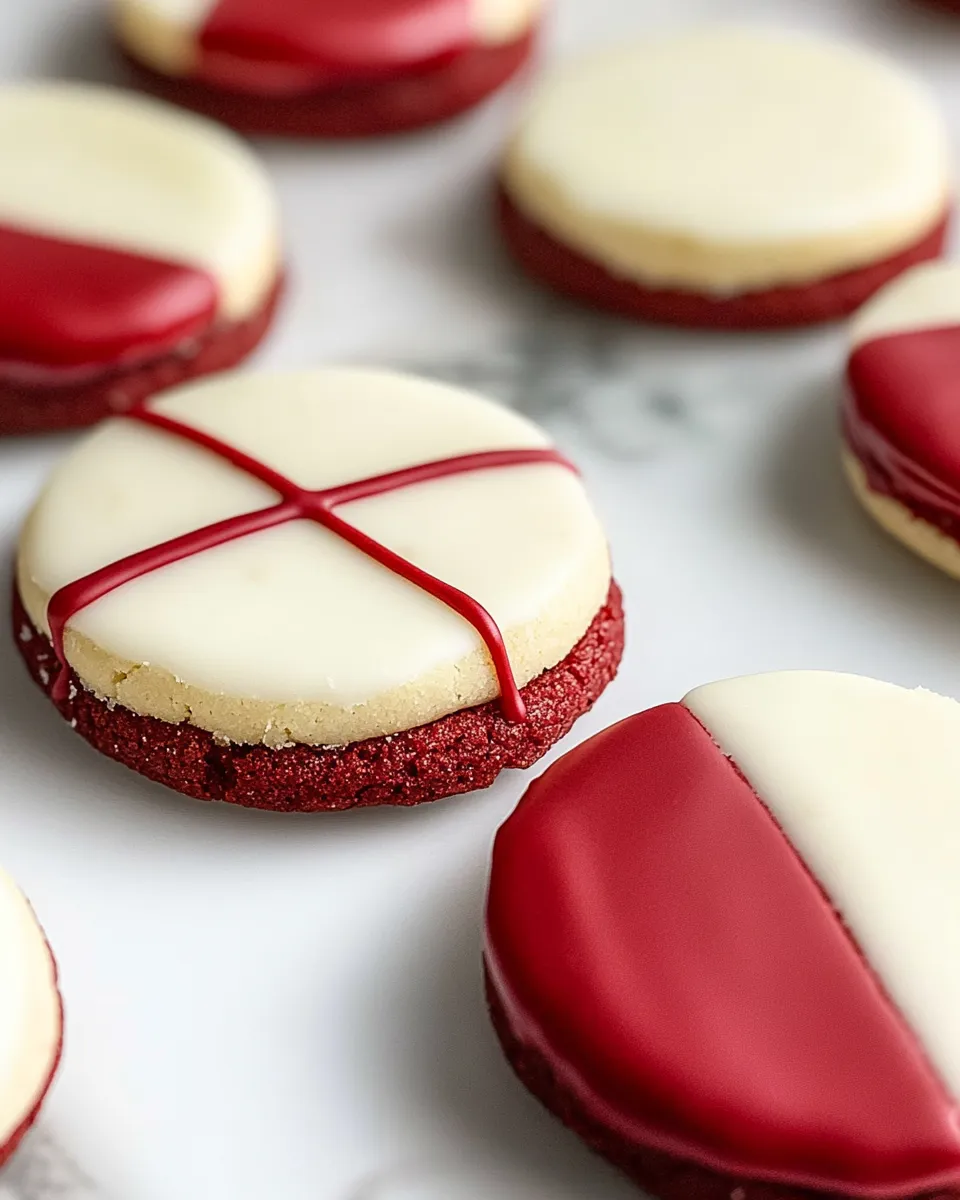
These Red Velvet Shortbread Cookies are a small, crisp, and slightly crumbly holiday favorite with a vivid color and a delicate cocoa whisper. They’re shortbread at heart — butter-forward and tender — with red velvet flavoring and a white chocolate dip that makes them feel celebratory. I rely on this recipe when I want something that looks special without a lot of fuss.
The dough comes together in a food processor, which means you spend less time handling butter and more time getting the thickness and texture right. The cookies bake low and slow to set without browning, then get a half-dip of white chocolate and sprinkles for instant charm. If you follow the steps precisely, you’ll get consistently shaped, even-baked cookies that hold up in a cookie tin.
I’ll walk you through the exact ingredients, step-by-step directions, useful substitutions, and the storage tips I use when I bake a big batch for friends or a party. Practical, no-nonsense notes will help you skip the common mistakes and finish with cookies you’re proud to share.
What You’ll Need
Ingredients
- 1¼ cups all purpose flour — the structural base; measure by spooning into the cup and leveling for accuracy.
- ⅓ cup granulated white sugar — sweetens and keeps the texture clean and shortbread-like.
- 2 tablespoons unsweetened cocoa powder — adds the classic red velvet hint without overpowering.
- ¼ teaspoon salt — balances the sweetness and sharpens flavors.
- ½ cup (1 stick) salted butter, (cold) cut up into chunks — cold butter creates the tender, crumbly shortbread texture.
- 1 tablespoon red food coloring — concentrated color for that signature red velvet appearance.
- 1 teaspoon red velvet emulsion (check Amazon) — concentrated flavoring that amplifies the red velvet profile.
- 3 ounces white chocolate (with cocoa butter), coarsely chopped — melts to a smooth dip; cocoa butter helps flavor and sheen.
- 1½ teaspoons shortening — thins the melted chocolate and prevents bloom; helps it set shiny and smooth.
- festive sprinkles — applied while the chocolate is wet for immediate decoration.
Mastering Red Velvet Shortbread Cookies: How-To
- Preheat the oven to 325°F (163°C).
- In a food processor, add 1¼ cups all-purpose flour, ⅓ cup granulated white sugar, 2 tablespoons unsweetened cocoa powder, and ¼ teaspoon salt. Cover and pulse several times until the dry ingredients are evenly combined.
- Add ½ cup (1 stick) cold salted butter (cut into chunks), 1 tablespoon red food coloring, and 1 teaspoon red velvet emulsion to the processor. Pulse with short on/off turns until the mixture first looks like fine crumbs, then continue pulsing until the mixture begins to clump together into a dough. Scrape the bowl once or twice as needed.
- Turn the dough out onto a lightly floured surface. Knead gently a few times just until the dough is nearly smooth. Pat or roll the dough to a uniform ½-inch thickness.
- Using a floured 1½-inch round cutter, cut out cookies and place them 1 inch apart on an ungreased cookie sheet. Gather scraps, re-roll to ½-inch thickness, and cut additional cookies until all dough is used.
- Bake in the preheated oven for 20 to 25 minutes, or until the cookie centers are set. Transfer the cookies to a wire rack and let them cool completely to room temperature before decorating.
- Place 3 ounces white chocolate (with cocoa butter), coarsely chopped, and 1½ teaspoons shortening in a small heavy saucepan. Melt over very low heat, stirring constantly, until the mixture is smooth and fully combined. Remove from heat.
- Dip half of each cooled cookie into the melted white chocolate, letting excess chocolate drip back into the pan. Place dipped cookies on waxed paper or a wire rack. Immediately sprinkle with festive sprinkles while the chocolate is still wet.
- Let the dipped cookies sit until the chocolate is fully set. Store once set.
The Upside of Red Velvet Shortbread Cookies

These cookies feel upscale but are very approachable. They require straightforward tools and a short ingredient list, yet yield something visually impressive and texturally pleasing. Because they’re shortbread-based, they freeze well and travel without falling apart. That makes them ideal for party trays, cookie swaps, or gifting.
Unlike layered cakes or piped cookies, these are forgiving. The food processor handles the mixing so you don’t have to worry about overworking the dough. Temperatures are moderate; you can bake a tray while you prepare the next. The half-dip of white chocolate adds contrast in both taste and appearance — creamy sweetness against the slightly cocoa-tinged cookie.
Smart Substitutions
- Butter — If you prefer unsalted butter, use it and add a pinch more salt (about 1/8 teaspoon) to the dry mix. The recipe lists salted butter; unsalted works fine if you adjust seasoning.
- Red food coloring — If you only have gel coloring, use roughly the same visual amount by weight (gels are more concentrated); start with less and add until you like the color.
- Red velvet emulsion — If you don’t have the emulsion, vanilla extract will work in a pinch, but you’ll lose the signature red velvet nuance. The emulsion is optional but recommended for that specific flavor.
- White chocolate — Use high-quality white chocolate with cocoa butter as directed; compound chips may melt differently and can be thinned with additional shortening if necessary.
Setup & Equipment
Prep and layout matter. A food processor is the quickest way to bring the dough together; if you don’t have one you can cut the cold butter into the dry ingredients with a pastry cutter or two knives, then finish by hand. A 1½-inch round cutter is specified so the baking time and spacing work as intended; any small-round cutter will do, but adjust for size.
Other essentials: a lightly floured work surface, an ungreased cookie sheet (the recipe calls for ungreased), a wire rack for cooling, a small heavy saucepan for melting chocolate, and waxed paper or a non-stick rack for the dipped cookies. Keep a small bowl of your sprinkles within reach.
Don’t Do This
- Don’t overwork the dough. Knead only until the dough comes together. Overworking warms the butter and makes the texture less short and more tough.
- Don’t skip chilling if the dough feels too soft. The recipe uses cold butter; if your kitchen is very warm and the dough becomes sticky, chill the dough for 15–20 minutes before cutting.
- Don’t bake at a higher temperature. These cookies set best at 325°F (163°C). Higher heat will brown the edges and change the tender shortbread character.
- Don’t dip while the chocolate is too hot. Let the melted chocolate cool just slightly after removing from heat. If it’s piping hot you can melt the cookie surface or cause streaking.
Seasonal Twists
Red Velvet Shortbread Cookies are naturally festive, but you can nudge them toward holidays or seasons without changing the recipe fundamentals. For winter, use red-and-white or metallic sprinkles and a dusting of edible glitter. For Valentine’s Day, cut small heart shapes instead of rounds and add pink sprinkles. For Christmas, try green-and-red combos or a tiny peppermint crunch sprinkled on the wet chocolate for a minty finish.
For a fall twist, swap festive sprinkles for finely chopped toasted pecans or a dusting of cinnamon sugar after dipping. Keep the decorative changes small so they don’t overwhelm the delicate shortbread texture.
Pro Perspective
Consistency is everything. Measure flour accurately — spoon into the measuring cup and level off. Cold butter is the secret to a tender shortbread. Pulse the processor in short bursts to avoid warming the butter; you want crumbly pieces to coalesce into clumps, not a smooth paste. When rolling, aim for an even ½-inch thickness; that ensures uniform baking across the batch.
When melting white chocolate, do so gently over very low heat and stir constantly. White chocolate seizes more easily than dark, so adding the shortening helps keep it workable and glossy. Work quickly when dipping so the chocolate is still fluid enough to coat cleanly, and have your sprinkles ready to go.
Refrigerate, Freeze, Reheat
Storage is straightforward. Once the white chocolate has fully set, store cookies in an airtight container at room temperature for up to 5 days. Layer cookies with parchment or waxed paper to prevent sticking.
To freeze: place fully cooled and set cookies in a single layer on a tray and freeze until solid (about 1 hour). Transfer to an airtight freezer-safe container or bag, separating layers with parchment. Freeze for up to 3 months. Thaw at room temperature for 30–60 minutes before serving — don’t microwave; it will soften the chocolate and change texture.
Reheating isn’t necessary. If you prefer a slightly softer bite, let thawed cookies sit at room temperature for a bit before eating rather than applying heat.
Common Questions
- Can I make the dough ahead of time? Yes. You can refrigerate the dough, wrapped, for up to 48 hours. Let it sit at room temperature just long enough to roll and cut — you still want it cool. For longer storage, freeze the dough, thaw overnight in the fridge, then roll and cut.
- Why are my cookies dry or crumbly? If the dough was overworked or too much flour was added, cookies can dry out. Measure flour carefully and pulse gently. Also ensure you didn’t bake longer than 25 minutes; the centers should be set but not hard.
- Can I skip the red velvet emulsion? Yes. The emulsion intensifies the profile, but vanilla will work as an alternative. The emulsion is listed as an option to enhance flavor; omitting it won’t ruin the cookies.
- Why did my white chocolate dull or separate? White chocolate can dull if overheated or if moisture gets in. Melt over very low heat and stir constantly. Adding the specified shortening helps keep a glossy finish.
Serve & Enjoy
These cookies present beautifully on a platter — half-dipped in white chocolate with sprinkles or served plain for a simpler look. They pair well with coffee, mulled wine, or a creamy hot chocolate. If you’re gifting, stack them in a box with parchment between layers and tie with a ribbon.
They reward attention to small details: even thickness, gentle handling, and careful melting. Follow the steps above and you’ll end up with a tin of crisp, buttery cookies that look like you spent far more time on them than you did. Enjoy — and save a couple for yourself.
Red Velvet Shortbread Cookies
Equipment
- Oven
- Food Processor
- 1 1/2-inch round cutter
- Cookie sheet
- Wire Rack
- small heavy saucepan
- waxed paper
Ingredients
Ingredients
- 1 1/4 cupsall purpose flour
- 1/3 cupgranulated white sugar
- 2 tablespoonsunsweetened cocoa powder
- 1/4 teaspoonsalt
- 1/2 cup 1 sticksalted butter, (cold) cut up into chunks
- 1 tablespoonred food coloring
- 1 teaspoonred velvet emulsion check Amazon
- 3 ounceswhite chocolate with cocoa butter, coarsely chopped
- 1 1/2 teaspoonsshortening
- festive sprinkles
Instructions
Instructions
- Preheat the oven to 325°F (163°C).
- In a food processor, add 1¼ cups all-purpose flour, ⅓ cup granulated white sugar, 2 tablespoons unsweetened cocoa powder, and ¼ teaspoon salt. Cover and pulse several times until the dry ingredients are evenly combined.
- Add ½ cup (1 stick) cold salted butter (cut into chunks), 1 tablespoon red food coloring, and 1 teaspoon red velvet emulsion to the processor. Pulse with short on/off turns until the mixture first looks like fine crumbs, then continue pulsing until the mixture begins to clump together into a dough. Scrape the bowl once or twice as needed.
- Turn the dough out onto a lightly floured surface. Knead gently a few times just until the dough is nearly smooth. Pat or roll the dough to a uniform ½-inch thickness.
- Using a floured 1½-inch round cutter, cut out cookies and place them 1 inch apart on an ungreased cookie sheet. Gather scraps, re-roll to ½-inch thickness, and cut additional cookies until all dough is used.
- Bake in the preheated oven for 20 to 25 minutes, or until the cookie centers are set. Transfer the cookies to a wire rack and let them cool completely to room temperature before decorating.
- Place 3 ounces white chocolate (with cocoa butter), coarsely chopped, and 1½ teaspoons shortening in a small heavy saucepan. Melt over very low heat, stirring constantly, until the mixture is smooth and fully combined. Remove from heat.
- Dip half of each cooled cookie into the melted white chocolate, letting excess chocolate drip back into the pan. Place dipped cookies on waxed paper or a wire rack. Immediately sprinkle with festive sprinkles while the chocolate is still wet.
- Let the dipped cookies sit until the chocolate is fully set. Store once set.
Notes
I use gel paste food coloring to color my cookies (instead of the liquid food coloring). It’s more concentrated, and you can add more of it to get a deeper color without adding liquid to the mixture. Don’t overdo it though, or you’ll end up with red stained fingers as you eat your cookies!
For storing:Place the cookies in a single layer in an airtight container; cover. Store at room temperature for up to 3 days or freeze for up to 3 months.
These cookies are a shortbread-type cookie and not a really sweet cookie. They have a hint of the red velvet flavor that you might be hoping for. I’d say they are more of a pretty cookie… and the white chocolate drizzle helps make them sweeter and more festive.