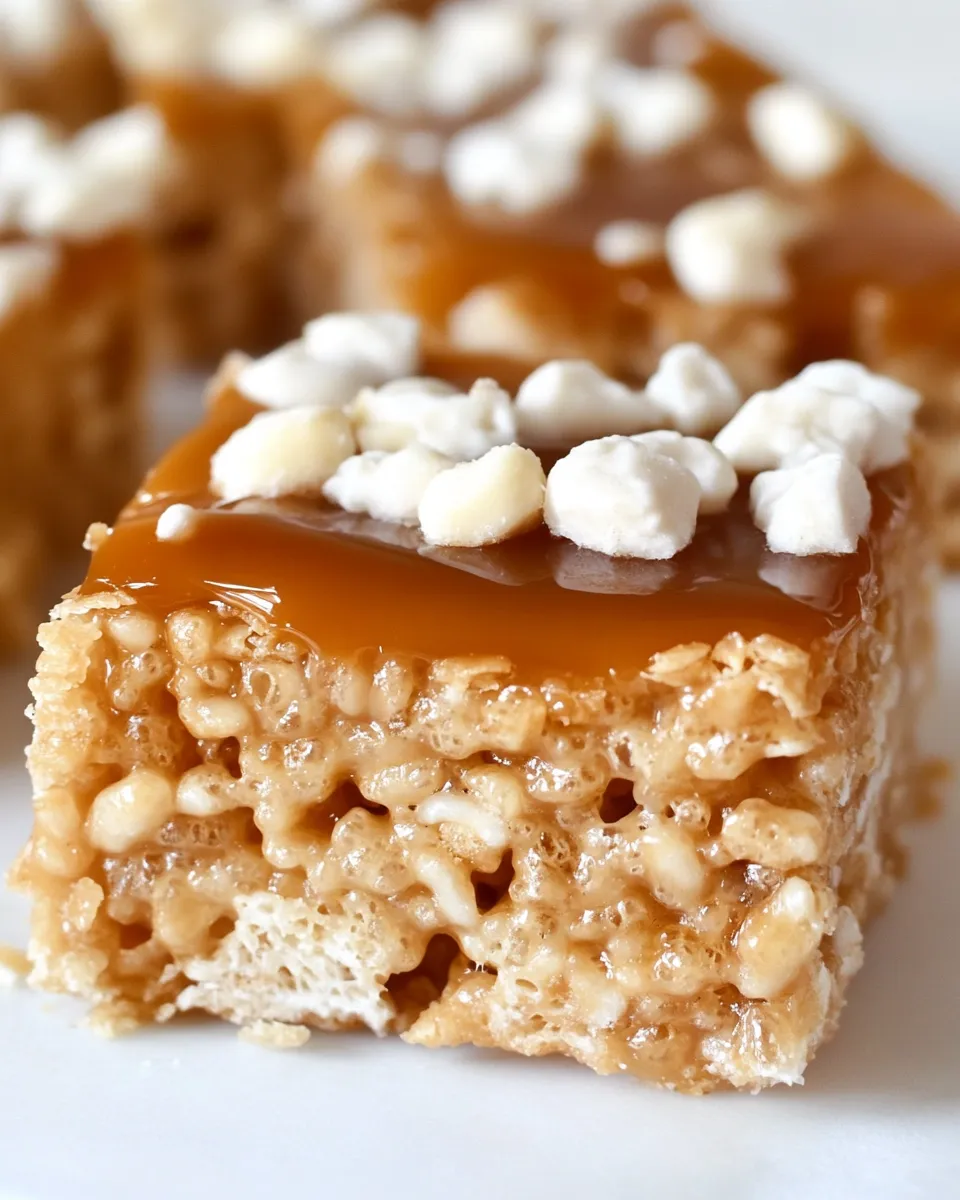
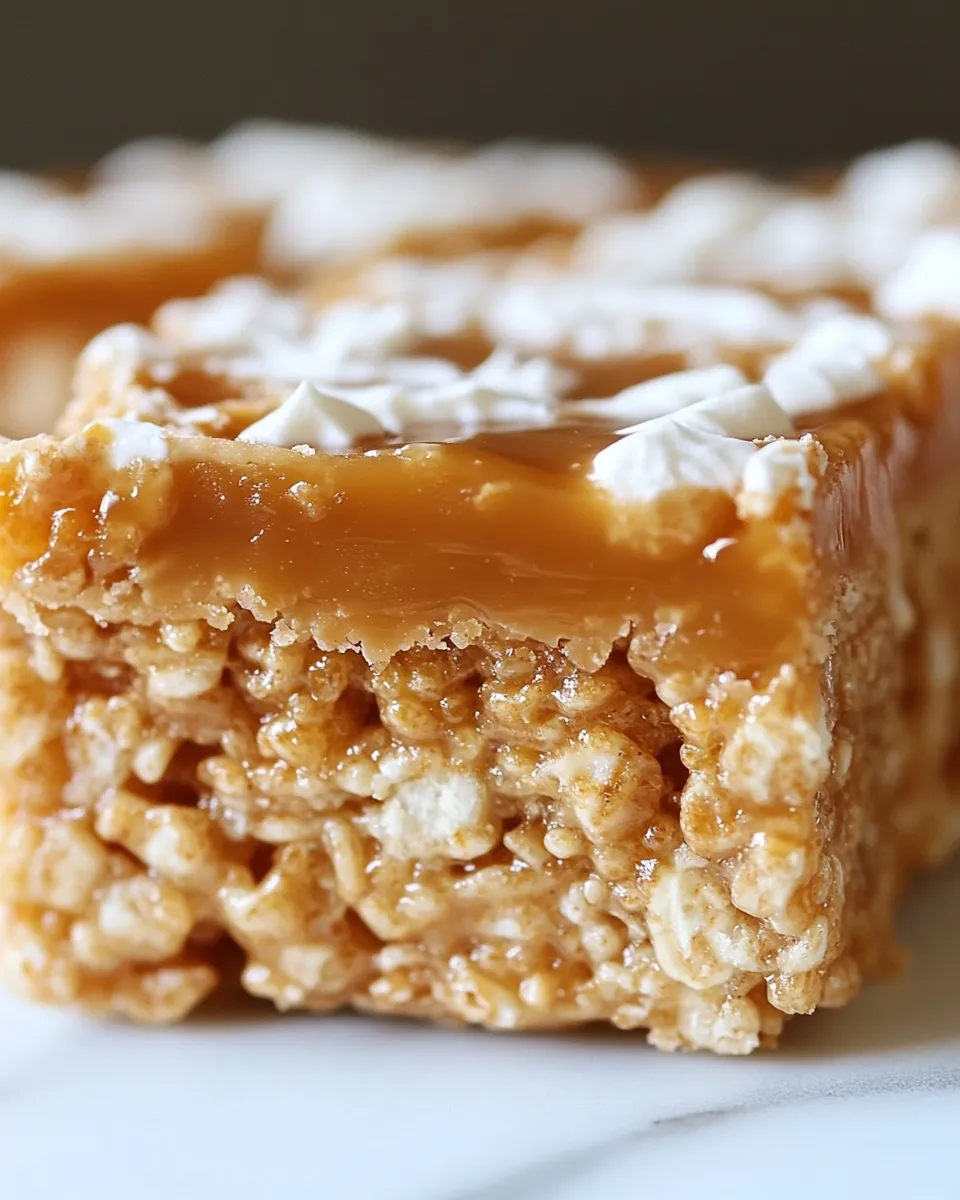
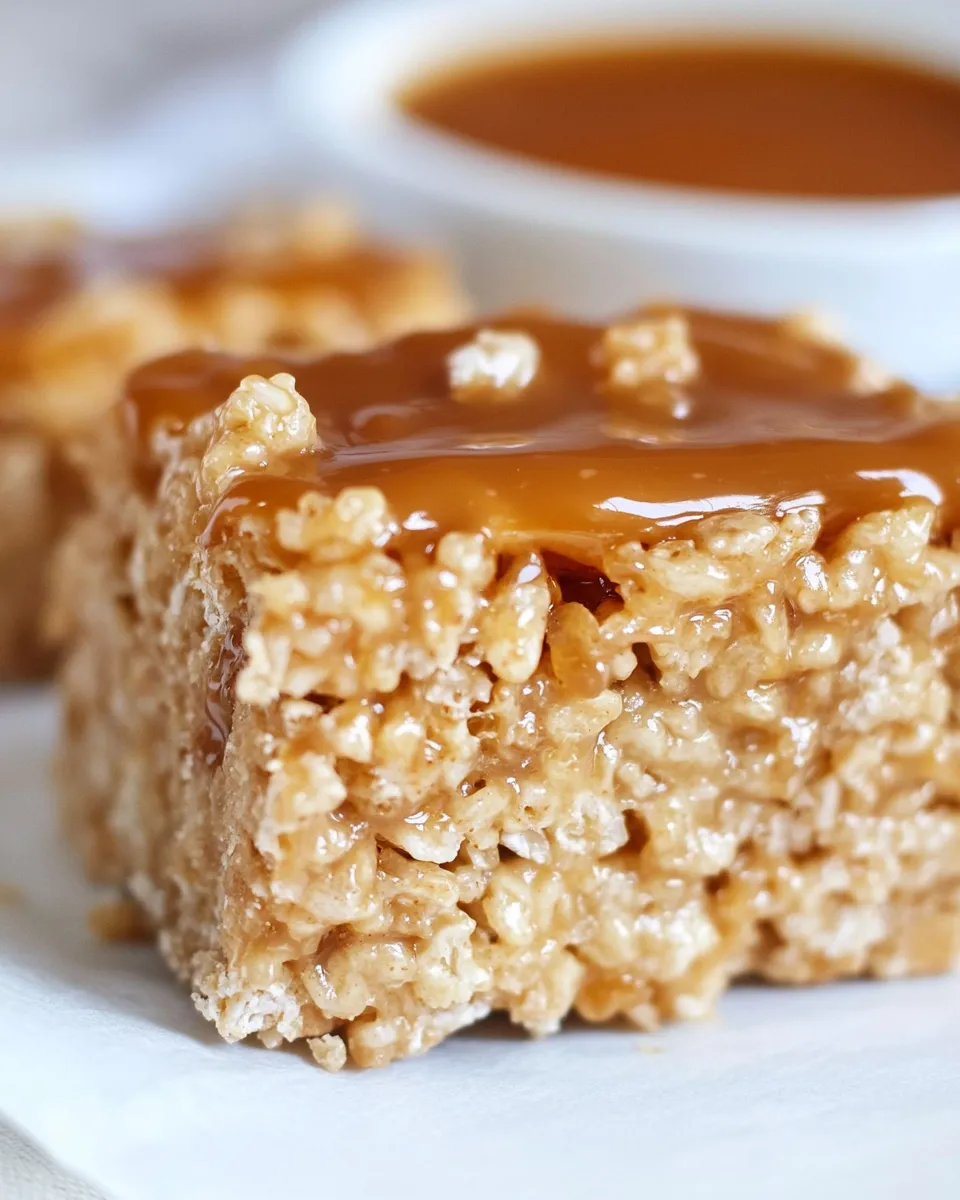
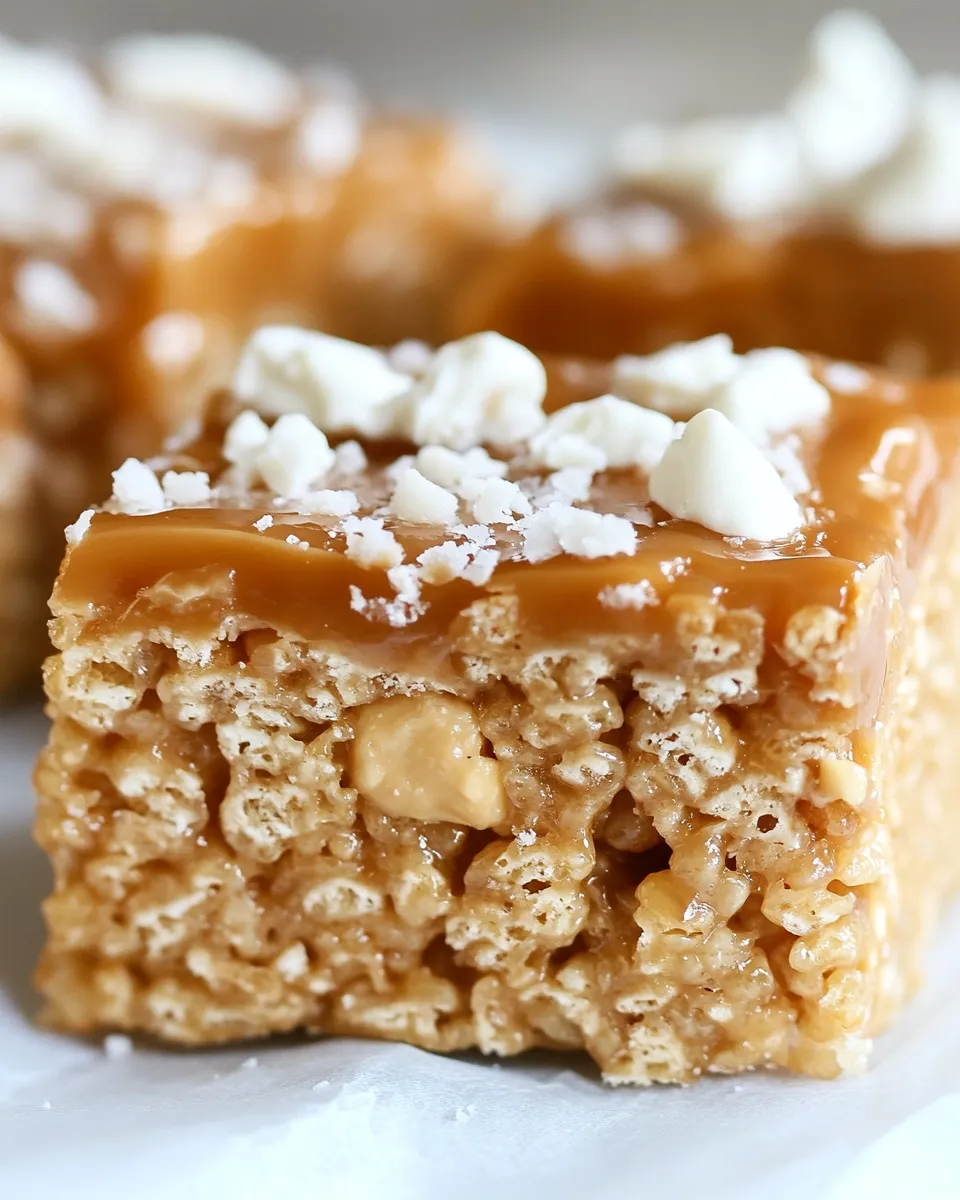
These bars are exactly what they sound like: crisp, peanut-buttery Rice Krispie treats topped with a glossy layer of melted caramels and a bold sprinkle of coarse sea salt. They hit a satisfying range of textures — chewy marshmallow base, snap from the cereal, and a silky, slightly chewy caramel top that pulls just enough to make them indulgent without being cloying.
I make these when I want something that feels special but takes less than an hour. The base is familiar and forgiving; the caramel finish is what nudges it from childhood snack to dessert worthy of a dinner party. The recipe is straightforward and uses pantry-stable ingredients for the most part, so you can pull it together spontaneously.
Below you’ll find the ingredient list, a clear step-by-step Cooking Guide that follows the recipe as written, practical tips, common mistakes and fixes, and ideas for seasonal tweaks. I keep the tone direct because you want to make something reliably delicious — not read a novel about it.
Ingredient List
- 3 tablespoons butter — used to melt with marshmallows and to add richness and nonstick protection for the pan.
- 6 cups mini marshmallows, divided — the base binder; the split quantity (4 cups then 2 cups) controls texture and chew.
- 1/2 cup smooth peanut butter — melds into the melted marshmallows for flavor and added chew/bind.
- 6 cups Rice Krispies cereal — provides the crisp structure and lightness of the bars.
- 2 tablespoons heavy cream — thins melted caramels slightly so they spread smoothly and set silky.
- 11 oz Kraft caramels (1 package), unwrapped — the salted caramel topping; Kraft caramels are convenient and reliable here.
- 1 1/2 tablespoons coarse sea salt — scattered on top to brighten and balance the sweet caramel.
Salted Caramel Peanut Butter Rice Krispie Treats Cooking Guide
- Lightly grease a 9×13-inch baking pan and set aside.
- In a large saucepan over low heat, melt 3 tablespoons butter.
- Add 4 cups of the mini marshmallows to the melted butter and stir constantly until completely melted and smooth. Remove the pan from the heat.
- Stir in 1/2 cup smooth peanut butter until fully incorporated and melted.
- Add 6 cups Rice Krispies cereal and the remaining 2 cups mini marshmallows to the saucepan. Stir until the cereal and marshmallows are evenly coated.
- Transfer the mixture to the prepared 9×13 pan. Using a lightly greased spatula or greased hands, press the mixture evenly and firmly into the pan. Set aside.
- Place the 11 oz unwrapped caramels and 2 tablespoons heavy cream in a microwave-safe bowl. Microwave in 20–30 second intervals, stirring after each interval, until the caramel is completely melted and smooth.
- Pour the melted caramel evenly over the pressed Rice Krispie layer and spread to mostly cover the top.
- Immediately sprinkle 1 1/2 tablespoons coarse sea salt evenly over the caramel. Let cool at room temperature until the caramel sets (about 30 minutes) or refrigerate 15–20 minutes to speed setting.
- Use a sharp knife to cut into bars. Store in an airtight container for up to 5 days.
Why Cooks Rave About It
There are a few simple reasons these bars get repeated requests. First, contrast. The airy crunch of Rice Krispies against a marshmallow-peanut butter matrix gives a satisfying bite. Then there’s the caramel: warm, buttery, and slightly sticky, it dresses a humble snack into something decadent. The coarse sea salt is the small but crucial counterpoint — it sharpens the sweetness and makes flavors pop.
Second, the technique is forgiving. Melting marshmallows with butter over low heat is fast and low-stress. The divided marshmallow method keeps some extra chew and pockets of texture. The caramel layer uses ready-made caramels, which reduces technique overhead but delivers a great result. In short: dramatic payoff for little complexity.
International Equivalents
If you work with metric measurements or live where certain brands are different, here are practical equivalents and local swaps to keep the finished bars consistent.
- Volume conversions (approximate): 1 cup ≈ 240 ml, so 6 cups Rice Krispies ≈ 1.4 liters by volume. 1/2 cup peanut butter ≈ 120 ml. For tablespoons: 1 tablespoon ≈ 15 ml.
- Rice Krispies: In many countries the cereal is sold under local brands as “Rice Bubbles” or “Rice Krispies.” Any plain puffed rice cereal will work — the key is lightness and crunch without added sugar clusters.
- Caramels: If Kraft caramels aren’t available, look for wrapped soft caramels (about 11 oz / ~311 g total). Alternatively, pre-bought dulce de leche or a jarred soft caramel sauce can work — reduce or omit heavy cream if the store-bought caramel is already pourable.
- Sea salt: If you don’t have coarse sea salt, use flaky finishing salt (like Maldon) for the best texture. Fine salt will distribute too evenly and feel saltier; if you must use fine salt, halve the amount and taste.
Prep & Cook Tools
- 9×13-inch baking pan — for the correct thickness and even setting.
- Large saucepan — to melt butter and marshmallows and mix base ingredients.
- Rubber spatula or wooden spoon — for stirring and folding cereal without crushing it.
- Measuring cups and spoons — accuracy matters for texture.
- Microwave-safe bowl — to melt the caramels safely and evenly.
- Greased spatula or lightly greased hands — for pressing the mixture into the pan.
- Sharp knife — to slice clean bars once the caramel is set.
- Airtight container — for storage to keep bars fresh up to 5 days.
Learn from These Mistakes
- Overheating the marshmallows: If the marshmallows boil or you heat too quickly, they can seize and become grainy. Keep the heat low and stir constantly until smooth.
- Pressing too hard: Forceful packing crushes the cereal and makes dense bars. Press firmly but gently; you want an even surface, not compacted rice.
- Caramel too thick to spread: If your caramels clump, microwave in short intervals and stir; add the specified 2 tablespoons heavy cream to loosen the texture. Do not overheat — it will stiffen as it cools.
- Salt added too late: If you wait until the caramel fully hardens, the salt won’t stick. Sprinkle immediately so it adheres and gives a visible, even finish.
- Using the wrong cereal: Sugary or textured cereals will change the balance. Use plain puffed rice for the intended crisp-chewy contrast.
Fresh Seasonal Changes
These bars are a great canvas for seasonal flavors. In autumn, stir a pinch of ground cinnamon into the melted marshmallows before adding the cereal — it pairs well with the peanut butter. In winter, consider folding a few crushed peppermint candies into the pressed base before pouring caramel for a holiday-studded finish.
For summer, swap coarse salt for a lighter sprinkle of toasted coconut flakes on top of the caramel once it’s slightly tacky. Spring calls for brightness: add a handful of crushed toasted peanuts on top of the caramel with the salt for extra crunch and a nut-forward finish.
Chef’s Rationale
Every choice in this recipe is about balance and reliability. Butter and marshmallows melted together form a smooth, spreadable glue that sets properly without added starches. Peanut butter is stirred in warm to ensure it melds completely, so the base holds together and carries flavor throughout.
Dividing the mini marshmallows is intentional: melting most of them creates a cohesive matrix, while folding in the remaining mini marshmallows adds chew and a little aeration, preventing a blocky texture. Using wrapped caramels plus a splash of heavy cream produces a gloss and pourable consistency that sets into a pleasant chew rather than cracking like a brittle.
Finally, coarse sea salt is applied right after pouring the caramel because the heat makes the salt adhere and sinks it slightly into the surface, giving a balanced bite in every bar.
Make Ahead Like a Pro
These bars hold up well for short-term make-ahead. Store them in an airtight container at room temperature for up to 5 days as the recipe states. If you need to prepare further in advance, wrap individual bars tightly in plastic wrap and freeze them in a sealed container for up to 1 month. Thaw at room temperature for 20–30 minutes before serving — frozen bars will have a firmer caramel that softens as they come back to room temp.
If you’re transporting them, cut the bars first and layer parchment between them in a shallow box to avoid smudging the caramel. Keep the container cool to prevent the caramel from sweating.
Ask & Learn
- Can I make this without peanut butter? Yes. Omit the peanut butter and you’ll have a classic marshmallow Rice Krispie base under the caramel. You may want to add a touch more butter (½ tablespoon) for richness if you skip the nut flavor.
- What if my caramels seize or become grainy? Re-warm gently in short microwave bursts and stir. Adding the 2 tablespoons heavy cream gradually while stirring will usually smooth out minor graininess. If they smell burnt, start over with a fresh batch.
- Why use coarse sea salt instead of table salt? Coarse or flaky salt gives texture and a pronounced salty pop in small bites. Table salt dissolves and distributes too evenly, which can taste saltier overall.
- Can I use homemade caramel? You can, but homemade caramel varies in set and texture. If using homemade, aim for a pourable, slightly firm caramel and use less heavy cream unless it’s very thick.
Hungry for More?
If you enjoyed these, try the classics and close cousins: a simple Rice Krispie Treat topped with chocolate ganache, peanut butter cookie bars, or salted caramel brownies for more caramel-forward decadence. For more quick, high-reward desserts that use pantry staples, check my blog index — and keep your pantry stocked with mini marshmallows. They’re small, but they do a lot of heavy lifting.
Make a batch. Share some. These keep well, travel well, and make a small, impressive dessert without complicated technique. Happy baking — and yes, taste the caramel before you cut the first bar (professional recommendation).
Salted Caramel Peanut Butter Rice Krispie Treats
Equipment
- 9x13 inch baking pan
- Large saucepan
- Microwave-safe Bowl
- Spatula
- Sharp Knife
Ingredients
Ingredients
- 3 tablespoonsbutter
- 6 cupsmini marshmallowsdivided
- 1/2 cupsmooth peanut butter
- 6 cupsrice krispies cereal
- 2 tablespoonsheavy cream
- 11 ozKraft caramels 1 package unwrapped
- 1 1/2 tablespoonscoarse sea salt
Instructions
Instructions
- Lightly grease a 9×13-inch baking pan and set aside.
- In a large saucepan over low heat, melt 3 tablespoons butter.
- Add 4 cups of the mini marshmallows to the melted butter and stir constantly until completely melted and smooth. Remove the pan from the heat.
- Stir in 1/2 cup smooth peanut butter until fully incorporated and melted.
- Add 6 cups Rice Krispies cereal and the remaining 2 cups mini marshmallows to the saucepan. Stir until the cereal and marshmallows are evenly coated.
- Transfer the mixture to the prepared 9×13 pan. Using a lightly greased spatula or greased hands, press the mixture evenly and firmly into the pan. Set aside.
- Place the 11 oz unwrapped caramels and 2 tablespoons heavy cream in a microwave-safe bowl. Microwave in 20–30 second intervals, stirring after each interval, until the caramel is completely melted and smooth.
- Pour the melted caramel evenly over the pressed Rice Krispie layer and spread to mostly cover the top.
- Immediately sprinkle 1 1/2 tablespoons coarse sea salt evenly over the caramel. Let cool at room temperature until the caramel sets (about 30 minutes) or refrigerate 15–20 minutes to speed setting.
- Use a sharp knife to cut into bars. Store in an airtight container for up to 5 days.