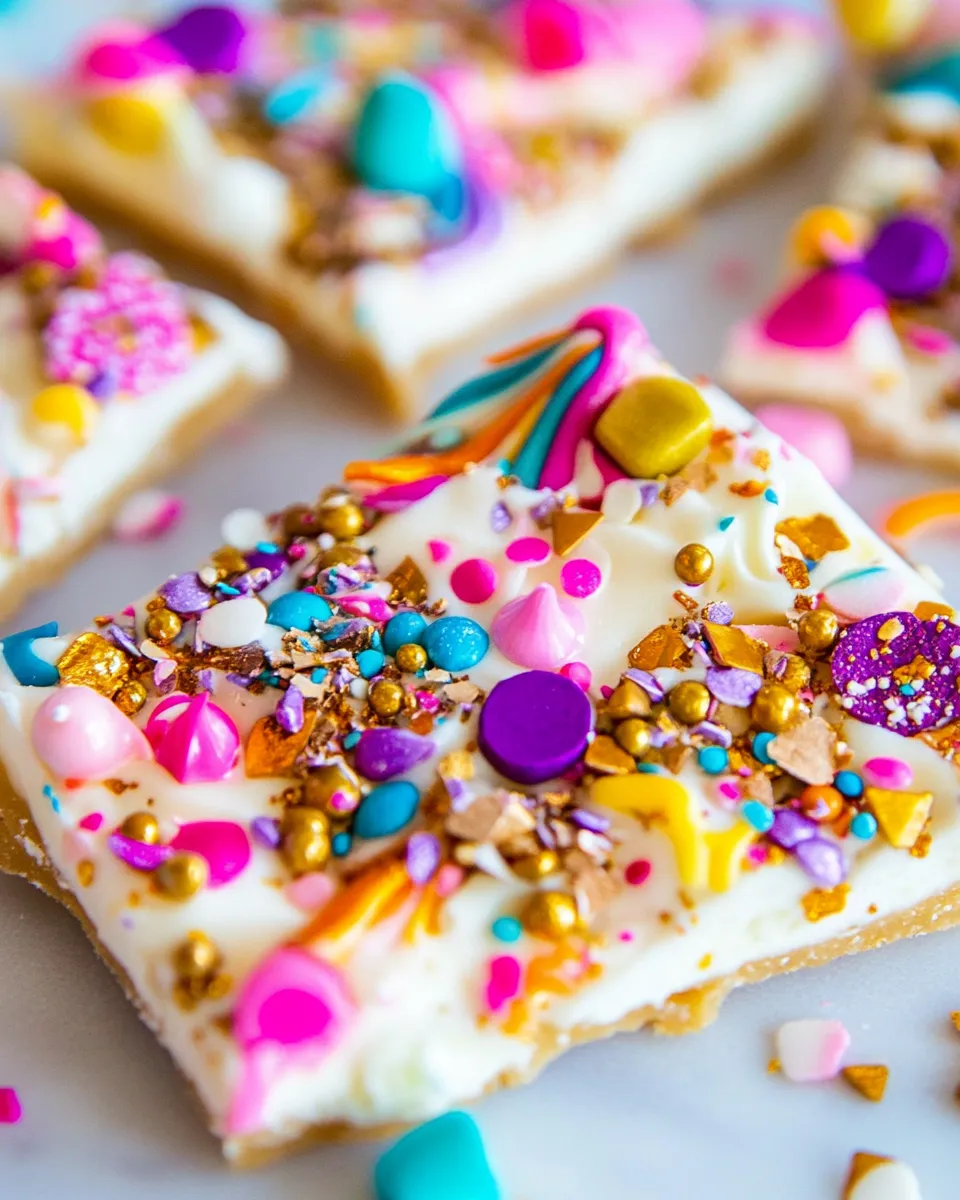
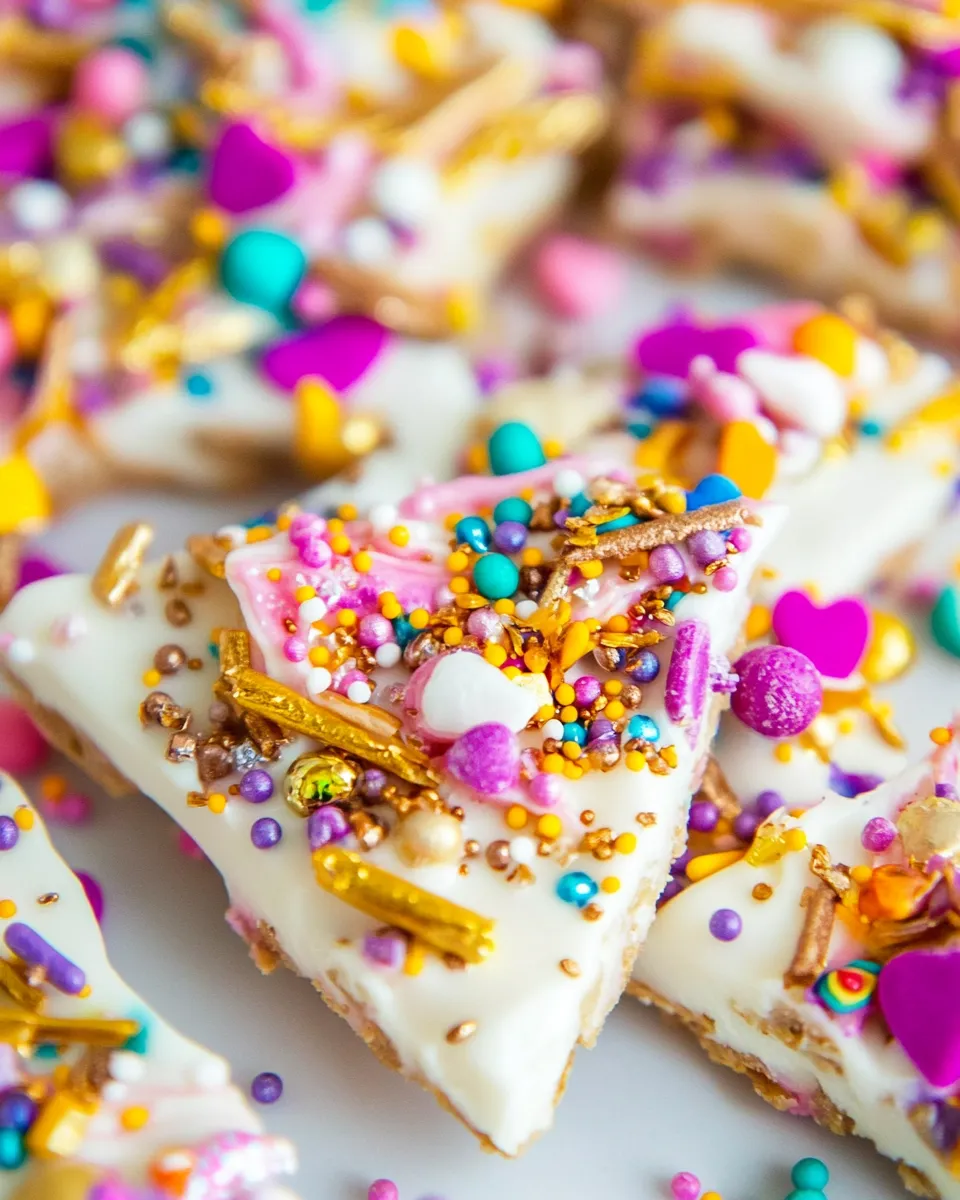
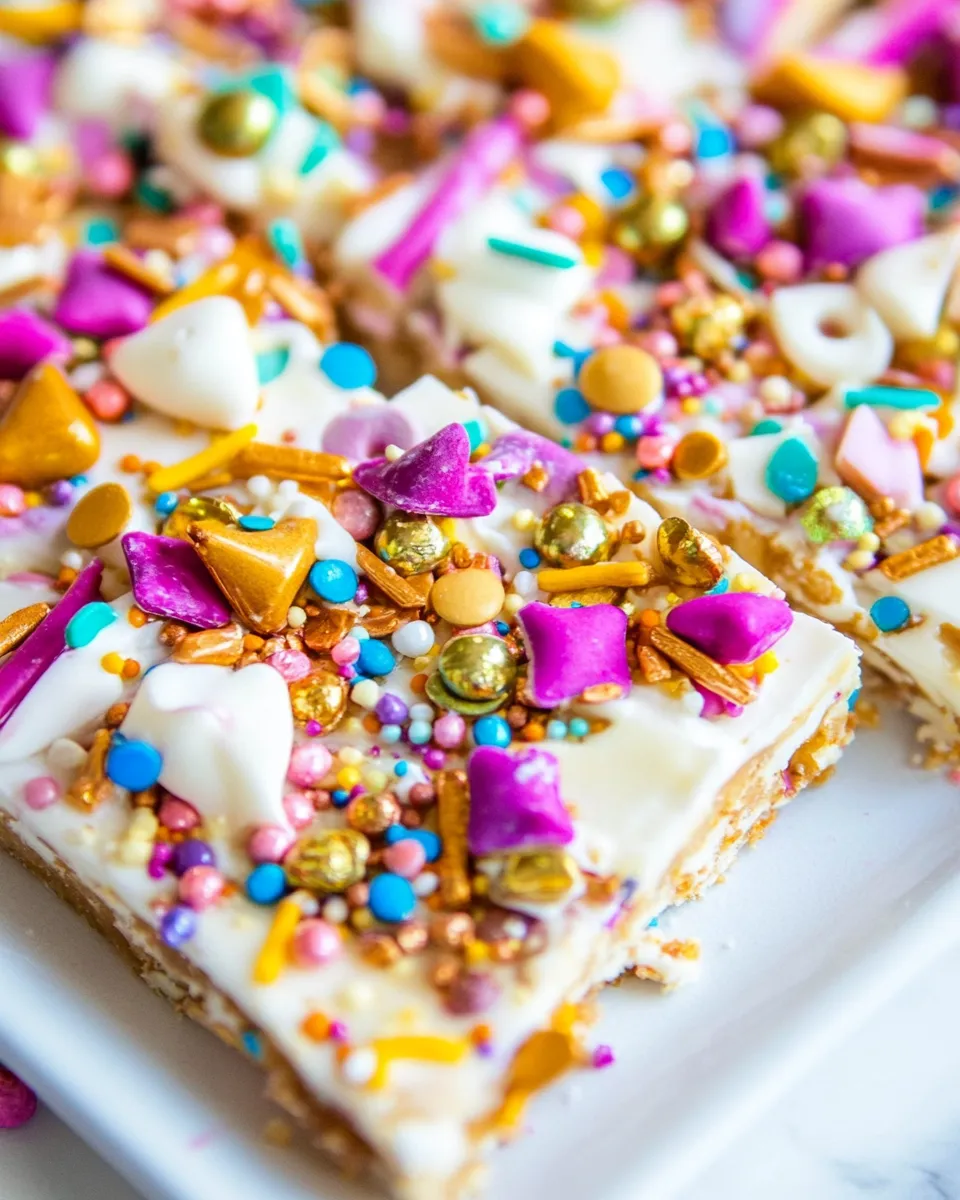
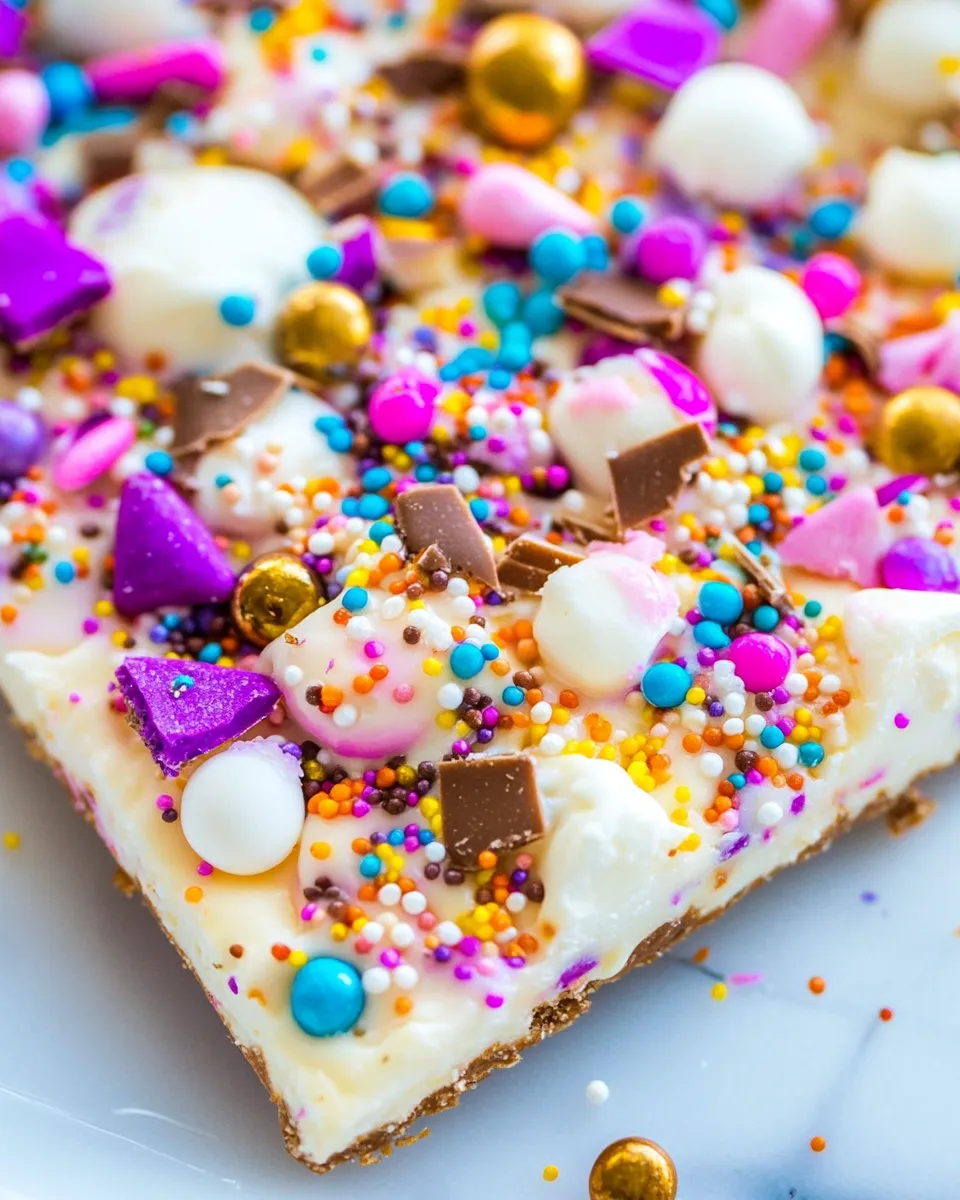
This is the kind of candy that’s loud, ridiculous, and impossible not to smile at. Loaded Unicorn Bark is a simple white chocolate canvas topped with crunchy pretzels, marshmallows, toffee bits, halved mini peanut butter cups, and generous sprinkles. It looks special but comes together quickly, which is why I keep a batch stashed during party season and for last-minute cookie exchanges.
I like this recipe because it’s forgiving: you can spread the chocolate thick or thin, swap a topping or two, and still end up with a colorful, textural treat. The trick is to assemble while the chocolate is still warm so everything sticks, then let it set completely.
Below you’ll find ingredient notes, the exact step-by-step method I use every time, and practical tips for scaling, storing, and customizing. No fluff — just clear directions and the little tricks that save time and keep the bark neat and irresistible.
Ingredient Notes
- 10 ounces white chocolate melts or coarsely chopped white chocolate bars — the base: use high-quality melts or bars for a smooth, glossy finish; melts are convenient, bars give a creamier flavor when chopped.
- ⅓ cup coarsely crushed pretzel twists — adds crunch and salt to balance the sweetness; crush coarsely so you get visible texture in each bite.
- ⅓ cup marshmallows — small marshmallows or mini mallows work best; they create soft pockets in the bark and make it whimsical.
- 2 tablespoons toffee bits — little crunchy caramel hits; sprinkle evenly so every piece has a bit of toffee.
- 12 mini peanut butter cups, halved — the peanut butter-pop keeps the bark from being one-note sweet; halve them to distribute flavor without large clumps.
- 3 tablespoons sprinkles, or as desired — the unicorn look comes from colorful sprinkles; use sturdier jimmies or nonpareils so they hold their shape on the chocolate.
Loaded Unicorn Bark Made Stepwise
- Line a baking sheet with parchment paper and set aside.
- Prep toppings: place the pretzel twists in a resealable bag and coarsely crush them; halve the 12 mini peanut butter cups if they are not already halved; measure out the marshmallows, toffee bits, and sprinkles.
- Put the 10 ounces white chocolate melts or coarsely chopped white chocolate bars in a medium microwave-safe bowl. Microwave for 30 seconds, stop and stir, then continue heating in 15-second bursts, stirring after each burst, until the chocolate is fully melted and smooth.
- Pour the melted white chocolate onto the prepared parchment and spread it into an even 1/8-inch-thick layer (about a 12×8-inch rectangle, if you want that approximate size) using an offset spatula or the back of a spoon.
- Immediately evenly scatter the crushed pretzels, marshmallows, toffee bits, halved peanut butter cups, and sprinkles over the still-melted chocolate. Press the larger pieces (peanut butter cups, pretzels, marshmallows) down gently so they adhere.
- Let the bark cool and set completely at room temperature. If you need it sooner, place the sheet in the refrigerator or freezer until firm.
- Once set, break or cut the bark into pieces and serve.
- Store the bark airtight at room temperature for at least 2 weeks, or keep in the refrigerator or freezer for longer storage.
Why This Recipe Is Reliable
There are no tempering steps, no oven timing, and no precise temperatures to chase — that’s why this works every time. It relies on a few consistent principles:
- Simple melt-and-spread technique: using microwave-safe bursts and frequent stirring prevents scorching and yields smooth chocolate quickly.
- Immediate topping: placing the toppings while the chocolate is still warm ensures everything adheres well without extra drizzle or glue chocolate.
- Texture contrast: salt from pretzels, chew from marshmallows, crunch from toffee, and the creamy pockets of peanut butter cups keep each piece interesting, so even a thin slab tastes generous.
Follow the steps in order and you’ll avoid the common pitfalls — grainy chocolate, toppings rolling off, or an uneven slab that’s hard to break apart.
No-Store Runs Needed
Most of these toppings are pantry staples around holidays. To avoid a late dash to the store, keep a small candy stash for projects like this. Quick-checks before you start:
- White chocolate: if you don’t have melts, coarsely chop white chocolate bars — they work the same.
- Pretzels and marshmallows: if you’re out of twists, use pretzel sticks or broken pretzel pieces; marshmallow pieces from s’mores kits also work.
- Peanut butter cups: if you only have full-size cups, chop them into smaller pieces rather than leaving giant blobs.
- Sprinkles: mix and match whatever colors you have; the look is forgiving.
Hardware & Gadgets
- Microwave-safe bowl — for melting the chocolate in short bursts.
- Offset spatula or the back of a spoon — for spreading a thin, even layer of chocolate.
- Baking sheet and parchment paper — parchment keeps the bark from sticking and makes cleanup simple.
- Resealable bag and rolling pin or heavy jar — to crush the pretzels without a mess.
- Refrigerator or freezer (optional) — speeds up setting when you’re in a hurry.
Slip-Ups to Skip
- Overheating the chocolate: microwave in short bursts and stir — chocolate can seize if it gets too hot.
- Waiting to add toppings: once the chocolate starts to set, toppings won’t stick and may slide off.
- Making the layer too thick: a very thick layer takes forever to set and can be awkward to bite; aim for about 1/8-inch as suggested.
- Pressing too hard: gently press larger items so they stick, but don’t force them through the chocolate — you want surface coverage, not holes.
- Skipping airtight storage: the marshmallows can stale and sprinkles can absorb humidity if left exposed; seal it up.
Make It Your Way
Flavor swaps and add-ins
- Use colored chocolate: if you want a pastel base, tint melted white chocolate with oil-based candy colors.
- Alternate candies: swap mini peanut butter cups for chopped peanut butter cups, chocolate-covered pretzels, or caramel squares if you prefer.
- Nut-free option: swap the peanut butter cups for more marshmallows or extra toffee bits if you need a nut-free version.
Presentation options
- Cut uniform rectangles for gift boxes, or break freely for rustic bowls and party platters.
- Layer two tones of chocolate: pour a thin colored base, let set slightly, then add white chocolate and toppings for a marbled look.
If You’re Curious
Why does this bark set without tempering? Because you aren’t aiming for a shiny, snap-when-broken bar in the same way as fully tempered chocolate — you’re making a coated candy slab where visual charm and texture matters more than professional sheen. The quick melt method keeps things accessible and fast.
Texture balance is the secret: salty and crunchy elements paired with sweet and soft bits keep each bite interesting. That’s why even a small amount of pretzel and toffee goes a long way.
Make Ahead Like a Pro
This bark is a great make-ahead treat. Store it airtight at room temperature for at least two weeks; the flavors settle and the toppings stay pleasant. For longer storage, the refrigerator or freezer will extend life without a big loss in texture. Some practical notes:
- Room temperature: store in a single layer or separated by parchment to avoid sticking, in an airtight container — at least 2 weeks.
- Refrigerator: keep in airtight containers; let it come to room temperature before serving to avoid a chewy, damp mouthfeel from cold chocolate.
- Freezer: wrap well and thaw in the refrigerator to avoid condensation forming on the surface.
Common Questions
- Can I melt the chocolate on the stovetop? — Yes. Use a double boiler (bowl over barely simmering water), stirring until smooth, then proceed as directed.
- Will the marshmallows melt? — Mini marshmallows won’t fully melt when pressed into warm chocolate; they soften slightly and stay pillowy. If the chocolate is too hot they can change shape, so work while chocolate is warm but not steaming.
- How do I get the chocolate perfectly smooth? — Stir frequently during microwave bursts and stop heating the moment it’s smooth. Residual warmth will finish melting any stray bits.
- Can I double the recipe? — Yes. Use a larger sheet pan and keep the same thickness for consistent set time; you may need more than one sheet if you want a single-layer appearance.
Serve & Enjoy
Break the bark into varied-size pieces and arrange on a platter for a festive centerpiece, or place uniform rectangles in cellophane bags tied with ribbon for gifts. Let pieces come to room temperature before serving if refrigerated. The combination of salty pretzel, chewy marshmallow, crunchy toffee, sweet white chocolate, and pockets of peanut butter cups makes this bark a crowd-pleaser — and it disappears fast.
Keep a spare sheet in the freezer for emergencies: it thaws beautifully and still tastes homemade and thoughtful. Make a batch, have fun with the colors, and don’t stress about perfection — the joy is in the textures and the look. Happy snacking!
Loaded Unicorn Bark
Equipment
- Baking Sheet
- Parchment Paper
- resealable bag
- Microwave-safe Bowl
- Offset spatula
- Spoon
Ingredients
Ingredients
- 10 ounceswhite chocolate melts or coarsely chopped white chocolate bars
- 1/3 cupcoarsely crushed pretzel twists
- 1/3 cupmarshmallows
- 2 tablespoonstoffee bits
- 12 mini peanut butter cups halved
- 3 tablespoonssprinkles or as desired
Instructions
Instructions
- Line a baking sheet with parchment paper and set aside.
- Prep toppings: place the pretzel twists in a resealable bag and coarsely crush them; halve the 12 mini peanut butter cups if they are not already halved; measure out the marshmallows, toffee bits, and sprinkles.
- Put the 10 ounces white chocolate melts or coarsely chopped white chocolate bars in a medium microwave-safe bowl. Microwave for 30 seconds, stop and stir, then continue heating in 15-second bursts, stirring after each burst, until the chocolate is fully melted and smooth.
- Pour the melted white chocolate onto the prepared parchment and spread it into an even 1/8-inch-thick layer (about a 12×8-inch rectangle, if you want that approximate size) using an offset spatula or the back of a spoon.
- Immediately evenly scatter the crushed pretzels, marshmallows, toffee bits, halved peanut butter cups, and sprinkles over the still-melted chocolate. Press the larger pieces (peanut butter cups, pretzels, marshmallows) down gently so they adhere.
- Let the bark cool and set completely at room temperature. If you need it sooner, place the sheet in the refrigerator or freezer until firm.
- Once set, break or cut the bark into pieces and serve.
- Store the bark airtight at room temperature for at least 2 weeks, or keep in the refrigerator or freezer for longer storage.