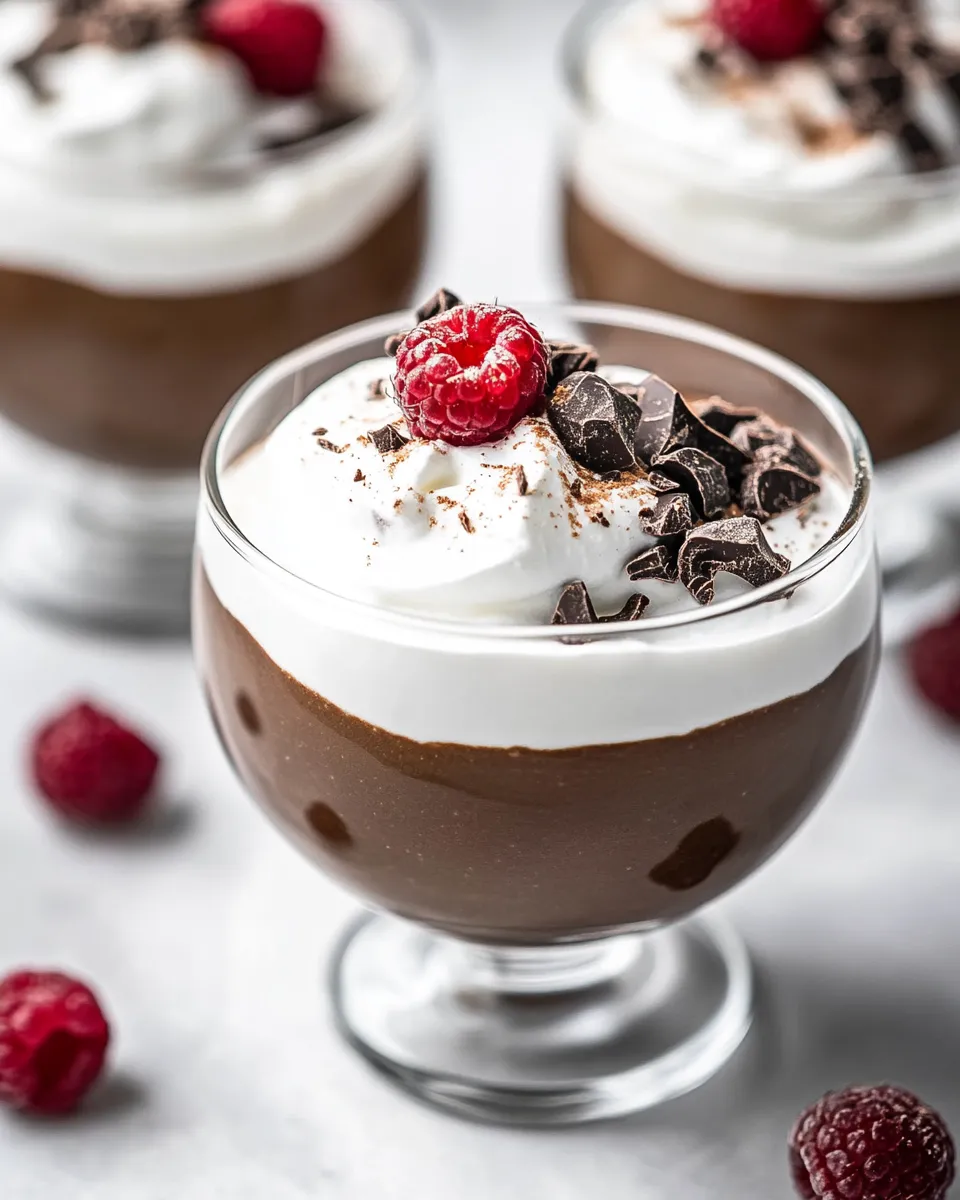
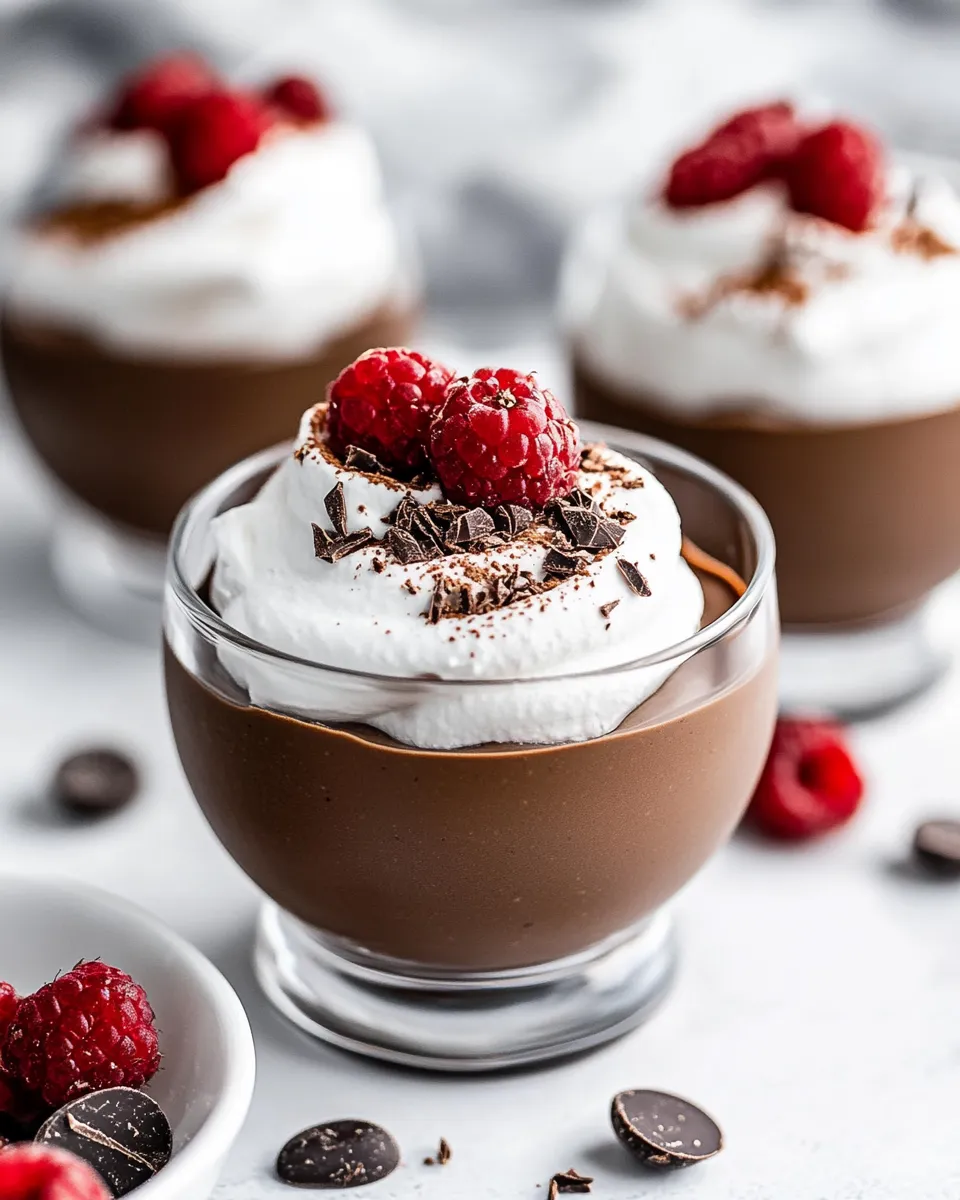
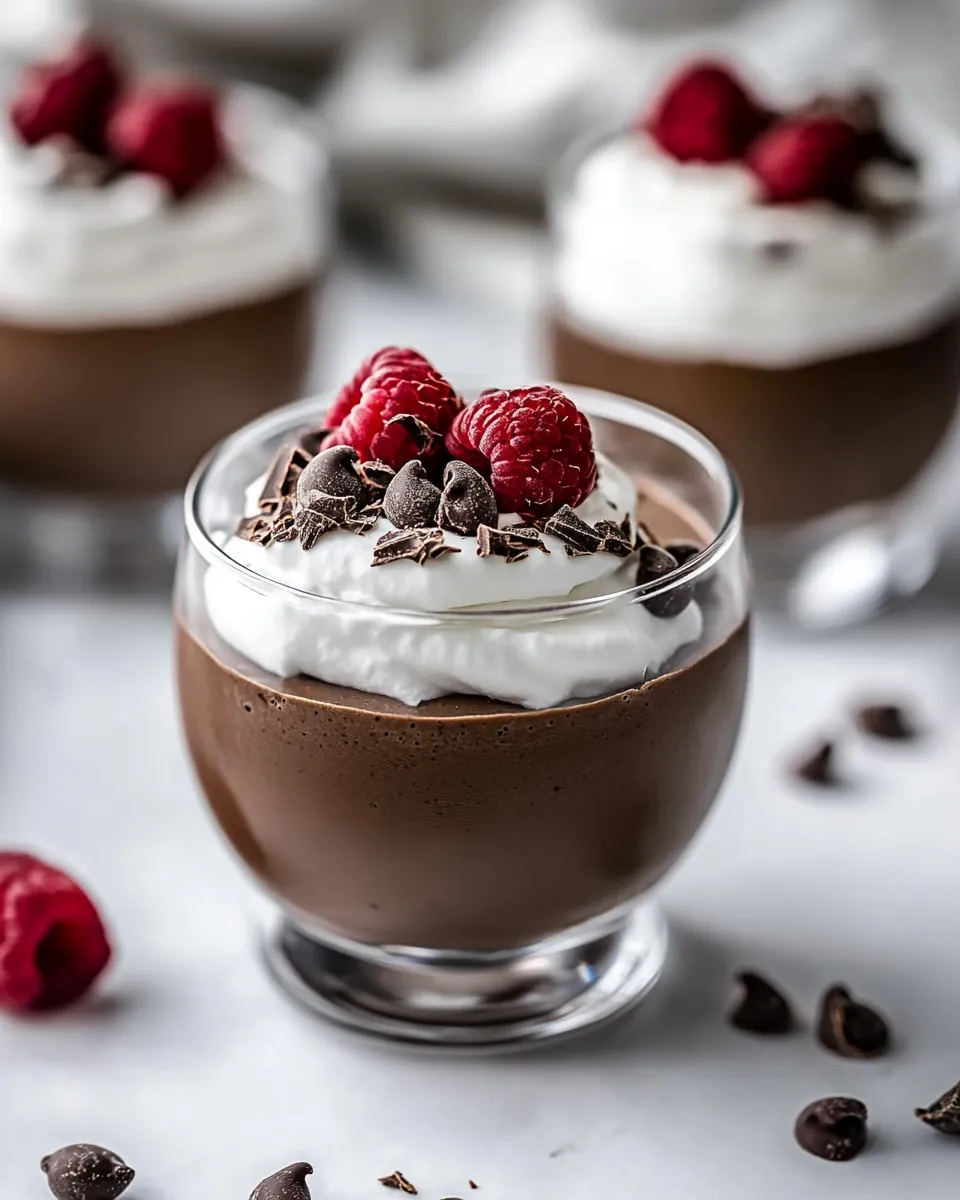
These Chocolate Parfaits are the kind of dessert I reach for when I want something that feels special but doesn’t demand a weekend’s worth of planning. They layer creamy chocolate pudding with pillowy whipped topping for contrast — a simple structure that always looks elegant in a clear glass. The recipe is straightforward, uses pantry-friendly ingredients, and plays well with dietary swaps when you need them.
The pudding is cooked on the stovetop and enriched with melted semi-sweet baking chocolate, then chilled until set. When it comes time to assemble, you spoon, layer, and finish. No fancy piping is required. If you like make-ahead desserts, these hold up beautifully in the fridge and make dinner-party prep far less frantic.
I keep a stash of Tru Whip or my favorite whipped cream in the fridge so I can pull these together quickly. They’re great for portion control, adaptable for dairy-free needs, and comforting year-round. Below you’ll find the exact ingredient list, step-by-step directions, and practical tips that make this recipe work every time.
Ingredients at a Glance
- 3 cups fat-free milk — provides the base for a lighter pudding; dairy-free milk works too if you need it.
- 2 1/2 tablespoons monk fruit sugar substitute — sweetens without added sugar; swap in your preferred sugar if you prefer.
- 1-1/2 teaspoons vanilla extract — rounds and lifts the chocolate flavor.
- 2 tablespoons cornstarch — thickens the pudding to the right spoon-coating consistency.
- 2 large egg yolks — add richness and help set the custard-like pudding.
- 4 ounces Semi-Sweet Baking Chocolate — I used Lily’s sugar-free; use dairy-free chocolate for a dairy-free option.
- 1 1/4 cups Tru Whip Whipped Topping — or whipped cream of your choice for the layered finish.
Chocolate Parfaits: How It’s Done
- In a medium nonstick saucepan, combine all of the milk, the monk fruit sugar substitute, and the cornstarch. Whisk thoroughly until the cornstarch and sugar are fully dissolved and the mixture is smooth.
- Place the saucepan over medium-low heat. Cook, whisking constantly, until the mixture has slightly thickened and becomes warm and steamy (about 10–15 minutes). Do not let it boil vigorously.
- While the milk mixture is heating, place the 2 large egg yolks in a large bowl and whisk lightly to break them up.
- When the milk mixture is hot and slightly thickened, remove the saucepan from the heat. Slowly pour about 1 cup of the hot milk mixture through a fine-mesh sieve into the egg yolks, adding it roughly a tablespoon at a time and whisking constantly to temper the yolks so they do not scramble.
- After the yolks are tempered, pour the remaining hot milk mixture through the sieve into the yolks and whisk until smooth.
- Return the combined mixture to the saucepan. Place over medium-low heat and cook, whisking constantly, until the mixture thickens to a pudding-like consistency and coats the back of a spoon, about 2–4 minutes. Do not let it boil hard.
- While the pudding mixture is cooking (or immediately after, off the heat), melt the 4 ounces of semi-sweet baking chocolate: microwave in a microwave-safe bowl in 20-second bursts, stirring between each burst, until fully melted and smooth (up to about 60 seconds total). Alternatively, melt the chocolate in a heatproof bowl over simmering water.
- Remove the saucepan from the heat. Whisk the melted chocolate and the 1 1/2 teaspoons vanilla extract into the hot pudding mixture until completely smooth and evenly combined.
- Transfer the chocolate pudding into a large bowl. Cover the surface directly with plastic wrap or wax paper so it touches the pudding (this prevents a skin from forming). Chill in the refrigerator for at least 2 hours or overnight until fully set and chilled.
- To assemble the parfaits: spoon 3 tablespoons of chilled chocolate pudding into each serving glass, add 2 tablespoons of Tru Whip whipped topping, add another 2 tablespoons of pudding, and finish with a dollop of Tru Whip on top. Serve chilled.
Why You’ll Love This Recipe
These parfaits balance indulgence and simplicity. The pudding is rich because of the egg yolks and melted chocolate, but the milk choice and measured sugar keep it from feeling heavy. The whipped topping adds an airy contrast, making each spoonful satisfying without being cloying.
They’re quick to assemble once the pudding is chilled. That makes them perfect for weekday treats, last-minute guests, or when you want a dessert that feels homey and polished. They look attractive in stemware or small jars, so serving requires no special techniques.
Ingredient Flex Options
Small swaps can accommodate taste and dietary needs without changing the structure of the recipe.
If you need dairy-free: use a sturdy dairy-free milk (oat or unsweetened almond) and replace the semi-sweet baking chocolate with a dairy-free or vegan dark chocolate. The ingredient notes already call this out, and the pudding sets well with those swaps.
Swap the sweetener: monk fruit is listed here, but you can use granulated sugar in the same amount if you prefer. If you use a liquid sweetener, be cautious — the ratio will change and could affect set.
Make it richer: use 2% or whole milk instead of fat-free for a creamier mouthfeel. The pudding will be slightly denser and more custard-like.
Gear Up: What to Grab
Minimal gear is needed. Grab a medium nonstick saucepan, a whisk, a fine-mesh sieve for tempering, a microwave-safe bowl (or a heatproof bowl and saucepan for a double boiler), and serving glasses. Plastic wrap or wax paper is essential for covering the pudding to prevent a skin.
Optional but helpful: a rubber spatula to scrape the pudding out of the pan cleanly, and a set of small measuring spoons and cups to make assembly precise. If you plan to serve many at once, shallow prep bowls for the whipped topping and pudding can speed assembly.
Easy-to-Miss Gotchas
Temper the yolks slowly. Pouring too much hot milk at once will scramble them. The tablespoon-at-a-time approach is patient, but it prevents curdled bits and keeps the texture silky.
Keep heat low. The recipe specifies medium-low because a rapid boil can break the pudding or cause the eggs to overcook. Whisk constantly when it’s thickening. That motion keeps the mixture smooth and prevents lumps.
Don’t skip the surface cover. Pudding develops an unappealing skin if left exposed while cooling. Press plastic wrap or wax paper directly on the surface; that step makes a bigger difference than you might think.
Customize for Your Needs
Portion and presentation options
For smaller servings, use espresso cups or small 4-ounce jars. For a showier dessert, use wine glasses or parfait glasses. The listed assembly uses two pudding layers and two whipped layers; you can add a third layer for taller glasses as long as you measure so each serving remains balanced.
Flavor variations
Add a pinch of espresso powder into the milk while heating for a mocha note — it deepens the chocolate without making it coffee-forward. For a mint twist, stir 1/4 teaspoon peppermint extract into the whipped topping rather than the pudding (peppermint extract is potent; start small).
Dietary adjustments
To make these completely sugar-free, pair the monk fruit substitute with a sugar-free chocolate like the Lily’s mentioned. For a kosher or specialty brand of whipped topping, choose a compliant product — or use your favorite stabilized whipped cream prepared with powdered sugar to maintain peaks.
Insider Tips
Make the pudding the day before. It chills and firms up better with time, and the flavors actually marry overnight. Assemble right before serving for the freshest whipped topping texture.
When melting chocolate, keep water out of the bowl. A few drops of steam or water in melted chocolate can seize it. If that happens, add a teaspoon of neutral oil or a small splash of hot milk to smooth it out.
Use a warm spoon or scoop to portion the pudding cleanly — it slides easier and creates neater layers. If you’re serving multiple parfaits, line them up and work across to maintain an assembly rhythm: pudding, whip, pudding, whip.
Freezer-Friendly Notes
These parfaits are best served chilled from the refrigerator rather than frozen. The textural contrast of whipped topping and silky pudding doesn’t survive freezing well; the whipped topping can collapse and the pudding can separate once thawed.
If you must store longer than a few days, freeze the pudding (without the Tru Whip) in an airtight container for up to one month. Thaw overnight in the refrigerator and re-whisk before assembling with fresh whipped topping.
Top Questions & Answers
Can I make the pudding without eggs? The yolks add silkiness and help set the pudding. If you avoid eggs, you can increase the cornstarch slightly or use a commercial custard powder designed for eggless puddings, but results will differ.
Can I use a hand mixer for tempering? You can whisk by hand or use a handheld whisk. A mixer isn’t necessary and can incorporate more air, which changes texture slightly.
How long will assembled parfaits last in the fridge? If assembled, eat within 48 hours for best texture. The whipped topping can soften over time, and the layered look will degrade after several days.
What if my pudding is too thin after cooking? Return it to low heat and whisk gently until it thickens to coat the back of a spoon. If it still refuses to thicken, mix a little cornstarch with cold milk and whisk it in, cooking briefly until it sets.
That’s a Wrap
These Chocolate Parfaits are practical, forgiving, and reliably delicious. They bridge the gap between simple weeknight treats and dessert-worthy presentation, and they respond well to small swaps. Follow the directions, mind the tempering step, and you’ll have a chocolate dessert that feels thoughtful without being fussy.
Make the pudding ahead, keep your whipped topping chilled, and assemble just before serving for the best texture. Enjoy — and don’t be surprised if these become your new go-to for quick gatherings and everyday indulgence.

Chocolate Parfaits
Equipment
- medium nonstick saucepan
- Whisk
- Fine mesh sieve
- Microwave-safe Bowl
- Heatproof bowl
- Serving glasses
- Plastic Wrap
Ingredients
Ingredients
- 3 cupsfat-free milk dairy-free milk works too
- 2 1/2 tablespoonsmonk fruit sugar substitute or sugar of your choice
- 1-1/2 teaspoonsvanilla extract
- 2 tablespooncornstarch
- 2 largeegg yolks
- 4 ouncesSemi-Sweet Baking Chocolate I used Lily's sugar-free (use DF chocolate for dairy-free)
- 1 1/4 cupsTru Whip Whipped Topping or whipped cream of your choice
Instructions
Instructions
- In a medium nonstick saucepan, combine all of the milk, the monk fruit sugar substitute, and the cornstarch. Whisk thoroughly until the cornstarch and sugar are fully dissolved and the mixture is smooth.
- Place the saucepan over medium-low heat. Cook, whisking constantly, until the mixture has slightly thickened and becomes warm and steamy (about 10–15 minutes). Do not let it boil vigorously.
- While the milk mixture is heating, place the 2 large egg yolks in a large bowl and whisk lightly to break them up.
- When the milk mixture is hot and slightly thickened, remove the saucepan from the heat. Slowly pour about 1 cup of the hot milk mixture through a fine-mesh sieve into the egg yolks, adding it roughly a tablespoon at a time and whisking constantly to temper the yolks so they do not scramble.
- After the yolks are tempered, pour the remaining hot milk mixture through the sieve into the yolks and whisk until smooth.
- Return the combined mixture to the saucepan. Place over medium-low heat and cook, whisking constantly, until the mixture thickens to a pudding-like consistency and coats the back of a spoon, about 2–4 minutes. Do not let it boil hard.
- While the pudding mixture is cooking (or immediately after, off the heat), melt the 4 ounces of semi-sweet baking chocolate: microwave in a microwave-safe bowl in 20-second bursts, stirring between each burst, until fully melted and smooth (up to about 60 seconds total). Alternatively, melt the chocolate in a heatproof bowl over simmering water.
- Remove the saucepan from the heat. Whisk the melted chocolate and the 1 1/2 teaspoons vanilla extract into the hot pudding mixture until completely smooth and evenly combined.
- Transfer the chocolate pudding into a large bowl. Cover the surface directly with plastic wrap or wax paper so it touches the pudding (this prevents a skin from forming). Chill in the refrigerator for at least 2 hours or overnight until fully set and chilled.
- To assemble the parfaits: spoon 3 tablespoons of chilled chocolate pudding into each serving glass, add 2 tablespoons of Tru Whip whipped topping, add another 2 tablespoons of pudding, and finish with a dollop of Tru Whip on top. Serve chilled.
Notes
Tip: Crumble the wax paper or parchment paper first, it will be easier to shape.