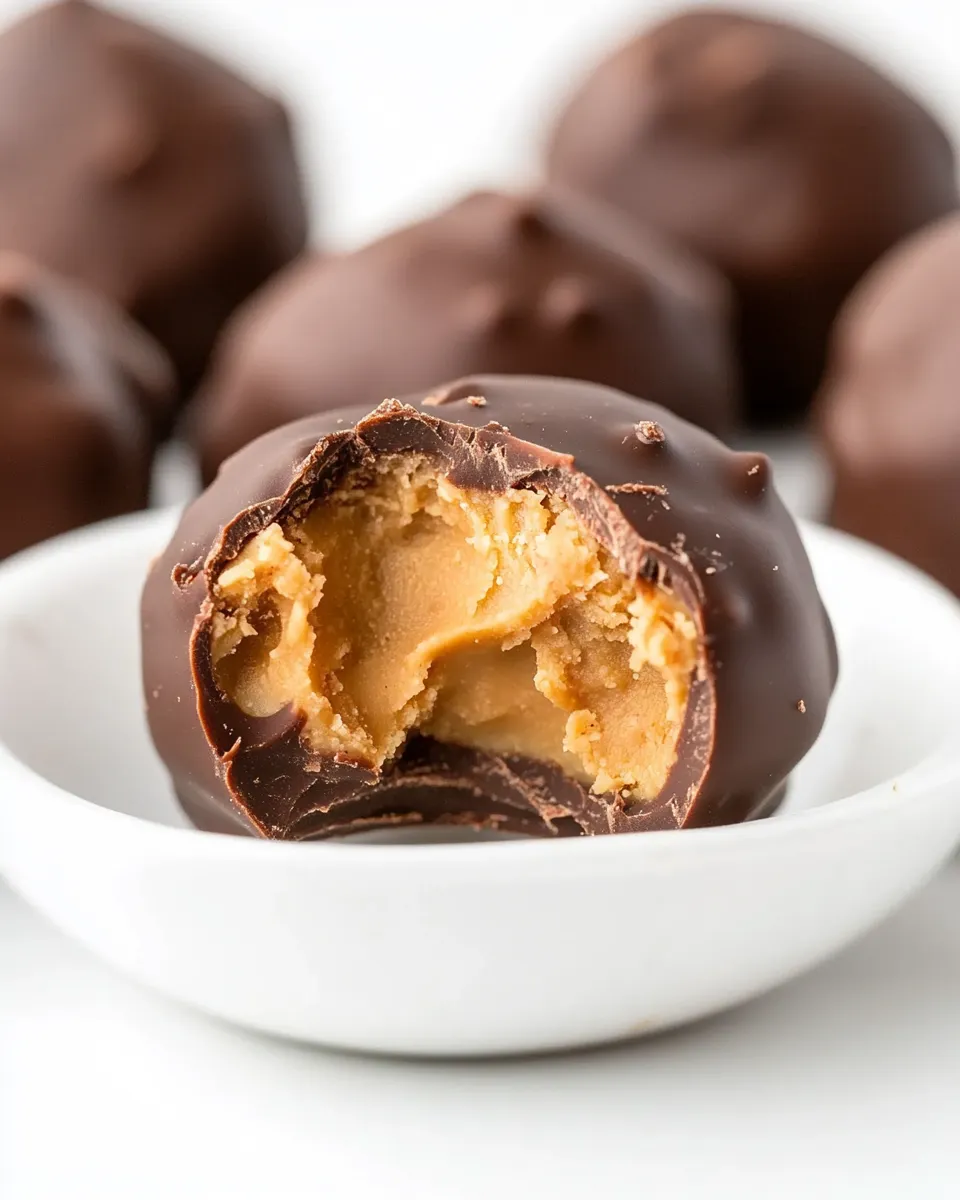
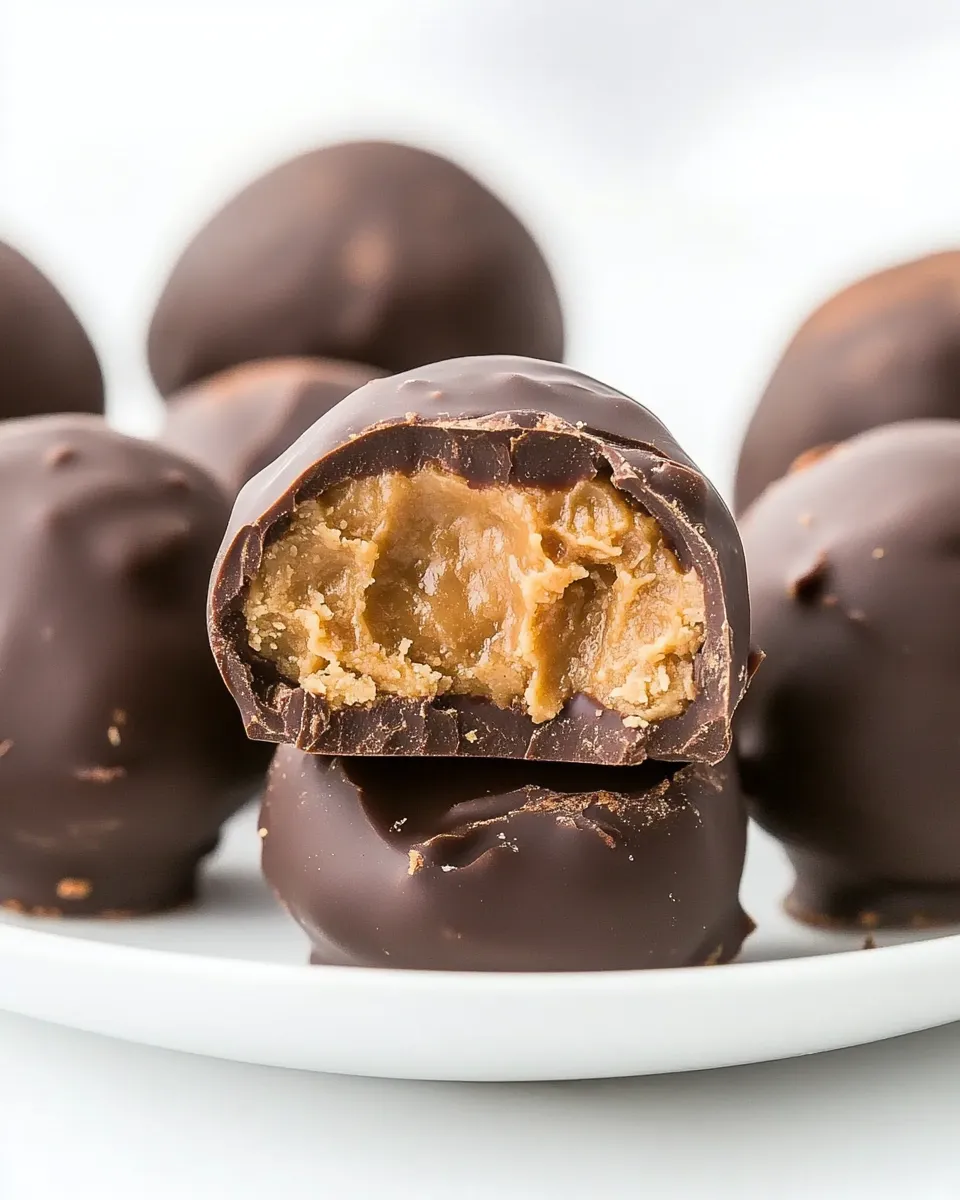
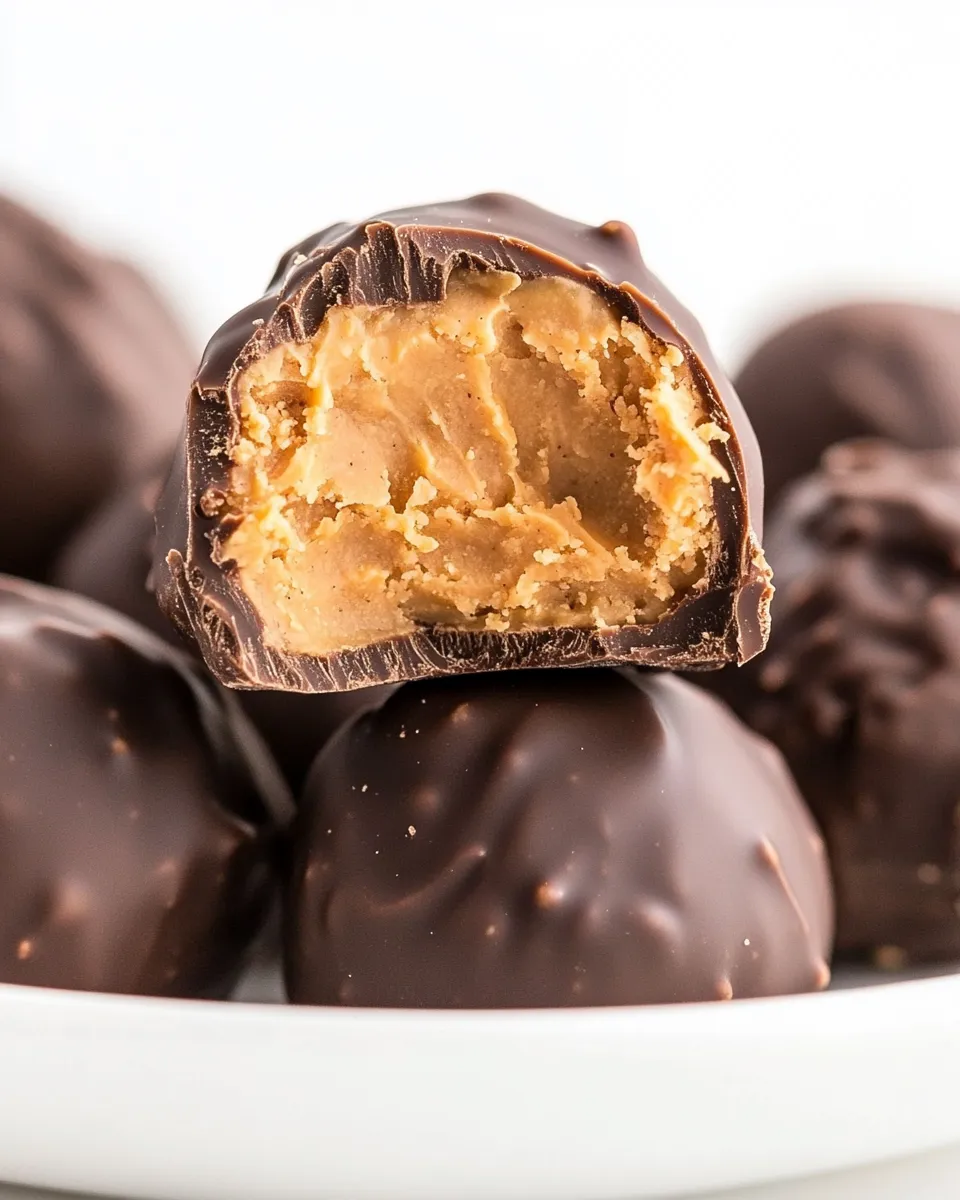
These little no-bake treats are one of my go-to snacks when I want something sweet without wrecking my macros. They balance salty peanut butter and dark chocolate, and they come together quickly with just a short chill. Texture is key: a grainy, slightly dry interior rolled into a smooth chocolate shell.
I test recipes in a small kitchen and I prefer practical instructions. You’ll find exact measures below, and every tip I give is something I’ve used to avoid meltdowns and sticky hands. Make them for a party platter, or keep a batch in the fridge for an easy, portion-controlled dessert.
Follow the steps as written and these will turn out reliably firm, not greasy, and set up quickly in the fridge. No complicated tempering, no long bake times—just a simple routine that produces consistent results.
The Essentials
Quick summary: mix coconut flour, smooth natural peanut butter, smashed peanuts and most of the sweetener; chill. Melt chocolate with coconut oil and the remaining sweetener; dip. Chill until firm. The process is straightforward, but a few small habits—measuring carefully, chilling the mixture, and letting excess chocolate drip—make the difference between a clean bite and a messy one.
Timings: active hands-on time is short (about 15–30 minutes, depending on rolling speed). Refrigeration takes the rest—30 minutes for the filling and additional time for the chocolate to set. Equipment needs are minimal: a bowl, baking sheet, parchment, and a microwave-safe bowl or double boiler for the chocolate.
Texture note: coconut flour absorbs a lot of moisture. Follow the recipe amounts, but if the mixture is noticeably loose after combining, the instructions include a measured adjustment: add ¼ cup additional coconut flour. That small correction keeps the bites firm and easy to roll.
Ingredients
- ¾ cup coconut flour — absorbs moisture and gives structure; add a little extra if the batter is too thin.
- 2 cups smooth natural peanut butter — the primary fat and flavor; smooth and natural keeps the texture even.
- ½ cup peanuts, smashed — provides crunchy contrast inside the center.
- 1 cup dark chocolate melting wafers — melts smoothly for the coating and sets shiny.
- ½ tablespoon coconut oil — thins the melted chocolate slightly for easier dipping and a smoother shell.
- 1 package Truvia sweetener, divided — split between the peanut butter mixture and the melted chocolate per the instructions.
Build Keto Chocolate Peanut Butter Balls Step by Step
- Line a 9×13-inch baking sheet with parchment paper and set aside.
- In a medium bowl combine ¾ cup coconut flour, 2 cups smooth natural peanut butter, ½ cup smashed peanuts, and ¾ of the package Truvia sweetener. Mix until the mixture is sticky but not thin. If the mixture is too thin, add ¼ cup additional coconut flour.
- Cover the bowl and refrigerate the peanut butter mixture for 30 minutes.
- In a small microwave-safe bowl combine 1 cup dark chocolate melting wafers, ½ tablespoon coconut oil, and the remaining ¼ package Truvia sweetener. Microwave for 30 seconds, stir, then microwave an additional 30 seconds. Stir well until the chocolate is smooth.
- Remove the peanut butter mixture from the refrigerator and roll it into bite-size balls.
- Using a spoon, dip each ball into the melted chocolate to coat, allow excess chocolate to drip off, and place the coated balls onto the prepared parchment paper.
- Refrigerate the chocolate-coated balls until the chocolate is set and they are firm.
Why It Works Every Time
Coconut flour is extremely absorbent. It pulls moisture out of the peanut butter and stabilizes the filling so you end up with a firm center rather than a spread. That absorbency also explains why the recipe allows a measured adjustment—adding ¼ cup more coconut flour if needed—rather than a guess.
The peanut butter provides fat and cohesion. Using a smooth natural version keeps the mix homogeneous; a heavily processed, oil-separated nut butter behaves differently and may yield a greasier texture. The smashed peanuts add mechanical structure and a sharp textural contrast that prevents the center from becoming uniformly pasty.
Melting wafers plus a touch of coconut oil make a forgiving, glossy coating that doesn’t require tempering. The coconut oil lowers the viscosity and helps the chocolate set to a pleasant snap once chilled. Splitting the sweetener keeps both the interior and coating balanced without over-sweetening the chocolate shell.
No-Store Runs Needed
If you already keep a basic keto pantry you probably have everything on hand. Coconut flour and Truvia are the two specialty items; most kitchens that follow low-carb cooking will have them. Peanut butter and peanuts are common staples.
Plan around space in the refrigerator: one flat tray and a little shelf space are all you need. If your chocolate melter or microwave-safe bowl is missing, use a small saucepan over very low heat and whisk constantly; the wafers will behave the same with close attention.
These make-ahead bites are especially useful because you can prepare the centers and store them briefly while you melt chocolate. No last-minute runs to the store for obscure ingredients.
Setup & Equipment
- Bowl (medium) — for mixing the filling.
- Measuring cups and spoons — accuracy matters, especially with coconut flour.
- 9×13-inch baking sheet — any flat tray will work.
- Parchment paper — prevents sticking and makes cleanup easy.
- Small microwave-safe bowl or small saucepan — for melting chocolate and coconut oil.
- Spoon or fork — for dipping and tapping off excess chocolate.
- Refrigerator space — a flat surface to chill the sheet while the chocolate sets.
Pitfalls & How to Prevent Them
- Mixture too thin: Coconut flour varies by brand and how compacted it is. If the mixture looks loose after combining, add exactly ¼ cup additional coconut flour as the recipe instructs. Mix just until sticky; overworking can make the centers dry.
- Greasy filling: Using peanut butter that’s overly oily or not natural can result in a greasy mixture. Use smooth natural peanut butter for the intended texture.
- Chocolate that’s grainy: Microwave in short bursts (30 seconds), stirring between intervals. If reheating beyond the two 30-second bursts, do so in 10–15 second increments and stir each time to avoid seizing.
- Drippy shells: Let excess chocolate drip off the spoon before placing balls on parchment, and give them enough fridge time to fully set. A thin shell will set firmer after a longer chill.
- Sticking to parchment: If you skip parchment, the chocolate can stick. Always line the tray so you can remove the balls cleanly and store them without damage.
Seasonal Flavor Boosts
You can enhance these without changing the core ingredient list. Use extra smashed peanuts on top immediately after dipping to add visual contrast and seasonal crunch. For holidays, cluster them on a platter with extra crushed peanuts around the base to look festive without changing the recipe.
Another small seasonal trick: reserve a tiny spoonful of the melted chocolate and drizzle it back over the set balls for a decorative finish that also seals the seam where the chocolate pooled. That keeps appearance polished and redoubles the chocolate layer without altering amounts.
Notes on Ingredients
¾ cup coconut flour — acts as the main dry binder. It absorbs moisture and prevents the peanut butter from being runny. Because coconut flour is so thirsty, the instruction to add ¼ cup more if needed is practical and measured.
2 cups smooth natural peanut butter — provides fat, flavor, and body. Natural peanut butter tends to have different oil profiles from processed varieties; it helps the mixture hold together. Avoid crunchy peanut butter in the filling unless you want extra texture beyond the smashed peanuts.
½ cup smashed peanuts — these are your crunchy punctuation. Smash them coarsely so you get occasional crunchy bites inside, rather than a uniformly nutty paste. They also help break up the density of the peanut butter.
1 cup dark chocolate melting wafers + ½ tablespoon coconut oil — wafers are formulated to melt smoothly and set evenly. Coconut oil is only a small quantity; it improves flow and shine for dipping without making the shell soft at room temperature once chilled.
1 package Truvia sweetener, divided — splitting the sweetener distributes sweetness where it matters: most of it stabilizes the filling, and the small remainder balances the dark chocolate in the coating.
Leftovers & Meal Prep
Store the finished balls in an airtight container in the refrigerator. They’ll keep firm and fresh for up to 2 weeks chilled. For longer storage, freeze them on the lined baking sheet until solid, then transfer to a freezer-safe container separated by parchment layers to prevent sticking. Frozen, they last up to 3 months.
To serve from frozen, move to the fridge for 30–60 minutes to avoid sweating. From freezer straight to table will yield a very firm center and may cause condensation on the chocolate as it warms. For best texture, thaw in the refrigerator briefly before serving.
Questions People Ask
- Can I make the filling ahead? Yes. Prepare the filling, shape into balls, and keep them chilled until you’re ready to melt the chocolate. Chilled centers are easier to dip and reduce chocolate pooling.
- What if my chocolate seizes? Stop heating and whisk in a tiny bit more coconut oil off-heat. Reheat gently in short bursts. The wafers are less prone to seizing than raw chopped chocolate.
- Can I skip the smashed peanuts? Technically yes, but you’ll lose the intended crunch. The peanuts add texture that balances the dense peanut butter base.
- Do they need to stay refrigerated? Yes. Because of the peanut butter and coconut oil, refrigeration keeps the shell and center firm. They soften quickly at room temperature.
Bring It to the Table
Present these on a simple platter with a few extra smashed peanuts sprinkled around for a rustic look. They’re great alongside hot coffee, as part of a dessert board, or boxed up for neighbor gifts. A neat tip: line small muffin liners on the tray before placing each coated ball into its cup; that makes serving and transport tidy.
Portion control is effortless: each bite-size ball should be consistent so caloric expectations remain steady. Serve chilled for the cleanest bite, and enjoy a treat that feels indulgent while sticking close to a keto plan.

Keto Chocolate Peanut Butter Balls
Equipment
- 9x13-inch baking sheet
- Parchment Paper
- Medium Bowl
- Small microwave-safe bowl
- Spoon
- Refrigerator
- Microwave
Ingredients
Ingredients
- 3/4 cupscoconut flour plus a little if batter if too thin
- 2 cupssmooth natural peanut butter
- 1/2 cuppeanuts smashed
- 1 cupdark chocolate melting wafers
- 1/2 tablespooncoconut oil
- 1 package Truvia sweetener divided
Instructions
Instructions
- Line a 9×13-inch baking sheet with parchment paper and set aside.
- In a medium bowl combine ¾ cup coconut flour, 2 cups smooth natural peanut butter, ½ cup smashed peanuts, and ¾ of the package Truvia sweetener. Mix until the mixture is sticky but not thin. If the mixture is too thin, add ¼ cup additional coconut flour.
- Cover the bowl and refrigerate the peanut butter mixture for 30 minutes.
- In a small microwave-safe bowl combine 1 cup dark chocolate melting wafers, ½ tablespoon coconut oil, and the remaining ¼ package Truvia sweetener. Microwave for 30 seconds, stir, then microwave an additional 30 seconds. Stir well until the chocolate is smooth.
- Remove the peanut butter mixture from the refrigerator and roll it into bite-size balls.
- Using a spoon, dip each ball into the melted chocolate to coat, allow excess chocolate to drip off, and place the coated balls onto the prepared parchment paper.
- Refrigerate the chocolate-coated balls until the chocolate is set and they are firm.
Notes
TIP: If you are rolling the balls with your hands and are finding that it is sticky work, lightly spray your hands with cooking spray to prevent the peanut butter from sticking to you.
TIP: The chocolate has to be quite hot and the peanut butter balls really cold for the chocolate to stick properly. If you find it is taking too much time, you may want to keep the peanut butter balls in the fridge and only take a few out at a time to work with.