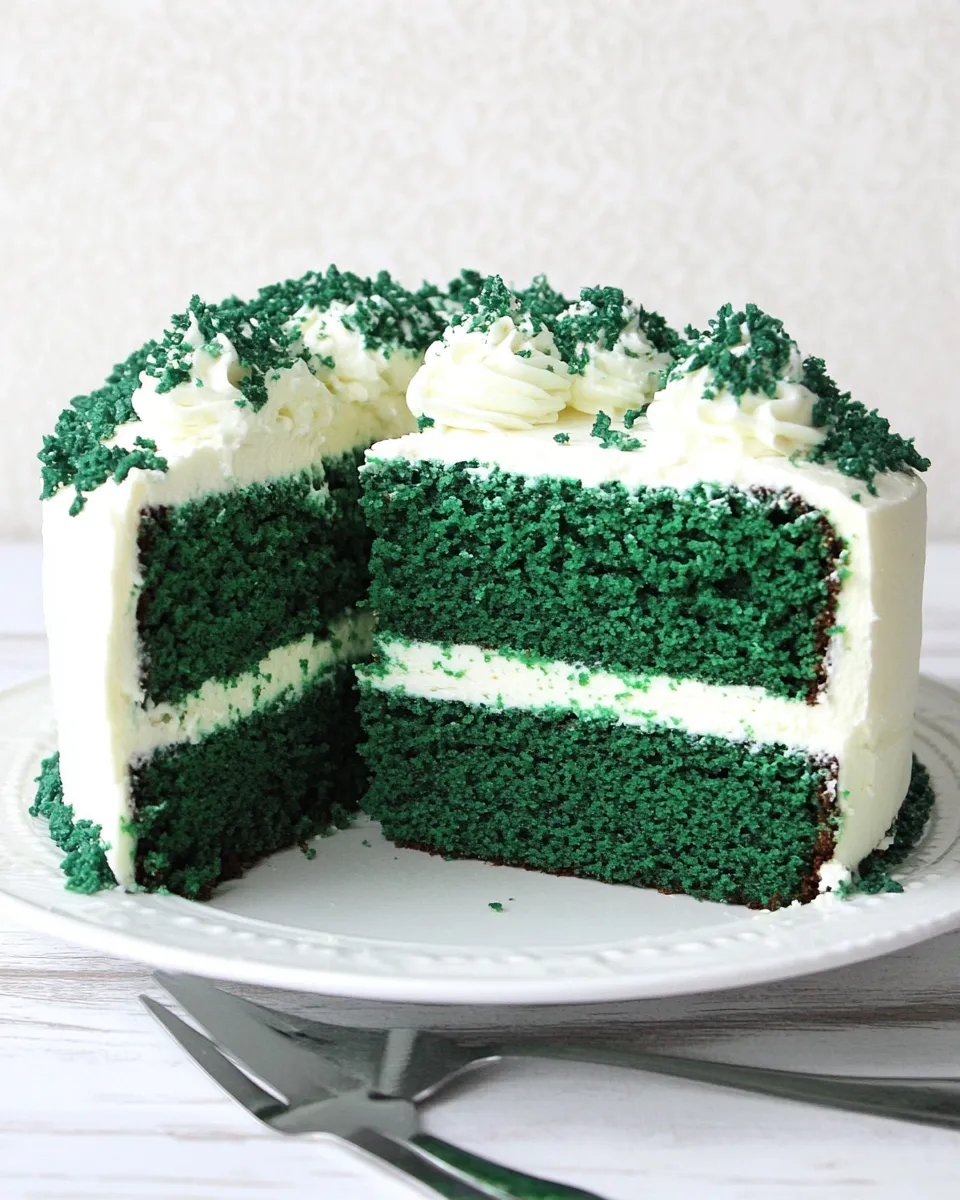
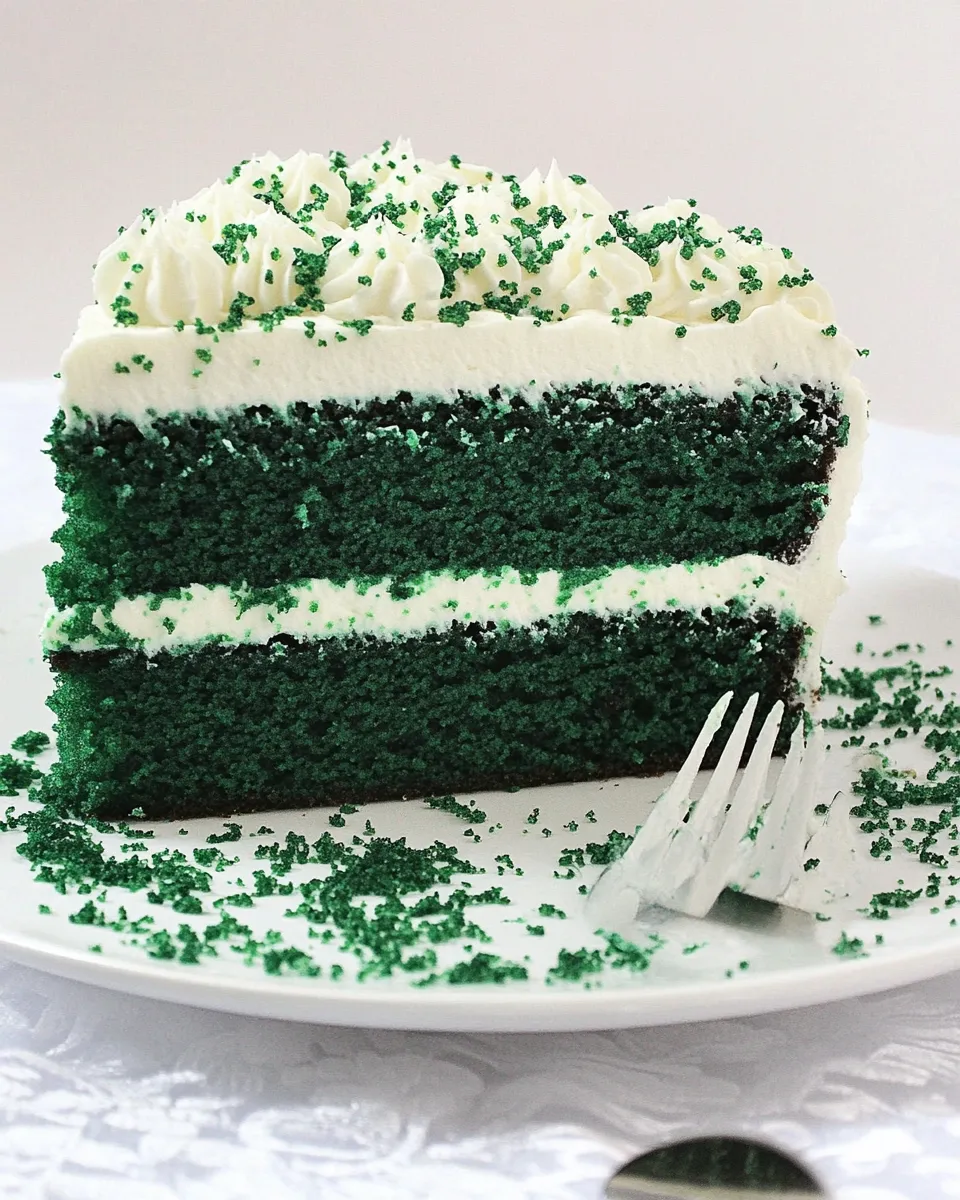
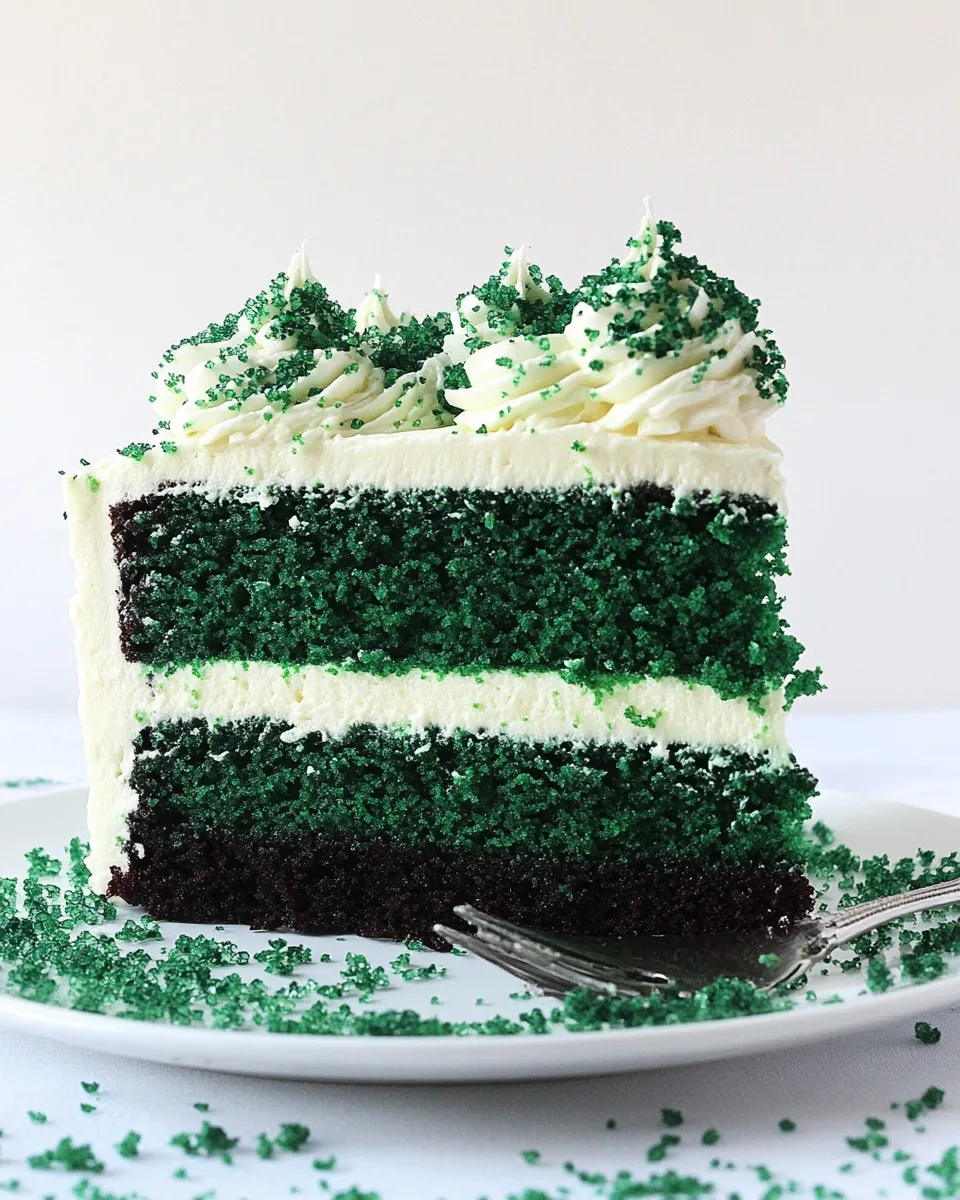
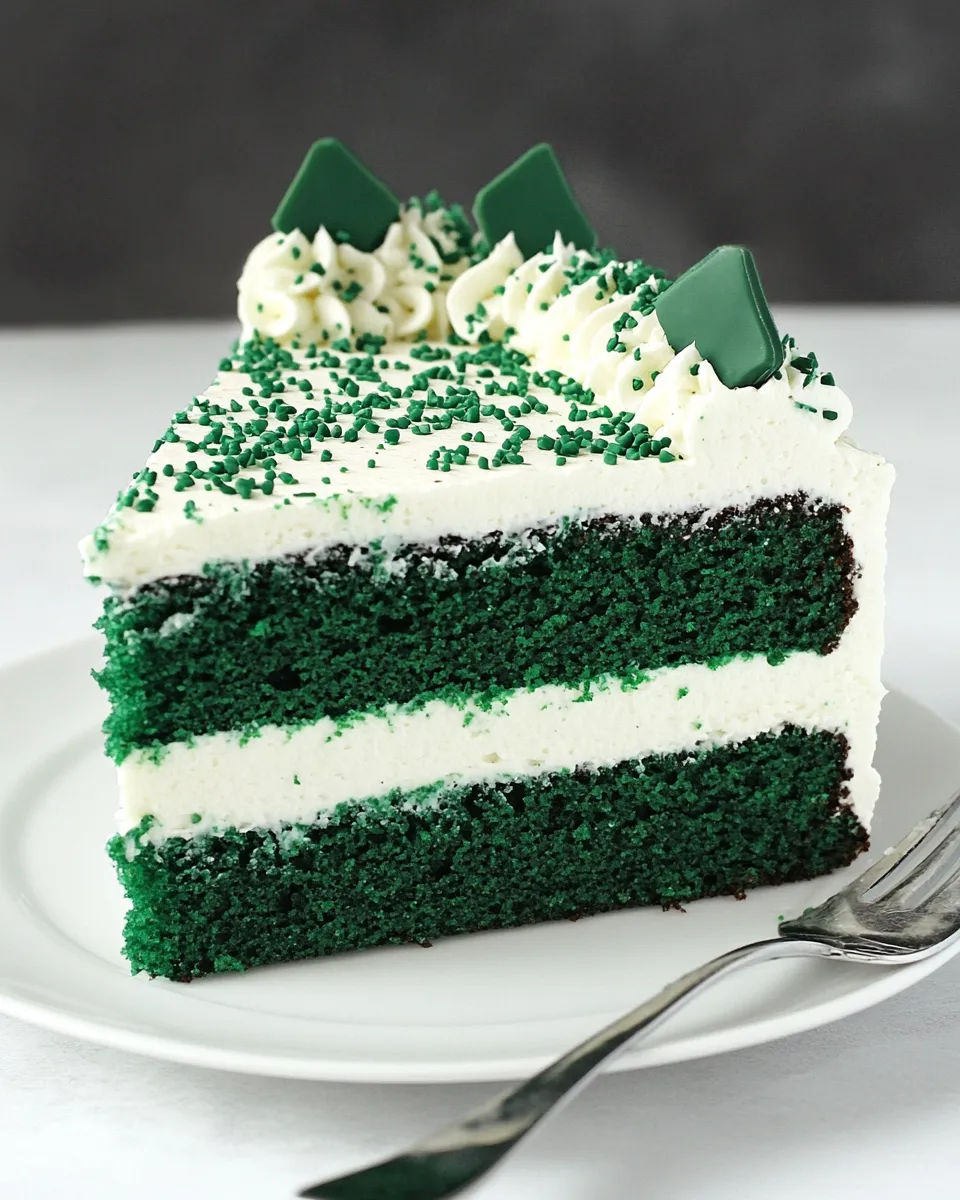
This Green Velvet Cheesecake Cake is exactly the sort of dessert I reach for when I want something that feels special but follows a clear, reliable process. It layers a frozen cheesecake disk between two bright green velvet cake layers, finished with a marshmallow-cream cheese frosting that’s smooth, tangy and a little wild in the best way. The contrast of dense frozen cheesecake and light cake is worth the extra steps.
I know the method looks long on paper, but most of the time is waiting: cooling, freezing, or baking. With simple organization and a few small tools, you can break the work into manageable sessions—cheesecake first, then freeze, then cake and assembly. I’ll walk you through what to buy, what to watch for, and how to bring it together cleanly.
Below you’ll find a precise ingredient list (use it as your checklist), the step-by-step directions in the order they should be done, and practical tips to avoid common pitfalls. No fluff—just the reliable, human-tested process that gets a showstopping cake on the table.
Your Shopping Guide
Before you start, collect everything in one trip. This recipe uses several dairy items and fresh eggs, plus pantry staples like flour and sugar. Buy things that are fresh—especially the cream cheese, eggs, sour cream, and buttermilk. If you’re baking in stages over two days, it’s fine to buy the refrigerated items a day before.
- Check cream cheese expiration dates and buy full-fat blocks for best texture.
- Get a reliable green food coloring—liquid works, but gel gives more vivid color with less product.
- Pick a jar of marshmallow creme (not mini marshmallows) for the frosting’s light structure.
- If you don’t have buttermilk, buy cultured buttermilk or get powdered buttermilk—fresh is best.
Ingredients
- Two 8-ounce packages cream cheese, at room temperature — for the cheesecake layer; soft room-temp blocks blend smoothly.
- 2/3 cup granulated white sugar — sweetens the cheesecake batter.
- pinch of salt — balances sweetness in the cheesecake.
- 2 large eggs — for the cheesecake; add one at a time for even texture.
- 1/3 cup sour cream — adds acidity and creaminess to the cheesecake.
- 1/3 cup heavy whipping cream — lightens the cheesecake without thinning it too much.
- 1 teaspoon vanilla extract — flavor for the cheesecake.
- 2 1/2 cups all purpose flour — for the cake layers; measure by spooning into the cup and leveling.
- 1/2 teaspoon salt — balances the cake batter.
- 1 1/2 cups canola or vegetable oil — keeps the cake tender and moist.
- 1 1/2 cups granulated white sugar — sweetens the cake layers.
- 2 large eggs — for the cake; add one at a time.
- 1 teaspoon vanilla extract — cake flavoring.
- 1 teaspoon white vinegar — reacts with baking soda for lift.
- 1 teaspoon baking soda — leavening for the cake.
- 1 cup buttermilk — acidity for tender crumb and reaction with baking soda.
- 1 tablespoon (1/2 of a 1-ounce bottle) green food coloring (alternately, you can use gel paste) — makes this green velvet; gel is more concentrated.
- Two 8-ounce packages cream cheese, at room temperature — for the frosting; again, room-temp works best.
- 1/2 cup (1 stick) salted butter, at room temperature — adds richness and stability to frosting.
- One 7-ounce jar marshmallow creme — gives the frosting its fluffy, marshmallow character.
- 1 cup powdered sugar — sweetens and adjusts frosting consistency.
Step-by-Step: Green Velvet Cheesecake Cake
- Preheat the oven to 325°F. Place a large roasting pan on the lower third rack of the oven. Bring a kettle of water to a boil on the stove.
- Prepare a 9-inch springform pan: spray the inside with nonstick spray and line the bottom with a round of parchment paper. Wrap a double layer of heavy-duty foil around the bottom and up the sides of the pan, sealing seams so water from the water bath cannot seep in.
- Make the cheesecake batter: in a large bowl, use an electric mixer to beat the Two 8-ounce packages cream cheese (room temperature) until smooth and creamy, about 1–2 minutes. Add 2/3 cup granulated sugar and a pinch of salt; blend for 2 minutes, scraping down the bowl as needed.
- Add the cheesecake eggs one at a time, mixing briefly after each until incorporated. Mix in 1/3 cup sour cream, 1/3 cup heavy whipping cream, and 1 teaspoon vanilla extract; mix until the batter is smooth.
- Pour the cheesecake batter into the prepared springform pan. Place the springform pan into the roasting pan on the oven rack. Carefully pour the boiling kettle water into the roasting pan until the water comes about 1 inch up the foil around the cheesecake pan.
- Bake the cheesecake at 325°F for 45 minutes, until the top is set to the touch and not jiggly.
- Remove the roasting pan from the oven. Carefully lift the springform pan out of the water bath and place it on a wire rack. Let the cheesecake cool on the rack for at least 1 hour.
- After cooling, place the cheesecake (still in the springform pan and foil) into the freezer and freeze completely, 4–5 hours or overnight.
- When the cheesecake is frozen solid, preheat the oven to 350°F. Prepare two 9-inch round cake pans: spray with nonstick spray and line the bottoms with parchment rounds.
- In a medium bowl, sift together 2 1/2 cups all-purpose flour and 1/2 teaspoon salt.
- In a large bowl, combine 1 1/2 cups canola or vegetable oil and 1 1/2 cups granulated sugar. Beat with an electric mixer for 2 minutes.
- Add the two cake eggs, one at a time, beating briefly after each. Add 1 teaspoon vanilla extract and beat an additional 2 minutes.
- In a small bowl, combine 1 teaspoon white vinegar and 1 teaspoon baking soda and stir briefly (the mixture will fizz). Add to this small bowl 1 cup buttermilk and 1 tablespoon green food coloring; stir to combine.
- Add the buttermilk/coloring mixture to the cake batter and beat on medium-low speed for 1 minute until blended.
- Add the sifted dry ingredients to the batter. Increase the mixer speed to medium-high and beat, scraping down the sides of the bowl, for 2 minutes more.
- Divide the batter evenly between the two prepared 9-inch pans. Bake at 350°F for 30–35 minutes, or until a toothpick inserted into the center comes out with a few moist crumbs attached.
- Let the cakes cool in their pans for 20 minutes. Run a knife around the edges, invert the cakes onto a wire rack, remove the parchment, and cool completely.
- Make the frosting: in a large bowl, beat the Two 8-ounce packages cream cheese and 1/2 cup (1 stick) salted butter (both at room temperature) on medium-high speed until creamy and smooth.
- Add the One 7-ounce jar marshmallow creme and mix until smooth. Add 1 cup powdered sugar and continue beating, scraping down the sides, until the frosting is smooth and spreadable.
- Assemble the cake: place one cooled cake layer on your cake plate or platter. Remove the frozen cheesecake from the freezer, unlock and remove the springform side, then slide a knife under the parchment to release the cheesecake from the pan and peel off the parchment.
- Trim the frozen cheesecake as needed so its diameter matches the cake layers. Place the cheesecake layer on top of the bottom cake layer, then place the second cake layer on top of the cheesecake.
- Apply a thin crumb coat of frosting to the assembled cake to seal in crumbs. Refrigerate the cake for 30 minutes, or until the crumb coat is set.
- Apply the final layer of frosting over the chilled crumb coat. Place a large scoop of frosting on top, use a long spatula or knife to spread it evenly across the top, then spread down the sides until smooth. Decorate as desired.
Why It’s My Go-To
This cake earns its place because it balances showmanship and predictability. The frozen cheesecake layer gives a silky, dense center that slices cleanly. The green velvet cake is soft, tender, and surprisingly straightforward—no complex folding, just measured steps and a little patience. The marshmallow-cream cheese frosting tastes lighter than pure buttercream and pairs beautifully with the cheesecake.
It’s also forgiving: the cheesecake freezes solid which makes assembly neater, and the crumb coat step reduces finishing time and frustration when applying the final frosting. If you like a dessert that feels celebratory but you can actually finish on a weeknight with planning, this is it.
Smart Substitutions
- Full-fat cream cheese — essential for texture; reduced-fat versions change consistency, so avoid them if possible.
- Buttermilk — if you don’t have it, you can make a quick substitute by adding 1 tablespoon lemon juice or vinegar to a cup of milk and letting it sit for 5 minutes (no new measurements in the recipe are changed).
- Green food coloring — gel paste in small amounts gives brighter color with less liquid; use what you have.
- Oil — any neutral oil like canola or light olive oil works; do not use strongly flavored oils.
Must-Have Equipment
- 9-inch springform pan — for the cheesecake layer and easy release.
- Large roasting pan — for the water bath during cheesecake baking.
- Electric mixer — makes cheesecake and frosting smooth; a stand mixer or handheld both work.
- Two 9-inch round cake pans — for the green velvet layers.
- Wire racks — for proper cooling.
- Spatulas and offset spatula — for spreading frosting smoothly.
- Heavy-duty foil — to fully wrap the springform pan for the water bath.
Easy-to-Miss Gotchas
- Water bath seal: don’t skimp on wrapping the springform pan in double heavy-duty foil and sealing seams—water in the cheesecake ruins texture.
- Room temperature dairy: cream cheese and butter must be softened to room temperature for smooth batter and frosting; cold blocks cause lumps.
- Freezing step: freeze the cheesecake fully before assembling; a partially frozen cheesecake will squish or slip when you stack the cake layers.
- Coloring: adding too much liquid food coloring can thin the batter; prefer gel coloring if you want a bright green hue.
Allergy-Friendly Swaps
- Dairy-free: use dairy-free cream cheese and butter substitutes formulated for baking; texture will vary—chill and test before assembly.
- Egg-free: this recipe relies on eggs in both components, so use a trusted egg replacer blend designed for denser cakes and cheesecakes if you need to substitute; expect some textural differences.
- Gluten-free: swap the all-purpose flour for a 1:1 gluten-free baking blend and add a tablespoon of xanthan gum if your blend lacks it; bake time may vary slightly.
What Could Go Wrong
- Cracked cheesecake top — usually from overbaking or rapid temperature changes; remove from oven when the center is set but not rock-solid and cool gradually on a wire rack.
- Soggy bottom from water bath leakage — happens when foil isn’t sealed; test by pouring a little water in your wrapped pan before adding batter to check for leaks.
- Cake layers too dense — under-whipping or over-measuring flour are common causes; spoon and level the flour when measuring.
- Frosting too soft — chill briefly to firm up if your kitchen is warm; work in short bursts and refrigerate between steps if needed.
Best Ways to Store
Because the cheesecake layer was frozen during assembly, the finished cake is best stored in the refrigerator. Keep it covered with a cake dome or in a cake carrier to protect it from fridge odors.
- Short term: refrigerate for up to 4 days; slices will hold shape because of the frozen cheesecake core.
- Long term: you can freeze individual slices wrapped tightly in plastic wrap and foil for up to 1 month; thaw in the fridge overnight before serving.
- Do not leave the assembled cake at room temperature for more than 2 hours due to the cream cheese components.
Green Velvet Cheesecake Cake Q&A
Q: Can I make the cheesecake and cake on the same day?
A: You can bake both the cheesecake and the cake layers the same day, but the cheesecake needs 4–5 hours to freeze solid (or overnight). I usually do the cheesecake first and freeze it overnight, then bake the cake layers and assemble the next day.
Q: Do I have to freeze the cheesecake?
A: Yes—freezing it makes it rigid enough to handle when you stack the cake layers. Without freezing, the cheesecake would compress and likely leak when assembling.
Q: How can I get the brightest green?
A: Use a concentrated gel food coloring and add a little at a time until you reach the desired hue. Gel gives vivid color without thinning the batter.
Q: Can I make this into cupcakes?
A: The structure relies on a single cheesecake disk, so cupcakes would require separate mini cheesecake cores and different timing. It’s possible, but you’d be following a different method for assembly.
Bring It to the Table
When serving, slice with a sharp, warm knife—dip the knife into hot water, wipe dry, and cut; repeat between slices for clean edges. A thin layer of frosting around the perimeter helps stabilize each slice, and the frozen cheesecake center makes presentation impressive.
Garnish simply: a few toasted marshmallow bits, white chocolate shavings, or a scattering of fresh berries complement the richness without competing with the green velvet color. Serve slightly chilled—cold enough to keep the cheesecake layer firm, but not so cold that the flavors are muted.
This cake makes a statement on special occasions, but once you get the rhythm of the steps it’s entirely doable. Organize your timing, follow the steps in order, and you’ll end up with a striking, delicious Green Velvet Cheesecake Cake every time.
Green Velvet Cheesecake Cake
Equipment
- 9-inch Springform Pan
- large roasting pan
- 9-inch Round Cake Pans
- Electric Mixer
- Wire Rack
- Parchment Paper
- heavy-duty foil
- Kettle
Ingredients
Ingredients
- Two8-ounce packagescream cheese at room temperature
- 2/3 cupgranulated white sugar
- pinch of salt
- 2 largeeggs
- 1/3 cupsour cream
- 1/3 cupheavy whipping cream
- 1 teaspoonvanilla extract
- 2 1/2 cupsall purpose flour
- 1/2 teaspoonsalt
- 1 1/2 cupscanola or vegetable oil
- 1 1/2 cupsgranulated white sugar
- 2 largeeggs
- 1 teaspoonvanilla extract
- 1 teaspoonwhite vinegar
- 1 teaspoonbaking soda
- 1 cupbuttermilk
- 1 tablespoon 1/2 of a 1-ounce bottlegreen food coloring(alternately, you can use gel paste)
- Two8-ounce packagescream cheese at room temperature
- 1/2 cup 1 sticksalted butter, at room temperature
- One7-ounce jarmarshmallow creme
- 1 cuppowdered sugar
Instructions
Instructions
- Preheat the oven to 325°F. Place a large roasting pan on the lower third rack of the oven. Bring a kettle of water to a boil on the stove.
- Prepare a 9-inch springform pan: spray the inside with nonstick spray and line the bottom with a round of parchment paper. Wrap a double layer of heavy-duty foil around the bottom and up the sides of the pan, sealing seams so water from the water bath cannot seep in.
- Make the cheesecake batter: in a large bowl, use an electric mixer to beat the Two 8-ounce packages cream cheese (room temperature) until smooth and creamy, about 1–2 minutes. Add 2/3 cup granulated sugar and a pinch of salt; blend for 2 minutes, scraping down the bowl as needed.
- Add the cheesecake eggs one at a time, mixing briefly after each until incorporated. Mix in 1/3 cup sour cream, 1/3 cup heavy whipping cream, and 1 teaspoon vanilla extract; mix until the batter is smooth.
- Pour the cheesecake batter into the prepared springform pan. Place the springform pan into the roasting pan on the oven rack. Carefully pour the boiling kettle water into the roasting pan until the water comes about 1 inch up the foil around the cheesecake pan.
- Bake the cheesecake at 325°F for 45 minutes, until the top is set to the touch and not jiggly.
- Remove the roasting pan from the oven. Carefully lift the springform pan out of the water bath and place it on a wire rack. Let the cheesecake cool on the rack for at least 1 hour.
- After cooling, place the cheesecake (still in the springform pan and foil) into the freezer and freeze completely, 4–5 hours or overnight.
- When the cheesecake is frozen solid, preheat the oven to 350°F. Prepare two 9-inch round cake pans: spray with nonstick spray and line the bottoms with parchment rounds.
- In a medium bowl, sift together 2 1/2 cups all-purpose flour and 1/2 teaspoon salt.
- In a large bowl, combine 1 1/2 cups canola or vegetable oil and 1 1/2 cups granulated sugar. Beat with an electric mixer for 2 minutes.
- Add the two cake eggs, one at a time, beating briefly after each. Add 1 teaspoon vanilla extract and beat an additional 2 minutes.
- In a small bowl, combine 1 teaspoon white vinegar and 1 teaspoon baking soda and stir briefly (the mixture will fizz). Add to this small bowl 1 cup buttermilk and 1 tablespoon green food coloring; stir to combine.
- Add the buttermilk/coloring mixture to the cake batter and beat on medium-low speed for 1 minute until blended.
- Add the sifted dry ingredients to the batter. Increase the mixer speed to medium-high and beat, scraping down the sides of the bowl, for 2 minutes more.
- Divide the batter evenly between the two prepared 9-inch pans. Bake at 350°F for 30–35 minutes, or until a toothpick inserted into the center comes out with a few moist crumbs attached.
- Let the cakes cool in their pans for 20 minutes. Run a knife around the edges, invert the cakes onto a wire rack, remove the parchment, and cool completely.
- Make the frosting: in a large bowl, beat the Two 8-ounce packages cream cheese and 1/2 cup (1 stick) salted butter (both at room temperature) on medium-high speed until creamy and smooth.
- Add the One 7-ounce jar marshmallow creme and mix until smooth. Add 1 cup powdered sugar and continue beating, scraping down the sides, until the frosting is smooth and spreadable.
- Assemble the cake: place one cooled cake layer on your cake plate or platter. Remove the frozen cheesecake from the freezer, unlock and remove the springform side, then slide a knife under the parchment to release the cheesecake from the pan and peel off the parchment.
- Trim the frozen cheesecake as needed so its diameter matches the cake layers. Place the cheesecake layer on top of the bottom cake layer, then place the second cake layer on top of the cheesecake.
- Apply a thin crumb coat of frosting to the assembled cake to seal in crumbs. Refrigerate the cake for 30 minutes, or until the crumb coat is set.
- Apply the final layer of frosting over the chilled crumb coat. Place a large scoop of frosting on top, use a long spatula or knife to spread it evenly across the top, then spread down the sides until smooth. Decorate as desired.
Notes
*Measure your cheesecake layer against the cake layers. If the cheesecake layer turns out to be slightly larger size round than your cake layers, move it to a cutting board and use a knife to gently shave off some of the exterior of the cheesecake.
*How to apply a crumb coat layer of frosting:use a long, thin spatula or knife to cover the cake completely with a thin and even layer of frosting. Wipe off the spatula each time you’re about to dip it back into the bowl to get more frosting (this way you won’t be transferring any green crumbs into the bowl of frosting). Don’t worry at this point about the crumbs being visible in the frosting on the cake. When your cake has a thin layer of frosting all over it, place it into the refrigerator for 30 minutes to “set” the frosting. Once the first layer of frosting is set, apply the second layer.
*If you are serving this cake at a party, it’s perfectly okay to leave the cake at room temperature for a couple of hours (the cheesecake thaws very quickly). Otherwise, keep it stored in the refrigerator. It also freezes perfectly. Freeze it as is, then wrap it in plastic wrap and store it in the freezer until it is needed. Leftover slices may also be wrapped and frozen.