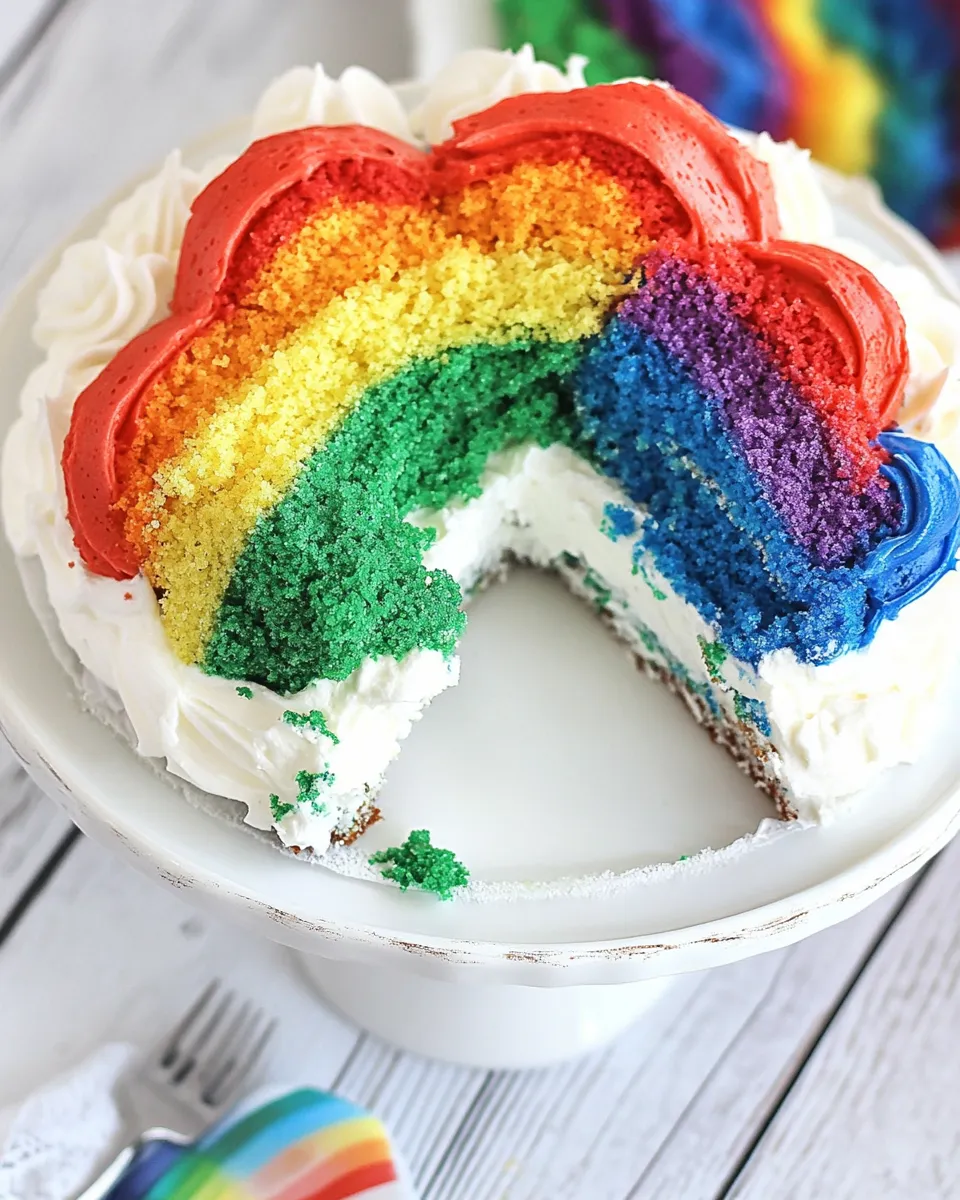
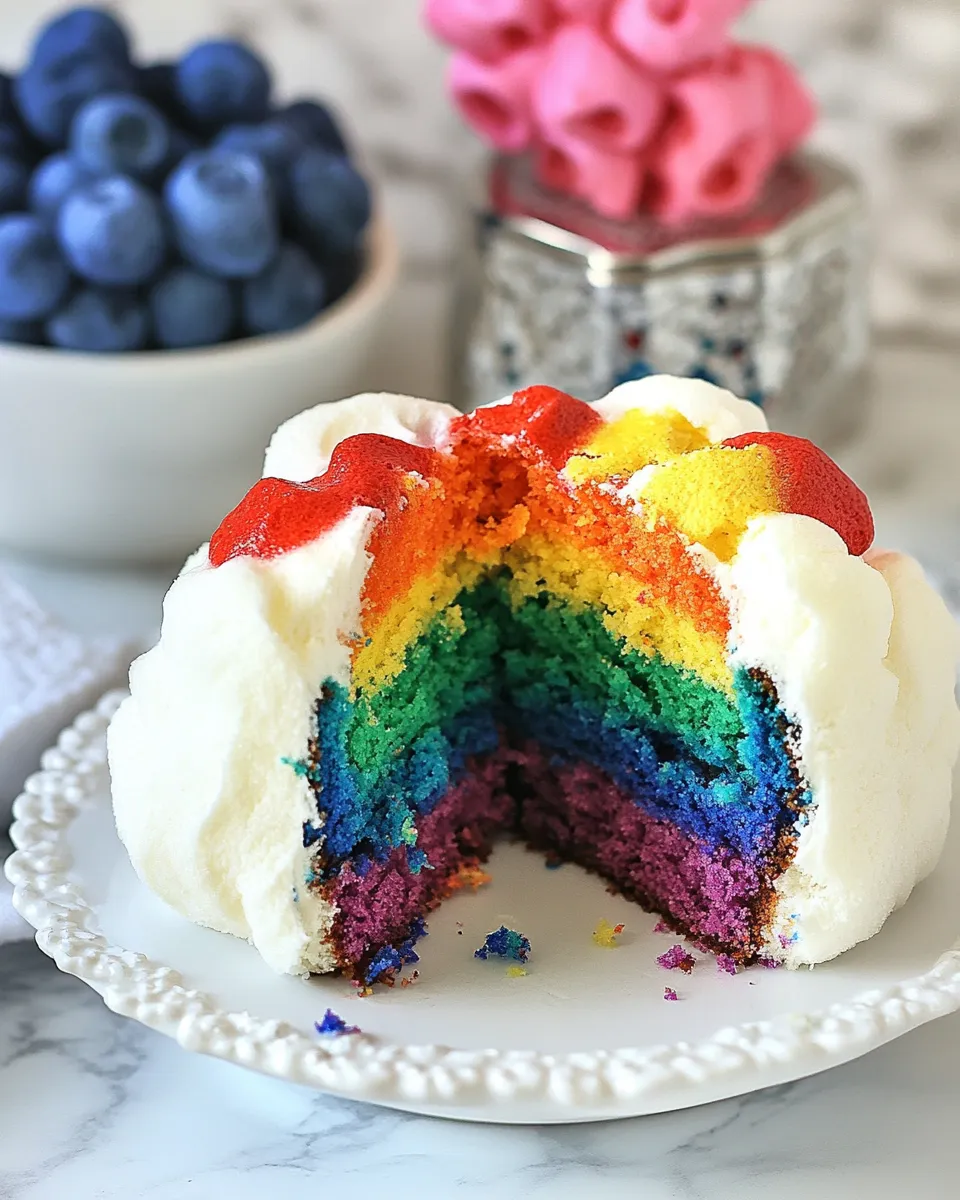
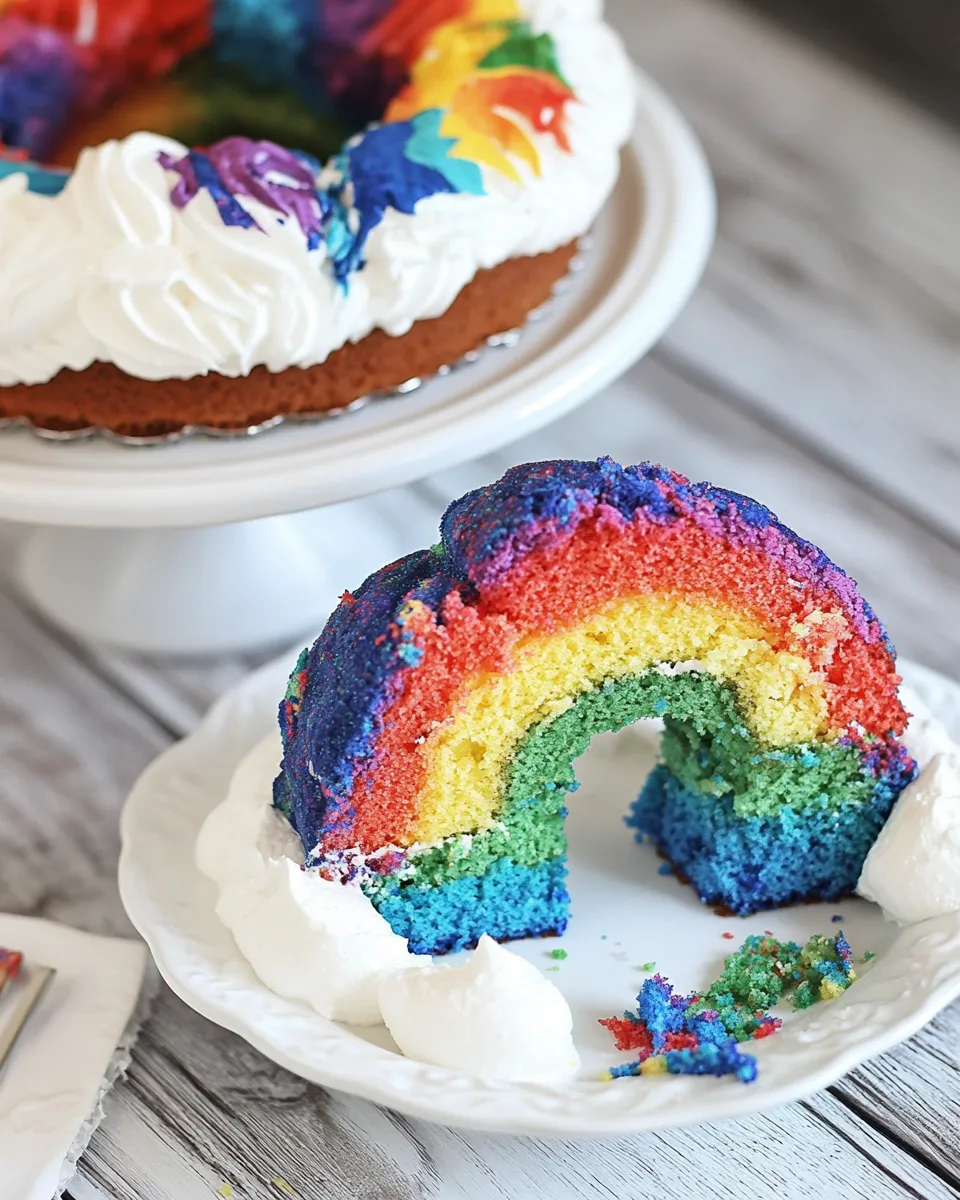
This is the kind of cake that stops conversation and makes people smile. It’s light, showy, and surprisingly simple in execution once you understand the layering. You’ll end up with a ringed, rainbow-stacked bundt cake that looks like a pastel target from above and slices into colorful crescents that reveal all the bands.
I test recipes for the blog regularly, and this one stood out because the technique is forgiving but dramatic. You don’t need advanced piping skills or exotic ingredients — just a white cake base, paste colors, and a steady hand for layering. The whipped cream served alongside becomes the “cloud” part, softening each bite.
Below I walk you through exactly what to expect, where people commonly go off-track, and small swaps to make it lighter or more pantry-friendly. Follow the directions as written for perfect rings; I also include tips for prep, storage, and presentation so it’s party-ready.
What Goes Into Rainbow Cloud Cake
Ingredients
- 1 package white cake mix + ingredients to make cake — The base batter. Follow the package directions for liquid and eggs so the structure is reliable for layering.
- Purpleblue, green, yellow, orange and red paste food coloring — Paste colors give vivid rings without thinning the batter; use small amounts and build color gradually.
- 1 cup heavy whipping cream — For the whipped cloud topping; chill the bowl and whisk for easiest whipping.
- 3 Tbsp powdered sugar — Sweetens and stabilizes the whipped cream slightly so it holds peaks.
- 1/2 tsp vanilla extract — Adds depth and rounds the sweetness of the cream.
Directions: Rainbow Cloud Cake
- Preheat oven to 325°F. Grease and flour a bundt pan.
- Prepare the white cake mix according to package directions. Pour the prepared batter into a large mixing bowl so you can measure and divide it.
- Spoon 1 1/3 cups batter evenly into the prepared bundt pan. Place 2 tablespoons batter in a small bowl and set it aside (reserved white batter).
- Divide the remaining batter into six bowls as follows: 2 tablespoons into bowl A, 1/4 cup into bowl B, 1/3 cup into bowl C, 1/2 cup into bowl D, 2/3 cup into bowl E, and all remaining batter into bowl F.
- Tint each bowl with the paste food colorings listed: tint bowl A purple (or purple/blue), bowl B blue (or purple/blue), bowl C green, bowl D yellow, bowl E orange, and bowl F red. Stir each bowl until the color is even.
- Spread the red batter (bowl F) in a wide ring on top of the white batter in the pan, leaving about 1/2 inch of the pan edge and some white batter visible around the outside.
- Working inward, spread the orange batter (bowl E) in a ring inside the red ring, leaving some red visible on both sides. Continue layering inward in this order so each ring is narrower than the last: yellow (bowl D), green (bowl C), blue (bowl B), and purple (bowl A) as the innermost colored ring.
- Spoon the reserved 2 tablespoons of white batter over the purple ring only, spreading gently to cover that center area.
- Bake 40–45 minutes, or until a toothpick inserted in the center comes out clean. Cool completely in the pan on a wire rack, then invert the pan to release the cake onto a serving plate.
- In a medium bowl, beat 1 cup heavy whipping cream until it begins to thicken. Add 3 tablespoons powdered sugar and 1/2 teaspoon vanilla extract and continue beating until stiff peaks form. Serve cake slices with the whipped cream as “clouds.”
Why It’s Crowd-Pleasing
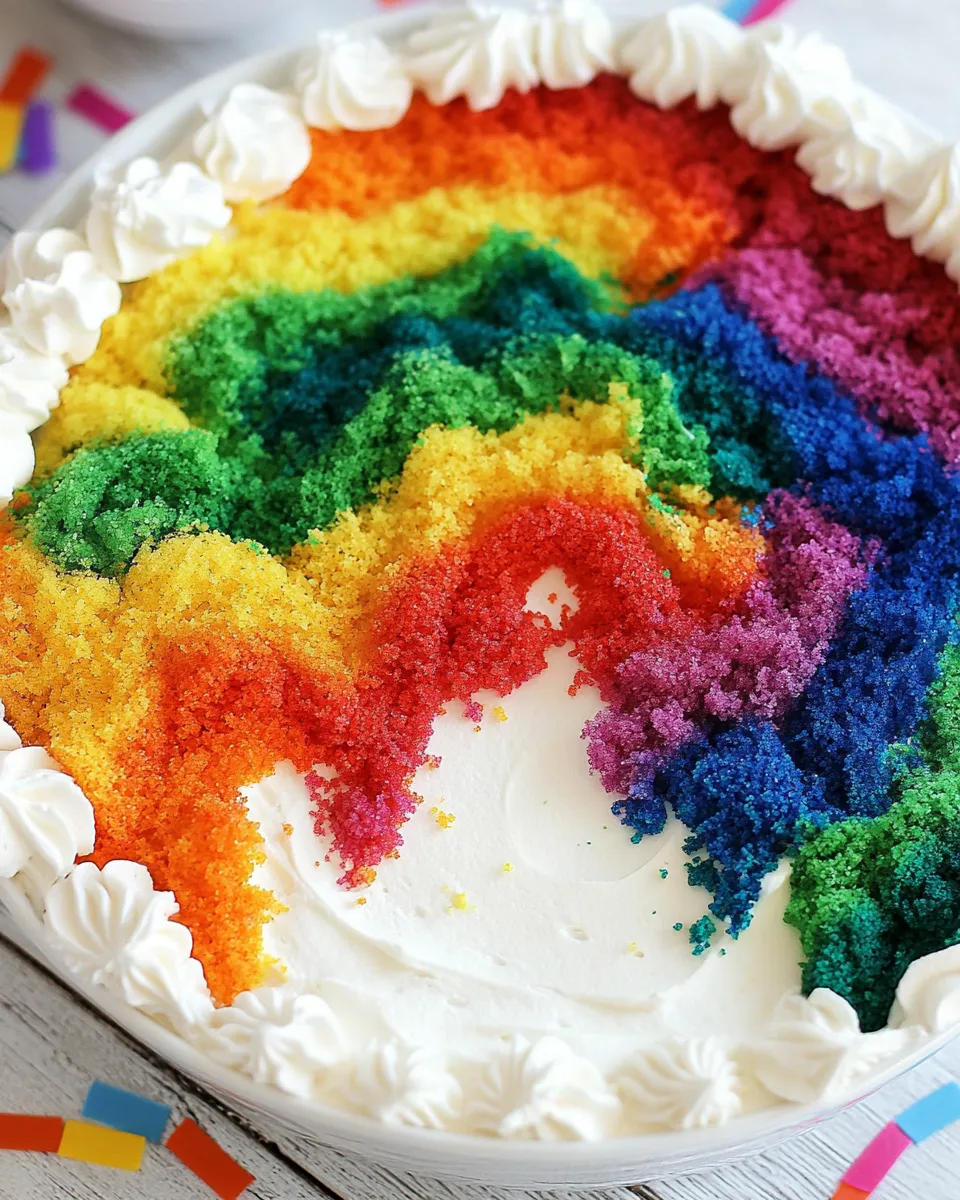
Visually, it’s a winner. People react to color first, and the concentric rings create that satisfying “reveal” when you slice. It reads festive without being over-the-top.
Texturally, the white cake base keeps the crumb tender and neutral, so the whipped cream really shines as a cool, airy counterpoint. The slices are easy to plate and serve at gatherings — everyone gets a little rainbow.
Healthier Substitutions
You can make small swaps without changing the method. Use a white cake mix labeled lower-fat, or choose one with fewer added gums if you prefer a simpler ingredient list. Remember that changes to the mix formula can alter batter volume and density, so eyeball the portions when dividing.
For the whipped “cloud,” replace half the heavy cream with an unsweetened non-dairy whipping alternative if you need lactose-free options; results will vary for stability, so whip and serve immediately. To reduce sugar, cut the powdered sugar in the whipped cream by a tablespoon or two — taste as you go.
Appliances & Accessories
Keep things simple: a bundt pan, a large mixing bowl for the whole batter, six small bowls for color portions, and a small bowl reserved for the tiny white center. You’ll also want an offset spatula or small rubber spatula to spread rings evenly.
A stand mixer or electric hand mixer makes whipping the cream quick and reliable. If you don’t have one, a chilled metal bowl and a vigorous arm will get you there — but plan more time.
Mistakes Even Pros Make
- Overmixing colored portions — Vigorous mixing to blend color can develop gluten if you’re working the batter too long. Stir just until the color is even.
- Using liquid food coloring — Liquid dyes thin cake batter and weaken structure. Paste colors are key for crisp rings and consistent bake time.
- Putting rings the same width — If rings are equal width, batter can shift and compress during bake; following the specified sizes keeps the visual gradient intact.
- Removing the cake too soon — Inverting while warm risks breakage. Cool completely in the pan so the shape is stable.
How to Make It Lighter
For a lighter feel without changing the recipe mechanics, focus on the topping. Make a stabilized whipped cream with a touch of nonfat Greek yogurt (up to 1/4 cup folded into whipped cream) to lighten mouthfeel and add a gentle tang. Fold gently to keep aeration.
Another trick: use a white cake mix that calls for oil instead of butter and reduce egg yolks by replacing one whole egg with two egg whites if the package allows. These swaps can yield a slightly airier crumb, but always keep an eye on batter volume when dividing for the rings.
What Could Go Wrong
If the rings blur together, it’s usually because colors were too wet or batter was spread too aggressively. Use paste coloring and a gentle hand with the spatula. Also, if you under-grease the bundt pan, the cake will stick and break on release; grease and flour thoroughly, tapping out excess flour.
Overbaking dries the crumb and diminishes the “cloud” effect when paired with whipped cream. Start checking at 40 minutes and rely on the toothpick test. If the top browns too much before the center is set, tent with foil for the last 10 minutes.
Best Ways to Store
Unfrosted slices: Wrap airtight and refrigerate up to 3 days. The color bands stay clear longer when chilled, and refrigeration keeps the crumb from crumbling.
Whole cake: Store in a cake saver or under a dome in the fridge for up to 2 days. Because the topping is whipped cream served on the side, you avoid sogginess that sometimes happens with frosted cakes.
Whipped cream: Best made the day of serving, but you can prepare it up to 8 hours ahead and keep it chilled, covered tightly. If you must store longer, stabilize the cream with 1/2 teaspoon unflavored gelatin (bloomed and melted) added while whipping; it keeps peaks firmer for a day.
Top Questions & Answers
Q: Can I use gel food coloring instead of paste?
A: Gel colors are closer to paste and usually work fine. Avoid standard liquid drops — they can thin the batter. Add color sparingly until you reach the shade you want.
Q: What if I don’t have a bundt pan?
A: This method is designed for a bundt shape to create concentric rings. If you must use a different pan, expect a different look and plan to layer rings in a round cake pan similarly, but baking time and ring spread will differ.
Q: Can I make the cake ahead?
A: Yes. Bake and cool completely, then wrap tightly and freeze for up to one month. Thaw in the fridge overnight and serve with freshly whipped cream.
Q: How do I get evenly spaced rings?
A: Follow the measured portion sizes in the directions. Use a small offset spatula and spread each ring gently, keeping about 1/2 inch of white batter around the outer edge for the first red ring.
Bring It to the Table
Slice the cake with a long, sharp knife and wipe the blade clean between cuts to keep the bands crisp. Serve each slice with a generous spoon of whipped cream on the side — the contrast of the vivid interior and the soft white topping is part of the charm.
For casual gatherings, plate slices on simple white dishes so the colors pop. For special occasions, scatter a few edible flowers or tiny meringue “clouds” around the plate. Keep forks and napkins handy — this cake invites second helpings.
Rainbow Cloud Cake
Equipment
- Bundt pan
- Mixing Bowls
- Small Bowl
- Medium Bowl
- Measuring cups and spoons
- Spatula or spoon
- Electric mixer or hand mixer
- Wire Rack
Ingredients
Ingredients
- 1 package white cake mix + ingredients to make cake
- Purpleblue green, yellow, orange and red paste food coloring
- 1 cheavy whipping cream
- 3 Tbsppowdered sugar
- 1/2 tspvanilla extract
Instructions
Instructions
- Preheat oven to 325°F. Grease and flour a bundt pan.
- Prepare the white cake mix according to package directions. Pour the prepared batter into a large mixing bowl so you can measure and divide it.
- Spoon 1 1/3 cups batter evenly into the prepared bundt pan. Place 2 tablespoons batter in a small bowl and set it aside (reserved white batter).
- Divide the remaining batter into six bowls as follows: 2 tablespoons into bowl A, 1/4 cup into bowl B, 1/3 cup into bowl C, 1/2 cup into bowl D, 2/3 cup into bowl E, and all remaining batter into bowl F.
- Tint each bowl with the paste food colorings listed: tint bowl A purple (or purple/blue), bowl B blue (or purple/blue), bowl C green, bowl D yellow, bowl E orange, and bowl F red. Stir each bowl until the color is even.
- Spread the red batter (bowl F) in a wide ring on top of the white batter in the pan, leaving about 1/2 inch of the pan edge and some white batter visible around the outside.
- Working inward, spread the orange batter (bowl E) in a ring inside the red ring, leaving some red visible on both sides. Continue layering inward in this order so each ring is narrower than the last: yellow (bowl D), green (bowl C), blue (bowl B), and purple (bowl A) as the innermost colored ring.
- Spoon the reserved 2 tablespoons of white batter over the purple ring only, spreading gently to cover that center area.
- Bake 40–45 minutes, or until a toothpick inserted in the center comes out clean. Cool completely in the pan on a wire rack, then invert the pan to release the cake onto a serving plate.
- In a medium bowl, beat 1 cup heavy whipping cream until it begins to thicken. Add 3 tablespoons powdered sugar and 1/2 teaspoon vanilla extract and continue beating until stiff peaks form. Serve cake slices with the whipped cream as "clouds."