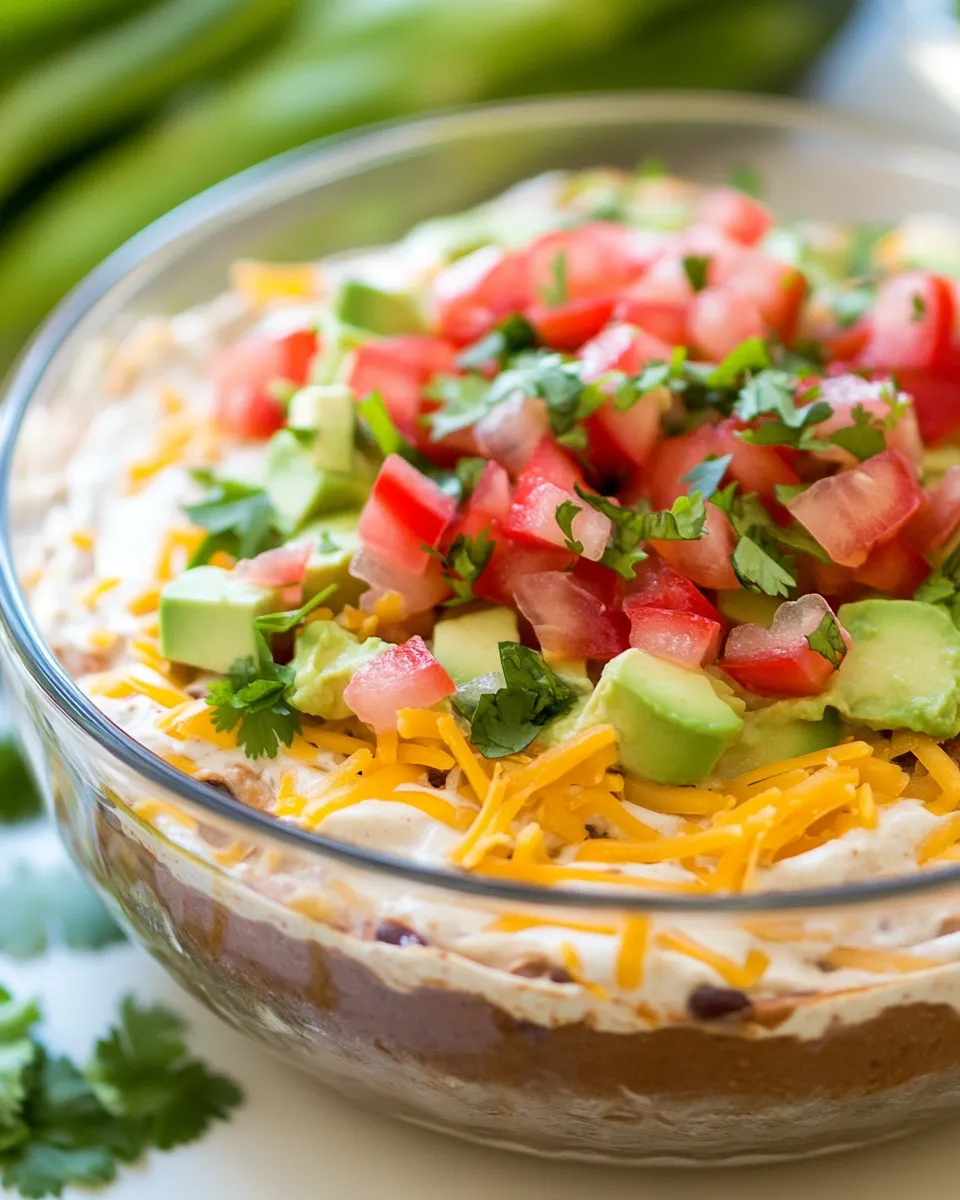
This layered taco salad dip is one of my go-to party dishes: effortless to assemble, forgiving in timing, and seriously crowd-pleasing. It hits the familiar taco flavors—seasoned beef, tangy salsa, creamy cheeses—and dresses them up with lettuce, tomato, and avocado so it eats like a deconstructed taco in dip form. It’s perfect for game day, potlucks, or a casual weeknight where everyone grazes at the table.
What I love most is how predictable it is. Brown the beef, mix the cheeses, layer everything, and you’re basically done. There’s room to customize, but the core build is sturdy: a savory meat base, a creamy mid-layer, melting cheddar, and bright, crisp toppings. Little touches—fresh cilantro, diced avocado, or using a roasted salsa—make a noticeable difference.
Below you’ll find a clear ingredient breakdown, the step-by-step method (followed exactly), and practical tips for storing, serving, and adapting this Taco Salad Dip to fit diets or allergies. No fluff—just a warm, reliable recipe you can count on.
Ingredient Breakdown
Each ingredient below is listed with a short note to explain its role or offer a quick tip.
- 1 package Taco Seasoning Mix — we bought Original Taco by McCormick; this provides the familiar taco spice profile without measuring individual spices.
- 1/4 cup water — used to hydrate and bloom the taco seasoning so it coats the meat evenly.
- 1 lb lean ground beef — I purchased 7% fat; browns nicely and keeps the dip from getting greasy when drained.
- 18 oz package cream cheese — the creamy base that smooths and binds the cottage cheese and salsa; cut into pieces if firm for easier processing.
- 1 cup cottage cheese — any size curd; adds body, tang, and a lighter texture than using all cream cheese.
- 1 cup salsa — we used our roasted salsa, but you can use any salsa; balances the cheeses and adds fresh tomato and pepper flavor.
- 2 cups (8 oz) finely shredded medium cheddar cheese — melts on top of the cream layer and gives classic sharpness.
- 2 cups shredded lettuce — provides crunch and freshness; iceberg or romaine both work well.
- 2 cups finely chopped tomatoes — bright, juicy layer that keeps the dip tasting fresh.
- 1 avocado, diced, optional — creamy, rich contrast; add right before serving for best color.
- Cilantro for garnish, optional — adds a fresh herbal note; use to brighten the finished dish.
- Taco Chips, or any kind of firm tortillas to serve — choose sturdy chips or baked tortilla wedges that can scoop multiple layers.
Taco Salad Dip: Step-by-Step Guide
- In a large skillet over medium-high heat, brown 1 lb lean ground beef, breaking it into crumbles as it cooks. Cook until no pink remains. If there is excess fat or liquid, drain it off (you can blot with paper towels).
- In a small bowl, stir together 1 package taco seasoning mix and 1/4 cup water until combined.
- Add the seasoning mixture to the cooked beef, stir to coat, and cook briefly until the liquid is mostly absorbed or thickened. Remove the skillet from the heat and let the beef cool slightly.
- In the bowl of a food processor, combine 18 oz cream cheese (cut into pieces if firm), 1 cup cottage cheese, and 1 cup salsa. Process until smooth and well combined.
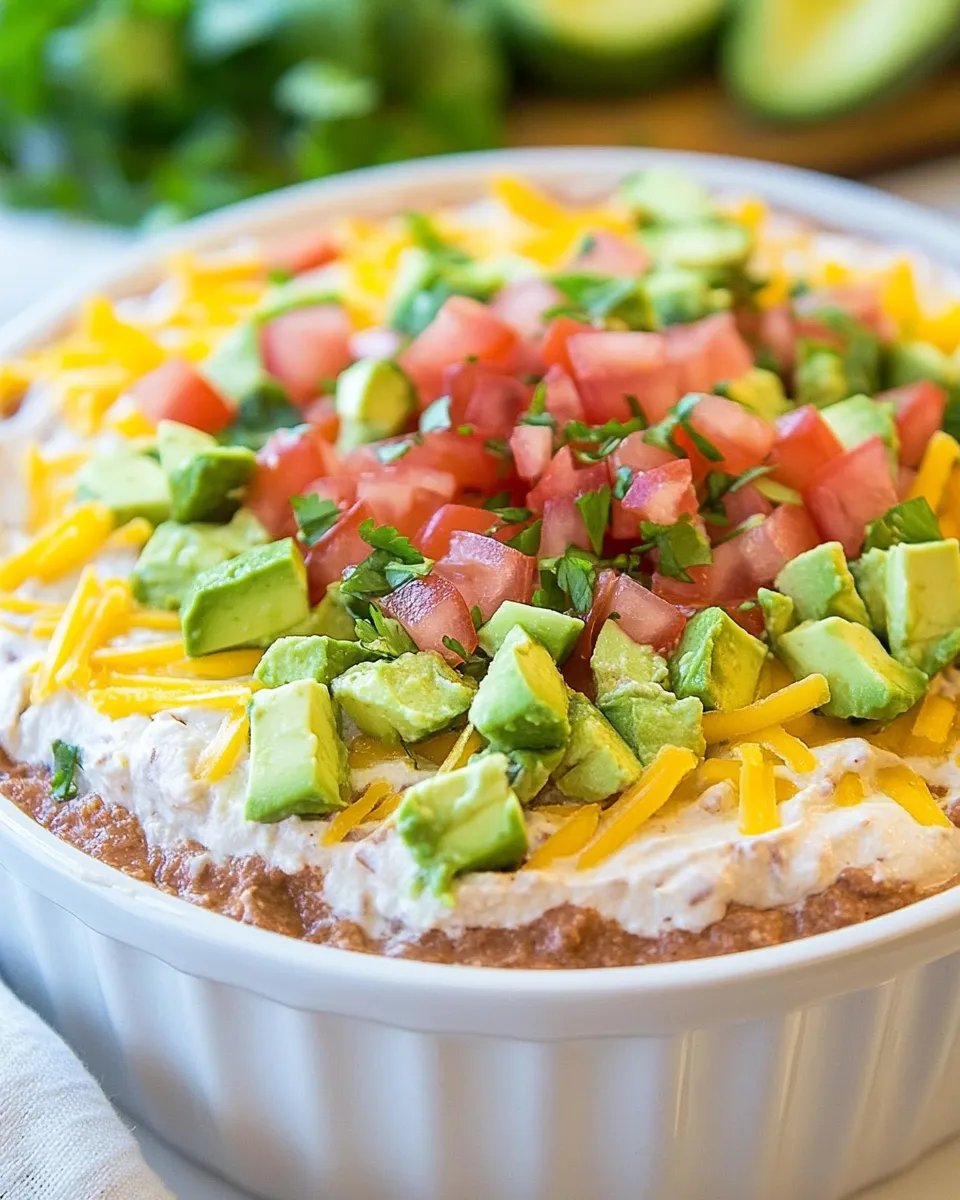
- Spread the seasoned beef in an even layer across the bottom of a 9×13-inch glass baking pan or into individual ramekins.
- Spread the cream cheese–cottage cheese–salsa mixture evenly over the beef layer.
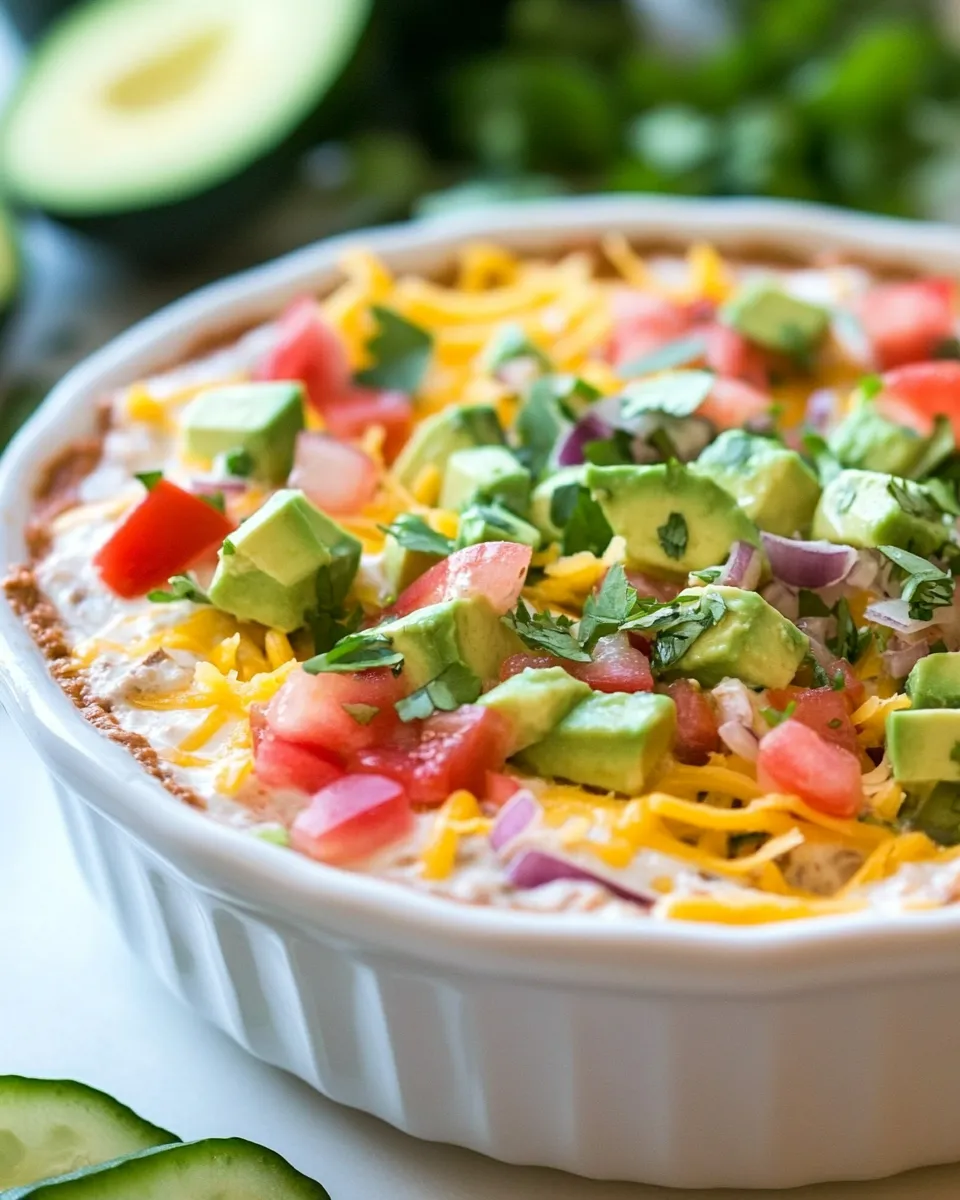
- Sprinkle 2 cups (8 oz) finely shredded medium cheddar cheese evenly over the cream cheese layer.
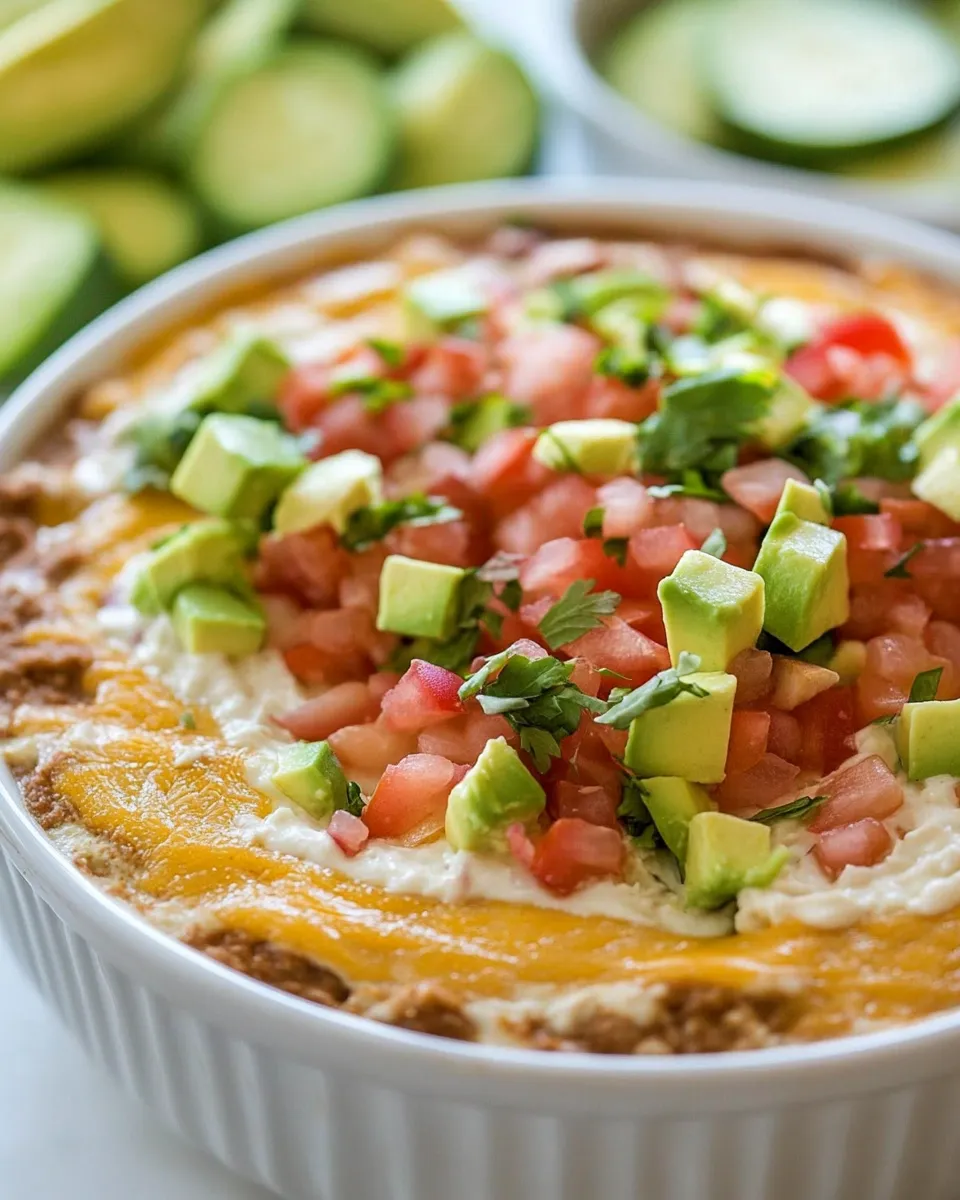
- Top the cheese with 2 cups shredded lettuce, then 2 cups finely chopped tomatoes in an even layer.
- If using, add 1 diced avocado and garnish with cilantro.
- If not serving immediately, cover tightly with plastic wrap and refrigerate until ready to serve. (For best avocado color, add the diced avocado just before serving.)
- Serve the dip with taco chips or firm tortillas.
Top Reasons to Make Taco Salad Dip
It’s easy to assemble: most of the work is browning the meat and pulsing the cheese mixture. You can put this together in 20–30 minutes and have a full, layered party dip ready.
It’s versatile and forgiving: the recipe tolerates substitutions in the protein, salsa, and garnish while still tasting great. That makes it ideal when you’re working with what’s on hand.
It feeds a crowd: a 9×13-inch pan serves well for a group, and the dip format lets guests graze and return for more. It travels well to potlucks and reheats or stores cleanly in the fridge.
Allergy-Friendly Substitutes
If you’re accommodating allergies, here are practical swaps to keep the spirit of the dish without introducing risk.
- Milk/Dairy sensitivity: Replace cream cheese and cottage cheese with dairy-free cream cheese and dairy-free cottage-style alternatives when available. Use a dairy-free shredded cheese for the top layer. Note texture varies, so chill before serving.
- Egg sensitivity: This recipe doesn’t contain eggs, so it’s naturally safe for egg allergies.
- Nightshade sensitivity (tomato/pepper): Omit salsa and tomatoes and replace with a roasted carrot-parsley relish or a mild cucumber-dill relish for moisture and brightness.
- Gluten: The ingredients here are typically gluten-free, but check the taco seasoning mix and chips for any wheat-containing additives.
Essential Tools for Success
- Large skillet: For browning the ground beef evenly.
- Small bowl: To hydrate and mix the taco seasoning with water.
- Food processor: For a smooth, lump-free cream cheese–cottage cheese–salsa layer.
- 9×13-inch glass baking pan or individual ramekins: A shallow, broad pan helps layer evenly and serve easily.
- Spatula and slotted spoon: For spreading layers and draining excess fat.
- Paper towels: Optional but handy for blotting any excess fat after draining the beef.
Frequent Missteps to Avoid
Here are the mistakes I see most often and how to avoid them:
- Skipping the drain: If you don’t remove excess fat or liquid after browning the beef, the dip can become greasy. Drain or blot well.
- Adding avocado too early: Dice avocado just before serving—left too long it browns and affects presentation and texture.
- Under-processing the cheese layer: If the cream cheese and cottage cheese aren’t smooth, the mid-layer can be lumpy and difficult to spread; run the food processor until fully combined.
- Using weak chips: Soft or thin chips will break under the weight of layers—serve with sturdy chips or tortilla wedges.
Substitutions by Diet
Want to adapt Taco Salad Dip for a specific diet? Here are tested swaps that keep the dish satisfying.
- Vegetarian: Replace ground beef with seasoned cooked lentils or a crumbled plant-based beef substitute. Drain well if the substitute releases liquid.
- Lower-fat: Use low-fat cream cheese and low-fat cottage cheese, and swap full-fat shredded cheddar for a reduced-fat variety. Use lean ground beef (as listed) or ground turkey to cut fat further.
- Gluten-free: Ensure taco seasoning and chips are certified gluten-free; the rest of the ingredients are naturally gluten-free.
- Dairy-free: Use plant-based cream cheese, cottage-style alternatives, and dairy-free shredded cheese; check salsa labels for added dairy in some specialty varieties.
Cook’s Notes
Make the beef ahead: Cook and season the beef earlier in the day, cool, and refrigerate. Reheat briefly to warm before assembling if you prefer a slightly warm meat layer under the cool cheese layer.
Food processor tips: If your cream cheese is very firm, cut into cubes and let it sit at room temperature 10–15 minutes before processing. Pulse until smooth; scrape the sides once for an even texture.
Layering order matters: Beef first, creamy cheese layer second, melted cheese third, then lettuce and tomatoes. This order keeps the tortilla chips from getting soggy and ensures each scoop hits the savory base and fresh toppings.
Leftovers & Meal Prep
Store leftovers tightly covered in the refrigerator for up to 3 days. If you’ve added avocado and lettuce, those layers will soften and darken faster—consider removing the avocado and lettuce before storing and add fresh shortly before serving.
To repurpose leftovers: Spoon the layers into warmed tortillas for quick taco wraps, or use as a filling for baked potatoes or stuffed peppers. The seasoned beef and cheesy mid-layer reheat well; reheat gently in a skillet or microwave until just warm.
Common Qs About Taco Salad Dip
Can I make this ahead of time? Yes. Cook and season the beef ahead and keep it refrigerated. Assemble everything but the avocado and lettuce up to a day in advance. Add those fresh toppings and garnish just before serving.
Is there a way to keep the avocado from browning? Adding avocado right before serving is best. If you must add it earlier, toss the diced avocado with a little lime juice to slow browning and cover tightly with plastic wrap so it touches the surface.
Can I bake this to melt the cheese? You can briefly bake the assembled beef and cream layer with shredded cheddar on top (about 5–7 minutes at 350°F) to melt the cheddar before adding lettuce and tomatoes. Watch closely so fresh toppings don’t wilt.
What chips work best? Thick, sturdy tortilla chips or baked tortilla wedges are ideal. Soft chips or thin restaurant-style chips will likely break when scooping through layers.
Serve & Enjoy
Serve this Taco Salad Dip chilled or slightly warm, with a bowl of sturdy chips for scooping. Encourage guests to load a chip with a bit of every layer—meat, creamy cheese, melty cheddar, lettuce, tomato, avocado, and cilantro—for the best bite. It’s casual, colorful, and built to share.
Make a pan for your next get-together and watch how quickly it disappears. Simple on the timeline, big on flavor—this Taco Salad Dip is one of those reliable recipes that never feels like a shortcut. Enjoy!
Taco Salad Dip Recipe
Equipment
- Large Skillet
- Small Bowl
- Food Processor
- 9x13-inch glass baking pan or ramekins
- Plastic Wrap
Ingredients
Ingredients
- 1 package Taco Seasoning Mix we bought Original Taco by McCormick
- 1/4 cupwater
- 1 lblean ground beef I purchased 7% fat
- 18 oz package cream cheese
- 1 cupcottage cheese any size curd
- 1 cupsalsa we used our roasted salsa, but you can use any salsa
- 2 cups8 oz finely shredded medium cheddar cheese
- 2 cupsshredded lettuce
- 2 cupsfinely chopped tomatoes
- 1 avocado diced, optional
- Cilantro for garnish optional
- Taco Chips or any kind of firm tortillas to serve
Instructions
Instructions
- In a large skillet over medium-high heat, brown 1 lb lean ground beef, breaking it into crumbles as it cooks. Cook until no pink remains. If there is excess fat or liquid, drain it off (you can blot with paper towels).
- In a small bowl, stir together 1 package taco seasoning mix and 1/4 cup water until combined.
- Add the seasoning mixture to the cooked beef, stir to coat, and cook briefly until the liquid is mostly absorbed or thickened. Remove the skillet from the heat and let the beef cool slightly.
- In the bowl of a food processor, combine 18 oz cream cheese (cut into pieces if firm), 1 cup cottage cheese, and 1 cup salsa. Process until smooth and well combined.
- Spread the seasoned beef in an even layer across the bottom of a 9x13-inch glass baking pan or into individual ramekins.
- Spread the cream cheese–cottage cheese–salsa mixture evenly over the beef layer.
- Sprinkle 2 cups (8 oz) finely shredded medium cheddar cheese evenly over the cream cheese layer.
- Top the cheese with 2 cups shredded lettuce, then 2 cups finely chopped tomatoes in an even layer.
- If using, add 1 diced avocado and garnish with cilantro.
- If not serving immediately, cover tightly with plastic wrap and refrigerate until ready to serve. (For best avocado color, add the diced avocado just before serving.)
- Serve the dip with taco chips or firm tortillas.