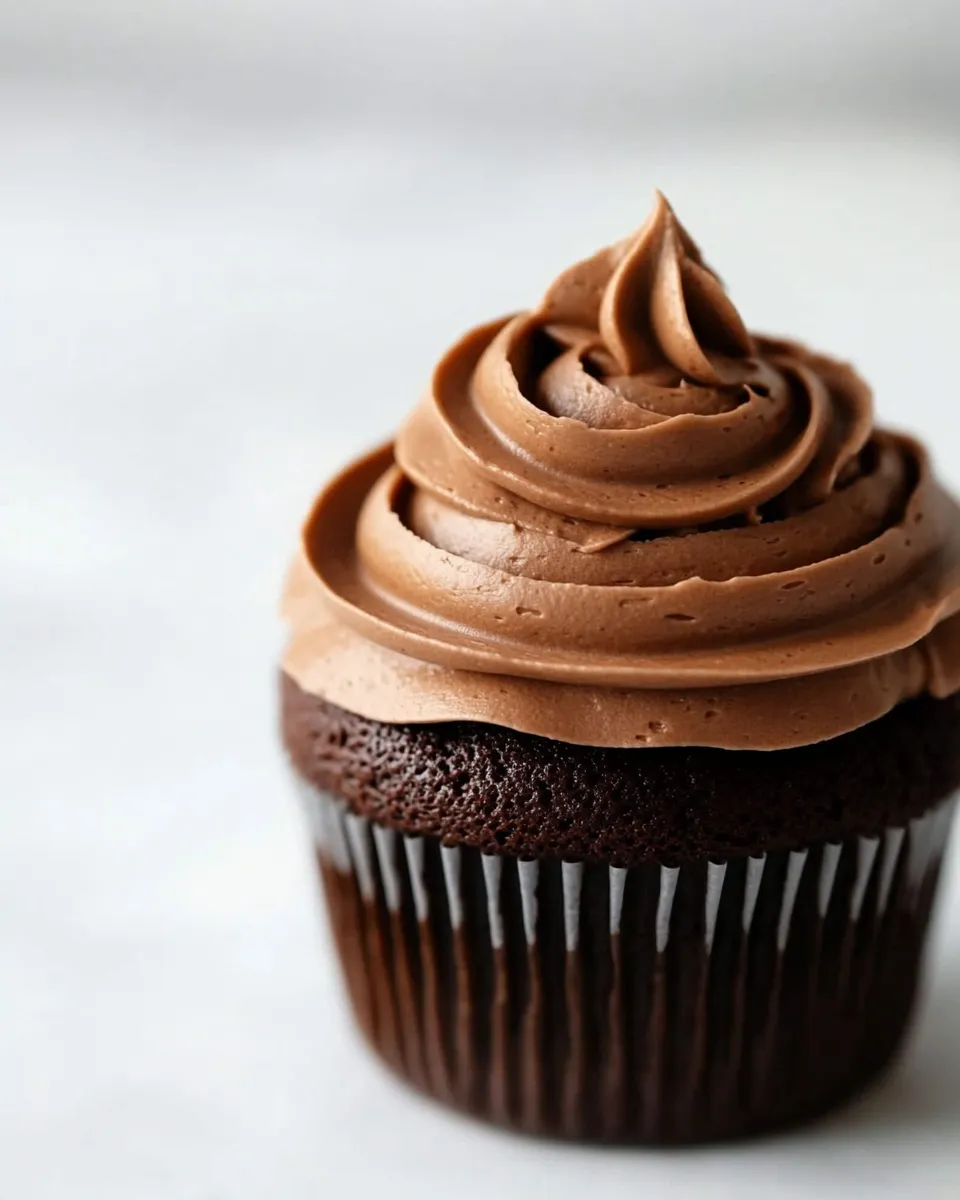
There are frosting recipes that look impressive and those that actually deliver every time. This Chocolate Buttercream Frosting belongs to the latter. It’s straightforward to make, pipeable or spreadable with tiny adjustments, and reliable under a variety of temperatures and cake styles. I use it more than I admit—cupcakes, layer cakes, cookie sandwiches—because it consistently tastes like chocolate and feels buttery, not overly sweet.
I’ll walk you through exactly what you need, the step-by-step process, and a handful of sensible troubleshooting tips so you don’t waste ingredients. No gimmicks, just clear guidance so your frosting behaves the way you want it to: glossy, smooth, and easy to work with.
If you like controlling texture—softer for spreading, stiffer for piping—this recipe lets you choose by adding milk one tablespoon at a time. Read the notes and storage advice; they’ll save you time and help keep the frosting fresh between uses.
Ingredients at a Glance

- 1 cup unsalted butter, softened — the base for creaminess and structure; bring to room temperature so it creams easily.
- 3 cups powdered sugar — provides sweetness and bulk; sift if lumpy for a smoother finish.
- 1/2 cup unsweetened cocoa powder — gives the chocolate flavor; use good-quality cocoa for a richer taste.
- 3 tablespoons milk, more as needed — thins the frosting to spreading or piping consistency; add one tablespoon at a time.
- 1 teaspoon vanilla extract — rounds and brightens the chocolate note.
- 1/4 teaspoon salt — balances sweetness and enhances chocolate depth.
Chocolate Buttercream Frosting, Made Easy
- Place the softened 1 cup unsalted butter in the bowl of a stand mixer fitted with the paddle attachment or in a large mixing bowl if using a hand mixer. Beat on medium speed until the butter is light and fluffy (about 1–2 minutes).
- With the mixer running on low, add the 3 cups powdered sugar gradually, about 1 cup at a time, allowing each addition to incorporate before adding more. After all the powdered sugar is added, increase the mixer speed to medium and beat until the mixture is smooth and evenly combined.
- Scrape down the sides and bottom of the bowl with a spatula to ensure all ingredients are incorporated.
- Add the 1/2 cup unsweetened cocoa powder, the initial 3 tablespoons milk, the 1 teaspoon vanilla extract, and the 1/4 teaspoon salt. Mix on medium to medium-high speed until the frosting is completely smooth and evenly combined. Scrape the bowl again if needed.
- If the frosting is too stiff for spreading or piping, add additional milk one tablespoon at a time, mixing briefly after each addition, until you reach a pipeable or spreadable consistency you prefer.
- Use the frosting immediately to frost cupcakes, cakes, or other desserts; if not using right away, cover and store at room temperature for short-term use or refrigerate and bring back to spreading consistency before using.
Why This Chocolate Buttercream Frosting Stands Out
It’s simple, dependable, and intensely chocolate without relying on melted chocolate. The unsweetened cocoa powder provides direct chocolate flavor and a dryer texture that powdered sugar balances, resulting in a frosting that holds shape yet remains soft on the fork. The butter gives it a creamy mouthfeel that many Swiss or Italian buttercreams aim for but with far less fuss.
Another advantage is control. The recipe starts with a base consistency and hands the finishing thickness to you through measured additions of milk. That means you can make a thin, spreadable frosting for filling a naked cake or a sturdier, pipe-ready batch for rosettes and borders simply by adding less liquid or chilling briefly.
Finally, it’s forgiving. Small temperature shifts or a slightly grainy powdered sugar can be corrected with a little extra mixing, scraping, and incremental milk. That reliability makes it a go-to for busy bakers and celebration cakes alike.
Swap Guide

- Butter — swap unsalted butter for salted if that’s what you have; reduce or skip added salt. Salted butter will add a perceptible saltiness, so taste as you go.
- Powdered sugar — confectioners’ sugar or icing sugar are equivalent terms depending on region. If your powdered sugar is very fine, you may need slightly less milk.
- Cocoa powder — Dutch-processed cocoa gives a darker, mellower chocolate flavor; natural cocoa is brighter and slightly more acidic. Either works; flavor and color will shift accordingly.
- Milk — whole milk is ideal for richness. For a lighter result, use lower-fat milk. Plant milks (almond, oat) work in a pinch but can thin texture and alter flavor slightly.
- Vanilla — pure vanilla extract is best for flavor clarity. Imitation vanilla will work but won’t have the same depth.
Toolbox for This Recipe

- Stand mixer with a paddle attachment — fastest and most consistent creaming.
- Hand mixer — perfectly fine for small batches or if you don’t have a stand mixer.
- Rubber spatula — for scraping the bowl clean and keeping everything uniform.
- Measuring cups and spoons — accuracy matters; powdered sugar especially needs the right volume.
- Sifter or fine-mesh sieve — optional but helpful if your powdered sugar or cocoa have lumps.
- Piping bags and tips — if you’re decorating; adjust consistency before filling the bag.
Pitfalls & How to Prevent Them
- Grainy or sandy texture — often caused by low-quality powdered sugar or insufficient mixing. Sift powdered sugar and cocoa, and mix until completely smooth. If it still feels grainy, beat a little longer on medium speed.
- Too soft to hold shape — frosting that won’t pipe usually has too much liquid or warm butter. Chill for 10–15 minutes, then re-whip. Add less milk next time, one teaspoon at a time.
- Too stiff to spread or pipe smoothly — add milk one tablespoon at a time, mixing briefly after each addition, until you reach the desired consistency. Avoid adding all the milk at once.
- Butter melting or separating — happens when the kitchen is very warm. Work in shorter bursts, chill the bowl for 10 minutes if necessary, and re-whip. Use room-temperature (not soft-to-the-point-of-melty) butter.
- Faded chocolate color — using low-quality or bleached cocoa will give you a paler result. Use a richer cocoa or add a pinch more for deeper color if needed.
Fresh Takes Through the Year
Spring: Add a teaspoon of lemon zest to a portion of the frosting for a bright pairing with berry cakes—stir in gently so the texture stays consistent. Summer: Chill the mixed frosting slightly and use it on lighter sponge cakes; it’s refreshing with fresh fruit. Fall: Stir in a pinch of cinnamon or espresso powder for warmth and depth that complements pumpkin or apple desserts. Winter: Replace a tablespoon of milk with strong cooled coffee for a mocha twist that plays well with chocolate layer cakes.
For holidays, keep the base frosting and split it into bowls for color or flavor variations—add cocoa to one, a touch of caramel to another, or a few drops of extract (peppermint at the holidays) into small portions rather than the whole batch.
Notes on Ingredients
1 cup unsalted butter, softened — Room-temperature butter should dent slightly under fingertip yet remain cool. This consistency traps air when beaten, giving the frosting its lightness. Over-soft butter will yield a flatter, greasier result.
3 cups powdered sugar — Powdered sugar contains a small percentage of cornstarch to prevent caking; that helps the frosting hold structure. If your kitchen is humid, sift it to remove clumps before adding.
1/2 cup unsweetened cocoa powder — Cocoa is where the chocolate flavor lives. Natural unsweetened cocoa contributes a brighter, slightly acidic flavor; Dutch-processed is smoother and deeper. Choose based on the profile you prefer.
3 tablespoons milk, more as needed — Milk controls the texture. Start with the stated amount and adjust slowly. Too much at once is the most common cause of a runny frosting.
1 teaspoon vanilla extract — Vanilla amplifies the chocolate notes. Pure extract is worth the small investment; it gives clarity that imitation vanilla lacks.
1/4 teaspoon salt — Small but essential. It rounds the edges of sweetness and brings balance. If you used salted butter, taste before adding and reduce if necessary.
Keep It Fresh: Storage Guide
- Room temperature — If you plan to use the frosting within 1–2 days and your kitchen is not hot, keep it in an airtight container at room temperature. Bring to room temperature and re-whip briefly if it feels too firm.
- Refrigerator — Store in an airtight container for up to 1 week. Before using, let it sit at room temperature until softened (about 30–60 minutes depending on amount), then whip to restore texture.
- Freezer — For longer storage, freeze frosting in a sealed container for up to 3 months. Thaw overnight in the refrigerator, bring to room temperature, then beat to smooth out any separation.
- Reconditioning — If chilled frosting is too firm, add a teaspoon of milk and beat until the desired consistency is achieved. If it splits after refrigeration, re-whip on medium speed to re-emulsify.
Questions People Ask
- Can I use salted butter? — Yes. Omit or reduce the added 1/4 teaspoon salt and taste before adjusting further.
- How do I make it stiffer for piping? — Reduce added milk and chill the frosting briefly, then re-whip. You can also add a little more powdered sugar if you need extra body, but that will increase sweetness.
- Can I make this ahead? — Absolutely. Make it the day before, store in the refrigerator, and re-whip before use. For longer storage, freeze and follow the thawing and re-whipping steps above.
- Will it melt in warm weather? — Butter-based frostings soften with heat. Keep frosted desserts cool and avoid leaving them in direct sun. For outdoor events, refrigerate until serving time when possible.
- Can I color this frosting? — Yes, but use gel or paste food coloring sparingly to avoid thinning the frosting. Add color after the final mix and beat briefly to distribute.
The Last Word
This Chocolate Buttercream Frosting is exactly the kind of recipe I reach for when I want dependable results without fuss. It balances chocolate intensity with a silky, buttery texture and gives you control over firmness for piping or spreading. Stick to the stepwise method, adjust milk by the tablespoon, and use the storage tips so you can bake ahead. Make it once, and you’ll find it slots into everything from weeknight cupcakes to celebratory layer cakes.
Chocolate Buttercream Frosting
Equipment
- Stand mixer
- paddle attachment
- Hand Mixer
- Spatula
Ingredients
Ingredients
- 1 cupunsalted buttersoftened
- 3 cupspowdered sugar
- 1/2 cupunsweetened cocoa powder
- 3 tablespoonsmilkmore as needed
- 1 teaspoonvanilla extract
- 1/4 teaspoonsalt
Instructions
Instructions
- Place the softened 1 cup unsalted butter in the bowl of a stand mixer fitted with the paddle attachment or in a large mixing bowl if using a hand mixer. Beat on medium speed until the butter is light and fluffy (about 1–2 minutes).
- With the mixer running on low, add the 3 cups powdered sugar gradually, about 1 cup at a time, allowing each addition to incorporate before adding more. After all the powdered sugar is added, increase the mixer speed to medium and beat until the mixture is smooth and evenly combined.
- Scrape down the sides and bottom of the bowl with a spatula to ensure all ingredients are incorporated.
- Add the 1/2 cup unsweetened cocoa powder, the initial 3 tablespoons milk, the 1 teaspoon vanilla extract, and the 1/4 teaspoon salt. Mix on medium to medium-high speed until the frosting is completely smooth and evenly combined. Scrape the bowl again if needed.
- If the frosting is too stiff for spreading or piping, add additional milk one tablespoon at a time, mixing briefly after each addition, until you reach a pipeable or spreadable consistency you prefer.
- Use the frosting immediately to frost cupcakes, cakes, or other desserts; if not using right away, cover and store at room temperature for short-term use or refrigerate and bring back to spreading consistency before using.