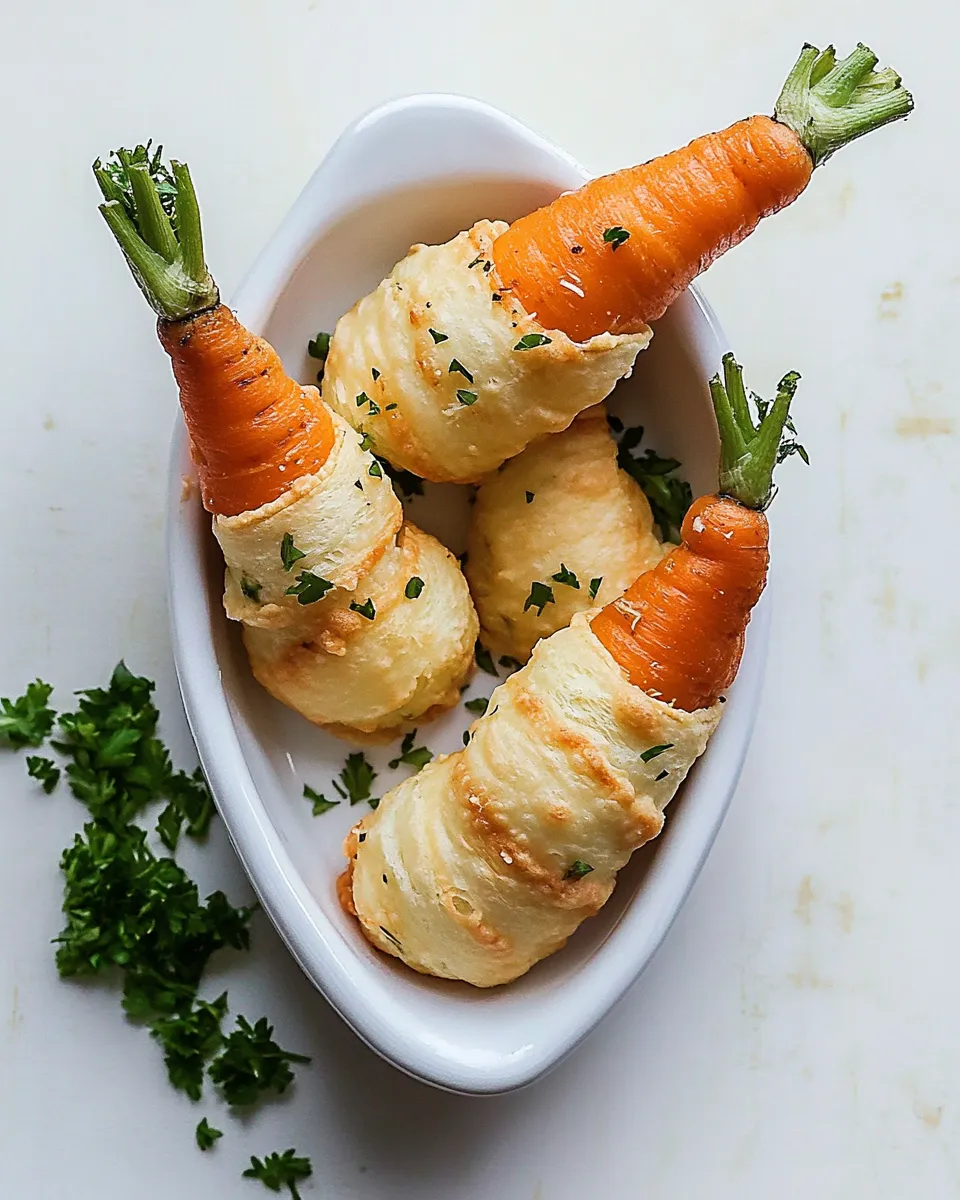
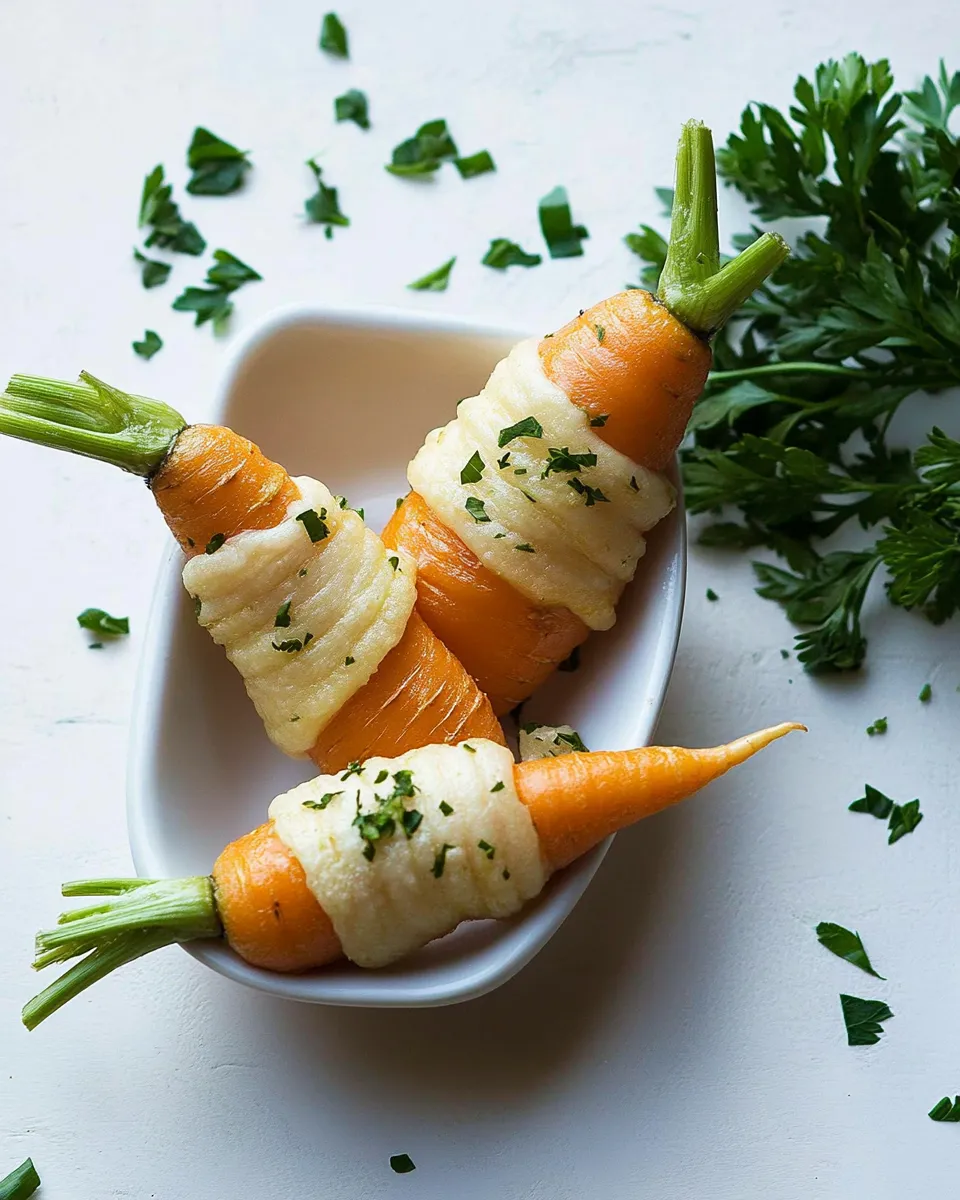
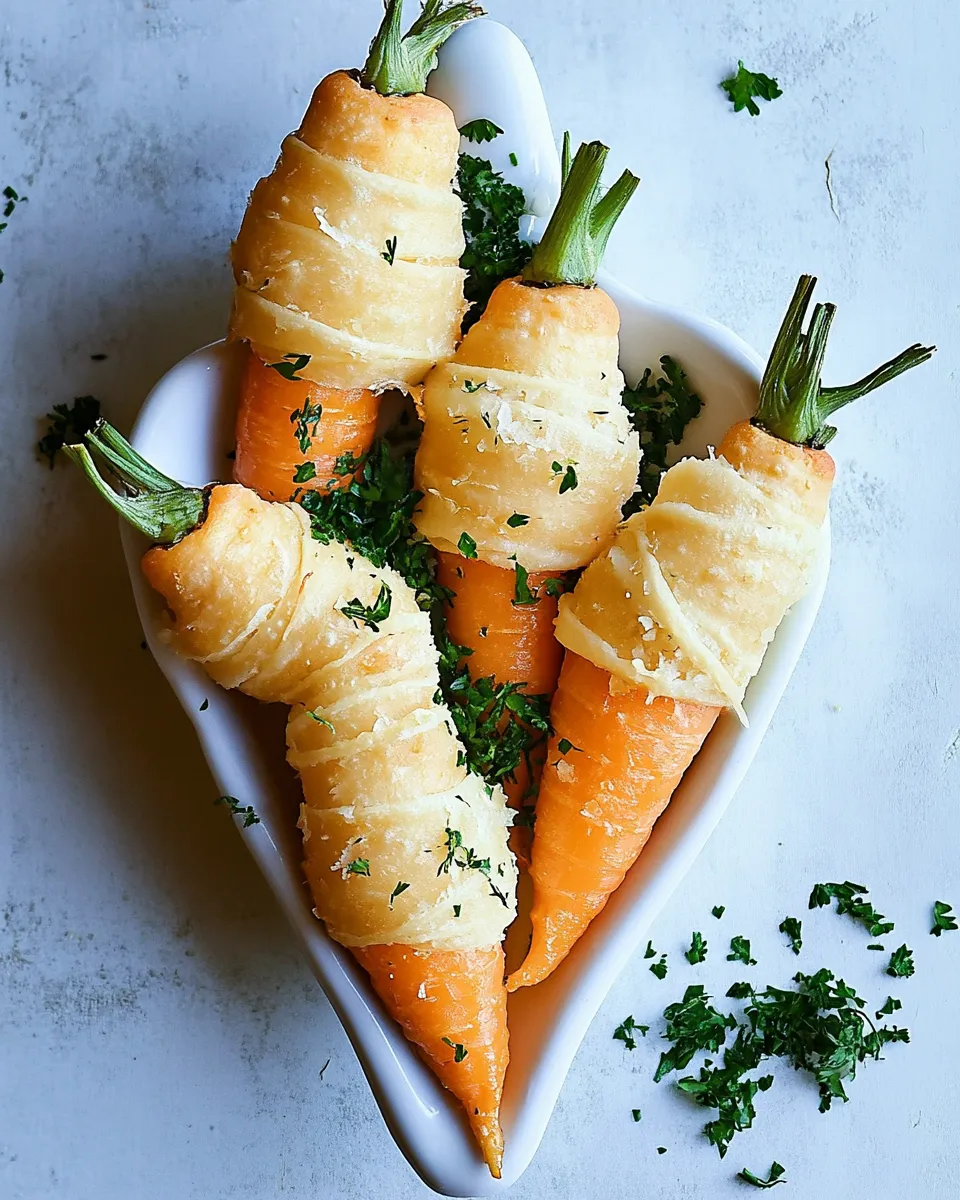
These little cones look like carrots, eat like an appetizer, and disappear faster than you can say “pass the platter.” They’re made by shaping foil into cones, wrapping them in crescent roll dough, baking until golden, and filling with chicken salad or your favorite spread. The result is a playful, finger-food-ready shell that holds up well and brings a bit of whimsy to any table.
I first made them for a spring brunch where I needed something that felt festive but wasn’t fussy. The technique is straightforward and forgiving: roll foil, wrap dough, bake, cool, and fill. If you can press seams, cut straight lines, and resist overfilling, you’re already halfway to success.
Below I’ll list the exact ingredients and the step-by-step directions you need. I’ll also share the troubleshooting tips and storage notes I rely on when I’m preparing these for a crowd.
Gather These Ingredients
- foil — will be rolled into cones to form the carrot molds.
- 1(8 ounce)package crescent roll dough — the dough that bakes into the crispy, handheld shell.
- chicken salad,(or any other filling) — the filling that turns the baked shell into a savory “carrot” appetizer.
- sprigs of parsley — garnish to mimic the carrot top and add a fresh note.
Crescent Roll Carrots — Do This Next
- Preheat the oven to 350°F and line a baking sheet with foil.
- Tear off eight pieces of foil and roll each piece into a wide cone with a hollow center (these will form the carrot molds). Set the cones upright on the prepared baking sheet.
- Unwrap the 8-ounce package of crescent roll dough and press the perforated seams together to form one smooth sheet.
- Using a knife or pizza cutter, cut the sealed dough sheet into 8 even lengthwise strips.
- Starting at the pointed end of a foil cone, wrap one dough strip around the cone, overlapping slightly as you work upward. Place the wrapped cone seam-side down on the baking sheet. Repeat with the remaining cones and dough strips, leaving space between each.
- Bake for 8–10 minutes, or until the dough is golden brown. Remove from the oven and let the shells cool until they are cool enough to handle.
- Carefully remove the foil cones from the baked shells, fill each shell with chicken salad (or your chosen filling), and top each filled cone with a sprig of parsley to complete the carrot.
Why It’s My Go-To
These Crescent Roll Carrots are a favorite because they look elevated while taking very little hands-on time. The technique transforms pantry staples into something memorable. They’re flexible: change the filling, and they fit breakfast, lunch, cocktail hour, or a potluck.
They travel and plate well. Wrapped shells can be made ahead and baked in batches, then filled right before serving so textures stay right. Visually, they add height and variety to a platter, and the parsley tops provide a bright, seasonal finishing touch.
Low-Carb/Keto Alternatives
If you’re aiming to keep carbs low, you can’t use the crescent roll dough as written, but you can capture the same concept: a hollow, cone-shaped edible vessel. Consider these approaches.
- Cheese “shells” — Make thin rounds of baked shredded cheese and shape them while warm over a cone mold. They crisp up and stay sturdy.
- Vegetable cups — Hollowed baby peppers or mini zucchini can stand in as a vessel and keep the concept low-carb.
For fillings, choose higher-fat, lower-carb versions of chicken salad (swap regular mayo for avocado oil mayo or mashed avocado, and emphasize herbs and crunchy low-carb veggies). The structure will differ, but the handheld, tossed-to-share idea remains intact.
Appliances & Accessories
You don’t need a lot of specialized gear. These are the items I use every time:
- Oven — set to 350°F for predictable, even baking.
- Baking sheet — lined with foil to catch any drips and make cleanup simple.
- Foil — torn into pieces and rolled into cones; it’s your mold and reusable if you want to wash and reuse.
- Knife or pizza cutter — for slicing the dough sheet into even strips quickly.
- Tongs or oven mitts — to handle the hot baking sheet safely when removing from the oven.
Troubles You Can Avoid
These are the common missteps I see, and how to prevent them so every “carrot” comes out uniform and attractive.
- Cones collapsing: Roll your foil cone with a snug but hollow center. If the foil is too loose, it will deform. Keep cones upright while assembling dough.
- Dough sticking to foil: Make sure the foil is smooth and even; press seams on the dough well so it forms a continuous surface. If you’ve had sticking before, lightly oil the foil.
- Uneven baking: Arrange cones spaced apart on the sheet so air circulates. Rotate the sheet halfway through if your oven has hot spots.
- Overfilling: Leave a small rim so the filling doesn’t spill. Wet fillings will make shells soggy over time, so fill just before serving when possible.
Nutrition-Minded Tweaks
To make these a bit lighter or more nutrient-forward without changing the fun factor, focus on the filling. A few simple swaps go a long way:
- Lean protein: Use shredded rotisserie chicken or poached leftover chicken with Greek yogurt and herbs for a lighter chicken salad.
- Veg-forward: Fold in diced celery, apple, or grated carrot for crunch and vitamins. Those additions boost fiber without much prep time.
- Lower-fat binding: Replace some mayo with plain yogurt or a mix of yogurt and a small amount of mustard to keep moisture but cut calories.
Remember the baked shell is still a crescent roll dough—treat the filling as the place to control nutrition rather than trying to change the shell drastically.
Recipe Notes & Chef’s Commentary
Small technique points that make a difference:
- Sealing the dough: When you press the perforated seams together, press firmly so the dough behaves like a single sheet. That prevents weak points where it could tear while wrapping.
- Even strips: Measure visually or use a ruler if you want exact repeats. Even strips wrap more predictably and give consistent bake times.
- Cooling time: Let the shells cool until you can hold them comfortably. If you rush removing the foil, you risk warping a warm, pliable shell.
- Presentation: Fill each shell so the parsley sprig sits upright as a “top.” A shallow spoonful of filling is more visually appealing than a mound that spills.
Keep It Fresh: Storage Guide
Timing matters for texture. Here’s how I store components and assembled bites to preserve crisp shells and safe fillings.
- Baked shells (unfilled): Cool completely, then store in an airtight container at room temperature for up to 24 hours. Beyond that, they can soften.
- Filling: Refrigerate chicken salad (or other filling) in an airtight container for 3–4 days.
- Assembled carrots: Fill shortly before serving. If you must assemble ahead, keep them refrigerated and expect the shells to soften after a few hours.
- Reheating: If you want warm shells again, remove filling and re-crisp shells in a 325°F oven for a few minutes, then cool slightly and refill.
FAQ
Q: Can I make the shells ahead of time?
A: Yes—bake the shells, cool completely, and store them in an airtight container for up to 24 hours. Fill shortly before serving for best texture.
Q: Is there a vegetarian filling that works well?
A: Absolutely. Think hummus mixed with finely chopped roasted red pepper and herbs, egg salad, or a seasoned cream cheese and garlic mix. Any scoopable spread that isn’t too watery will work.
Q: My dough browned unevenly; what went wrong?
A: Make sure cones are spaced out on the sheet and that your oven temperature is accurate. If your oven runs hot, lower the temp slightly and watch closely. Rotating the pan midbake helps with hot spots.
Q: Can I use puff pastry instead of crescent dough?
A: You can, but puff pastry behaves differently—it’s flakier and may puff more around the cone. Handle gently and watch bake times closely; results will be similar in spirit but different in texture.
Final Thoughts
Crescent Roll Carrots are a simple way to make an impression with minimal fuss. The recipe relies on a small number of ingredients and a repeatable technique that anyone can master. Make the shells ahead if you want less last-minute work, choose a filling that suits your event, and keep garnishes fresh until the last minute. They’re charming, adaptable, and reliably crowd-pleasing—perfect for brunches, showers, or any gathering where finger food earns an encore.
Crescent Roll Carrots
Equipment
- Baking Sheet
- Knife or pizza cutter
- Oven
Ingredients
Ingredients
- foil
- 1 8 ouncepackage crescent roll dough
- chicken salad (or any other filling)
- sprigs of parsley
Instructions
Instructions
- Preheat the oven to 350°F and line a baking sheet with foil.
- Tear off eight pieces of foil and roll each piece into a wide cone with a hollow center (these will form the carrot molds). Set the cones upright on the prepared baking sheet.
- Unwrap the 8-ounce package of crescent roll dough and press the perforated seams together to form one smooth sheet.
- Using a knife or pizza cutter, cut the sealed dough sheet into 8 even lengthwise strips.
- Starting at the pointed end of a foil cone, wrap one dough strip around the cone, overlapping slightly as you work upward. Place the wrapped cone seam-side down on the baking sheet. Repeat with the remaining cones and dough strips, leaving space between each.
- Bake for 8–10 minutes, or until the dough is golden brown. Remove from the oven and let the shells cool until they are cool enough to handle.
- Carefully remove the foil cones from the baked shells, fill each shell with chicken salad (or your chosen filling), and top each filled cone with a sprig of parsley to complete the carrot.