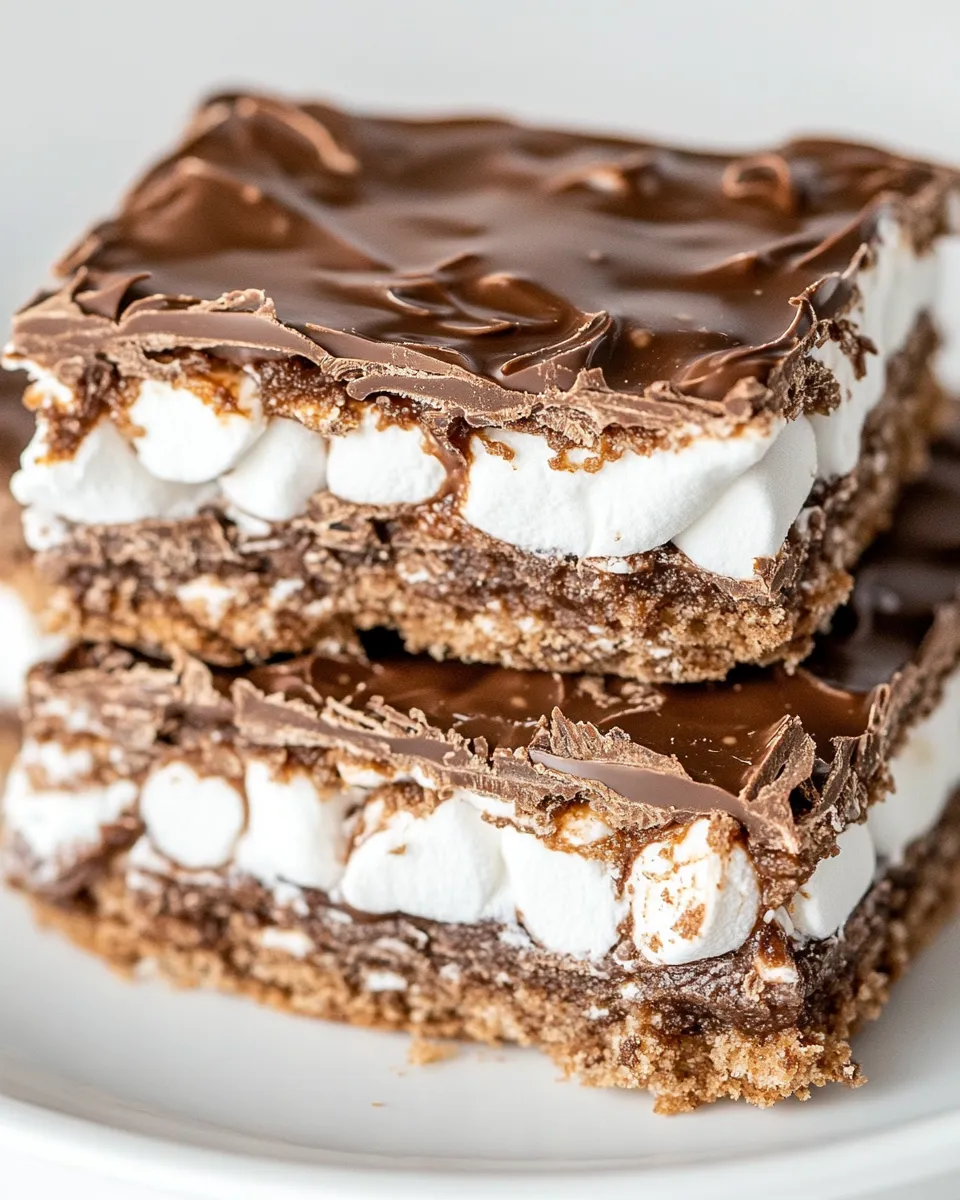
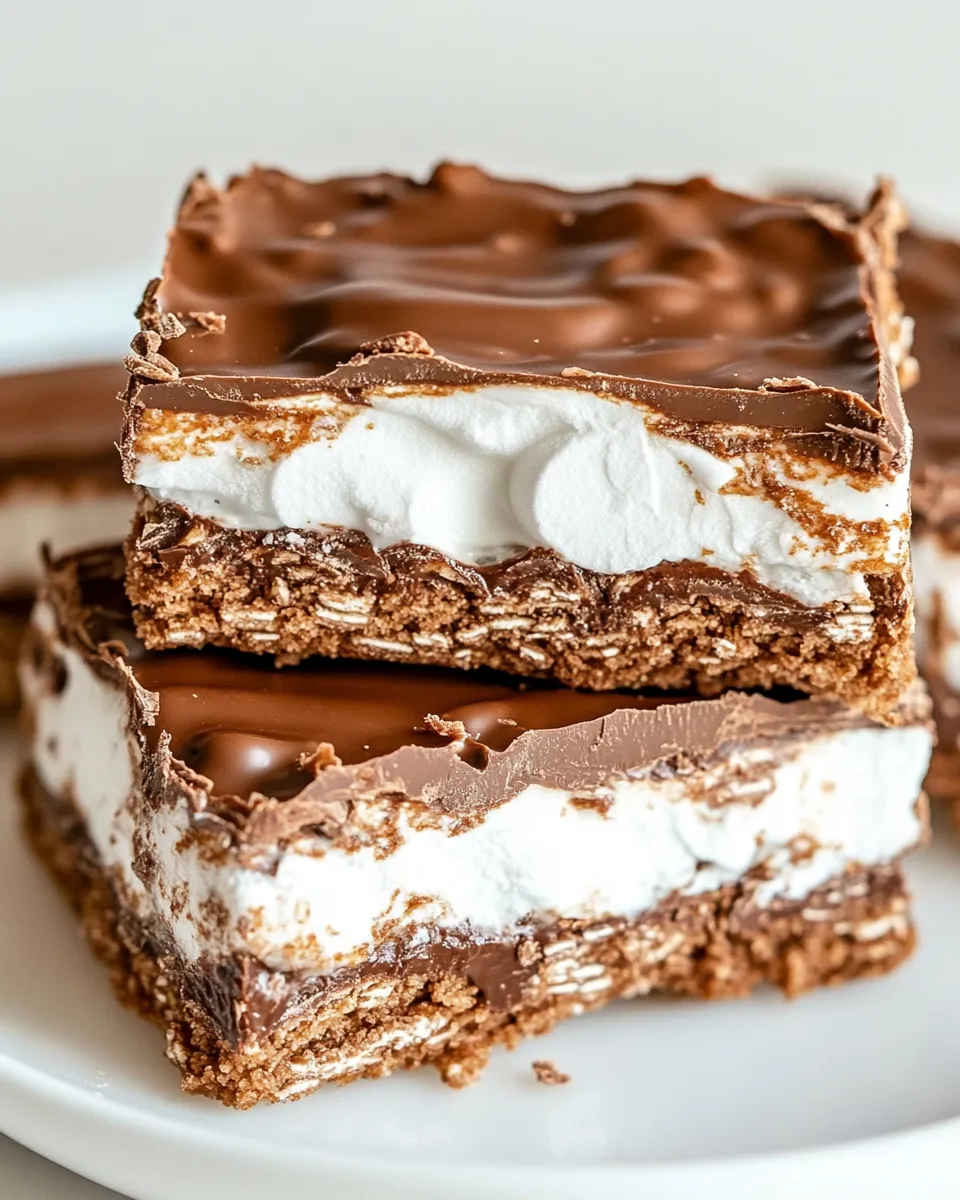
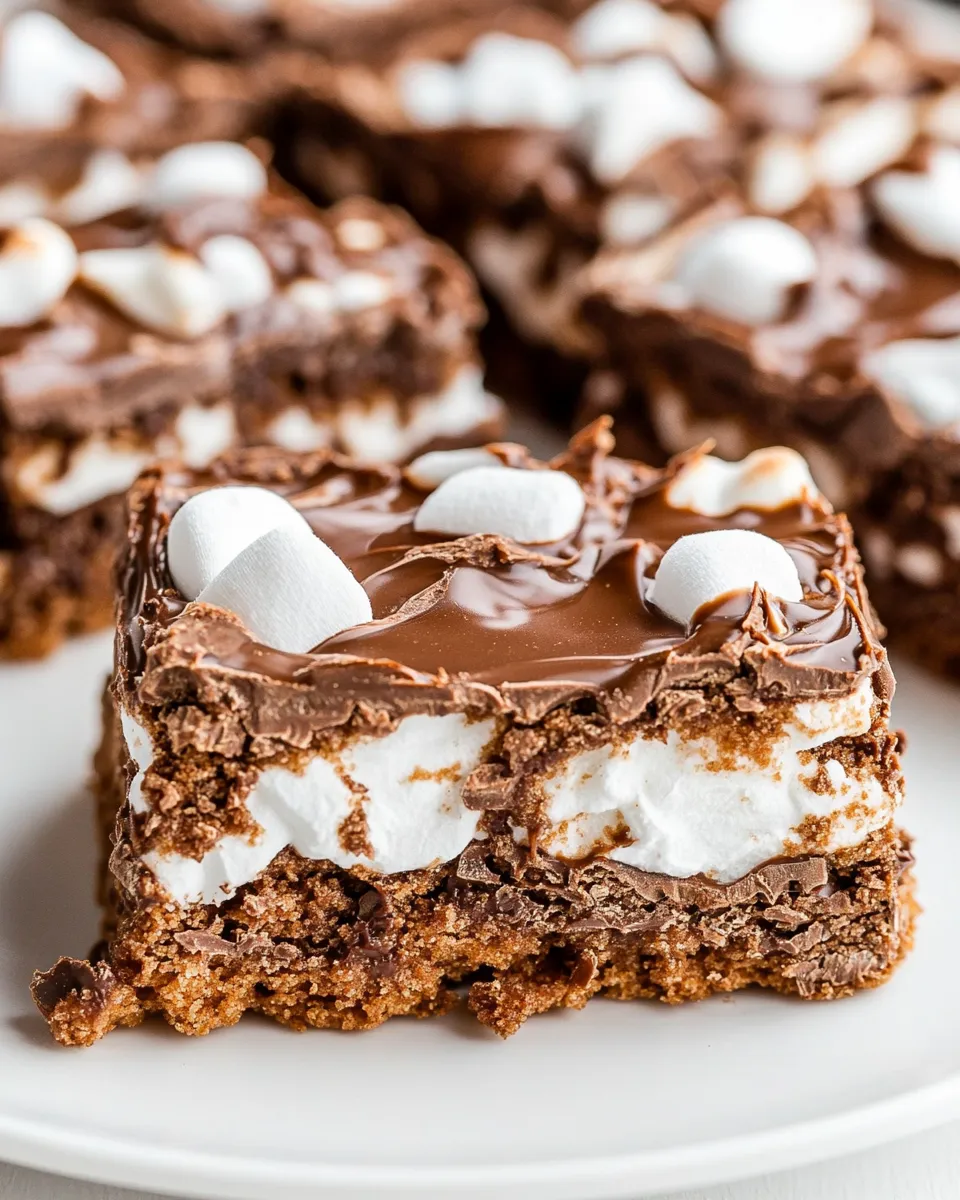
These bars are the kind of thing I make when I want a serious chocolate fix with a playful, nostalgic edge. The base is a dense, cocoa-scented slab; the middle is that pillowy marshmallow layer everyone fights over; the top is a crunchy chocolate–peanut butter shell studded with Rice Krispies. They’re not fussy, but they do deliver on texture and flavor in a way that feels special.
I wrote this recipe to be practical: simple steps, minimal gear, and predictable results. You’ll mix, bake, melt, spread, chill, and slice. There’s nothing decorative you must master — just follow the order and watch the layers come together.
Give yourself about an hour of active time plus chilling. Make them for potlucks, school events, or a rainy afternoon when you want something a little decadent and unmistakably homey. Store-bought marshmallows and a straightforward melting step keep this approachable while still feeling indulgent.
What You’ll Need
Before you begin, organize your workspace and have the ingredients and basic tools at hand. These bars are built in layers, so plan to assemble right after the base bakes. A 15‑in. x 10‑in. x 1‑in. pan is specified; using the correct pan size keeps the baking time and texture predictable.
Ingredients
- 1½ cups granulated white sugar — sweetens the base and helps create a tender crumb.
- 3/4 cup (1½ sticks) butter, at room temperature — provides richness and moisture to the base.
- 3 large eggs — bind the batter and add structure.
- 1 teaspoon vanilla extract — lifts and rounds the chocolate flavors.
- 1 1/3 cups all purpose flour — the primary structure for the base; spoon and level for accuracy.
- 3 tablespoons unsweetened cocoa powder — gives the base its chocolate character; use good-quality cocoa for best flavor.
- 1/2 teaspoon baking powder — a touch of leavening to keep the base from being too dense.
- 1/2 teaspoon salt — balances sweetness and enhances other flavors.
- 4 cups mini marshmallows — the gooey middle; mini melts more uniformly than large marshmallows.
- 8 ounces milk chocolate chips — melts into a smooth, milky topping when combined with butter and peanut butter.
- 3 tablespoons butter — added to the chocolate for glossy texture and easier spreading.
- 1 cup peanut butter — provides flavor and a creamy, stable partner to the chocolate.
- 2 cups Rice Krispies — add crispness and body to the topping; stir gently so they stay airy.
Cooking Royal Chocolate Marshmallow Bars: The Process
- Preheat oven to 350°F. Spray a 15‑in. x 10‑in. x 1‑in. baking pan with nonstick spray.
- In a large mixing bowl, use an electric mixer to beat 1½ cups granulated white sugar and 3/4 cup (1½ sticks) butter (at room temperature) until light and fluffy, about 2–3 minutes. Add the 3 large eggs and 1 teaspoon vanilla extract, mixing until well combined and the mixture is again light.
- In a medium bowl, whisk together 1 1/3 cups all‑purpose flour, 3 tablespoons unsweetened cocoa powder, 1/2 teaspoon baking powder, and 1/2 teaspoon salt.
- Add the dry ingredients to the butter mixture and mix on low speed just until combined; do not overmix.
- Spread the batter evenly into the prepared pan. Bake 15–18 minutes, or until the top is set and a toothpick inserted in the center comes out with moist crumbs (not wet batter).
- Remove the pan from the oven. Evenly sprinkle 4 cups mini marshmallows over the baked layer. Return the pan to the oven for 2–3 minutes, watching closely, until the marshmallows have softened and begun to melt.
- Remove the pan again. Dip a knife in warm water and wipe it dry, then use the knife to gently spread the melted marshmallows into an even layer over the first layer. Let the pan cool until the marshmallow layer is set to the touch.
- For the topping, place 8 ounces milk chocolate chips, 3 tablespoons butter, and 1 cup peanut butter in a medium saucepan over low heat. Cook, stirring frequently, until the mixture is completely melted and smooth. Remove from heat.
- Stir 2 cups Rice Krispies into the melted chocolate–peanut butter mixture until evenly coated. Immediately spread this mixture evenly over the marshmallow layer and smooth to level.
- Chill the assembled bars until the topping is firm. Cut into bars and serve.
Why It Deserves a Spot
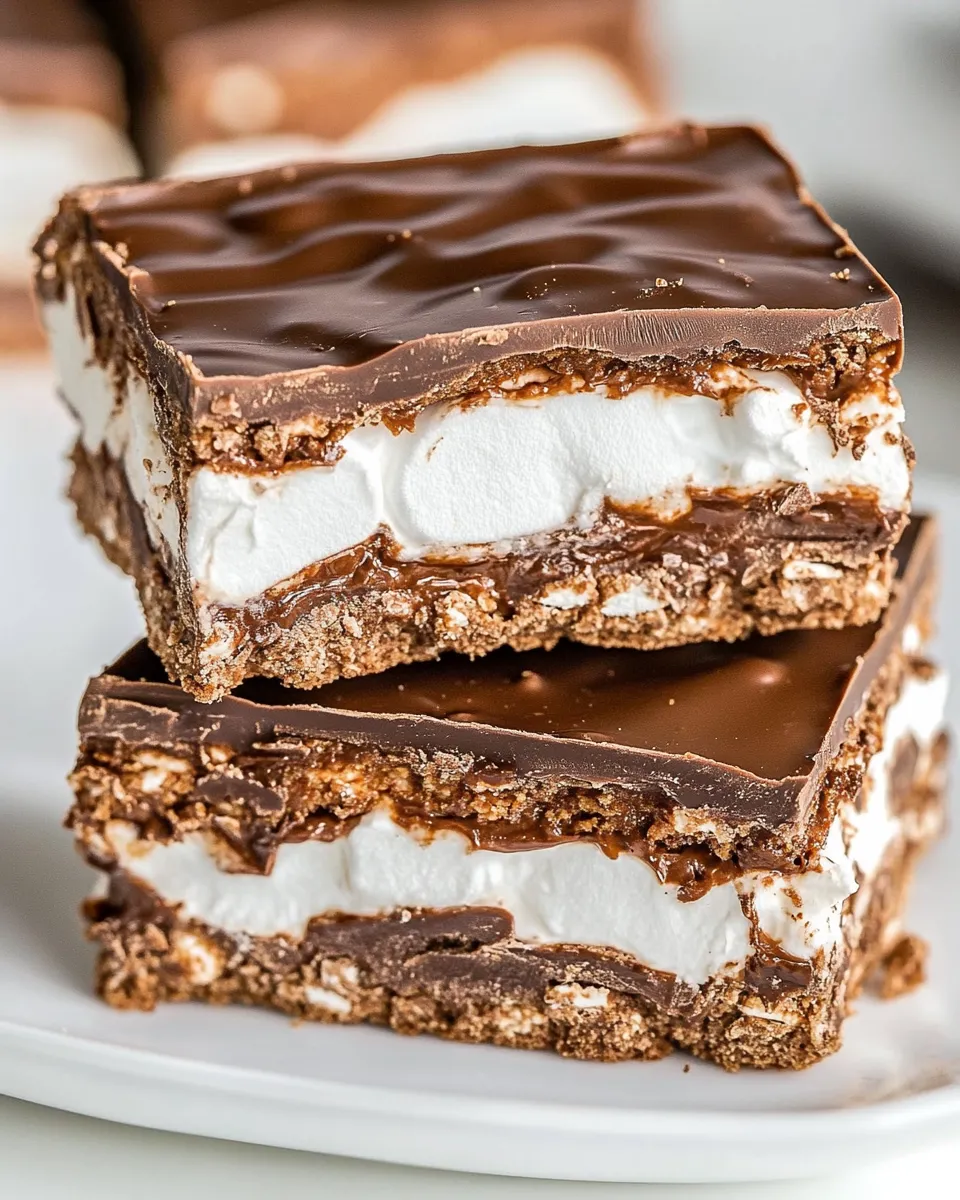
These bars balance comfort and contrast. The cocoa base is lightly sweet and cakey, the marshmallow middle brings chew and shine, and the chocolate–peanut butter–Rice Krispies top gives a satisfying crack and crunch. It’s a multi-textured dessert that still slices neatly once chilled.
They’re crowd-pleasers across ages. Kids love the marshmallow and crisp topping. Adults appreciate the restrained sweetness of the cocoa base paired with familiar flavors. You also don’t need advanced skills — this recipe rewards attention and timing more than technique.
Quick Replacement Ideas
- Milk chocolate chips — swap for semisweet or dark chocolate chips if you prefer a less sweet topping.
- Peanut butter — use almond butter or sunflower seed butter for a different nut note or to avoid peanuts.
- Rice Krispies — try crisped quinoa or crushed toasted oats for a slightly different texture (note: texture will change).
- Mini marshmallows — if you only have large marshmallows, chop them into smaller pieces so they melt more evenly.
Tools & Equipment Needed
- 15‑in. x 10‑in. x 1‑in. baking pan — the recipe is calibrated to this size.
- Electric mixer — speeds up creaming and gives a light base; hand whisk can work but will be more work.
- Medium bowl and large mixing bowl — for dry and wet components.
- Measuring cups and spoons — accuracy matters for the base texture.
- Medium saucepan — for melting chocolate, butter, and peanut butter together.
- Rubber spatula and offset spatula or knife — for spreading marshmallows and topping.
- Cooling rack and refrigerator space — allow for proper setting of layers.
Things That Go Wrong
Here are common problems and practical fixes so you get consistent results.
Base is underbaked or gummy
If the toothpick comes out wet rather than with moist crumbs, the base needs more time. Bake in additional 2-minute increments and check again. Avoid opening the oven repeatedly in the first 10 minutes so the temperature stays steady.
Marshmallows don’t melt evenly
Mini marshmallows melt fastest and most evenly. If the marshmallow layer hasn’t softened, return to the oven only briefly — they can go from soft to browned quickly. Spread while still warm using a knife dipped in warm water to prevent sticking.
Topping is greasy or separates
Melt the chocolate, butter, and peanut butter over low heat and stir constantly. High heat can cause separation. If it separates, remove from heat and whisk gently; a splash of neutral oil or a teaspoon of warm cream can sometimes bring it back, but it’s better to melt slowly.
Topping is too hard to cut
Chill thoroughly until the topping firms. Run a sharp knife under hot water, wipe dry, and make clean cuts — warm the blade between passes if needed.
Year-Round Variations
Change small elements to suit the season without disrupting the method.
- Winter holidays — add a pinch of ground cinnamon to the base or swap some milk chocolate chips for peppermint chips in the topping.
- Spring/summer — use a lighter nut butter (like almond) and top with a scattering of toasted coconut for brightness.
- Back-to-school — pack bars into small squares as an easy lunchbox treat (wrap individually to keep them fresh).
- Party trays — cut into bite-sized pieces and arrange on a platter alongside plain brownies for contrast.
Chef’s Rationale
I keep the base simple and slightly underbaked on purpose so it’s tender and holds up to the marshmallow layer. The marshmallows are added after baking to retain their glossy, pillowy quality rather than baking them into the batter. That step creates the classic s’mores-esque middle without drying out the top layer.
The chocolate–peanut butter topping is melted together to create a homogenous glaze that grips the Rice Krispies. That binding step ensures the topping sets as a cohesive sheet instead of crumbling apart. The Rice Krispies provide the crunch that balances the soft marshmallow and the tender base.
How to Store & Reheat
Store: Keep the bars chilled in an airtight container in the refrigerator. They will keep well for up to 5 days. Place parchment between layers to prevent sticking.
Freeze: For longer storage, wrap individual bars in plastic wrap and freeze in a sealed container for up to 3 months. Thaw in the refrigerator overnight before serving.
Reheat/Serve: These bars are best served cool to maintain the crisp topping. If you prefer the gooey marshmallow center warm, microwave a single bar on a microwave-safe plate for 6–10 seconds — check and repeat in short bursts so the chocolate topping doesn’t get too soft.
Royal Chocolate Marshmallow Bars Q&A
Q: Can I make the base ahead of time? A: Yes. Bake the base, cool completely, and wrap it tightly; add the marshmallow and topping the day you plan to serve for freshest texture.
Q: Can I use crunchy peanut butter? A: You can, but the topping will be chunkier and less smooth. Crunchy adds texture but may not spread as evenly.
Q: Will dark chocolate work? A: Dark or semisweet chocolate will work and cut sweetness. Adjust if you want a richer top.
Q: What if I don’t have Rice Krispies? A: Any light, crispy cereal can substitute, but the topping texture will vary. Avoid cereals that will dissolve or become soggy when mixed.
Q: Do I need to chill the bars before cutting? A: Yes. Chilling firms the topping and allows clean slices. Warm cutting causes smearing.
Wrap-Up
Royal Chocolate Marshmallow Bars are a reliable crowd-pleaser: straightforward to make, layered with contrasting textures, and flexible enough for small tweaks. Organize your ingredients, follow the order of steps, and you’ll end up with a dessert that looks like effort and tastes like comfort.
Make them for an event or keep them in the fridge for treat-worthy moments. They’re easy to scale and travel well when wrapped. If you try any of the variations, take note of what you changed so you can repeat your favorite version next time.
Royal Chocolate Marshmallow Bars
Equipment
- 15x10x1-inch baking pan
- nonstick spray
- Electric Mixer
- Mixing Bowls
- Medium Saucepan
- Knife
Ingredients
Ingredients
- 1 1/2 cupsgranulated white sugar
- 3/4 cup 1 1/2 sticksbutter, at room temperature
- 3 largeeggs
- 1 teaspoonvanilla extract
- 1 1/3 cupsall purpose flour
- 3 tablespoonsunsweetened cocoa powder
- 1/2 teaspoonbaking powder
- 1/2 teaspoonsalt
- 4 cupsmini marshmallows
- 8 ouncesmilk chocolate chips
- 3 tablespoonsbutter
- 1 cuppeanut butter
- 2 cupsRice Krispies
Instructions
Instructions
- Preheat oven to 350°F. Spray a 15‑in. x 10‑in. x 1‑in. baking pan with nonstick spray.
- In a large mixing bowl, use an electric mixer to beat 1½ cups granulated white sugar and 3/4 cup (1½ sticks) butter (at room temperature) until light and fluffy, about 2–3 minutes. Add the 3 large eggs and 1 teaspoon vanilla extract, mixing until well combined and the mixture is again light.
- In a medium bowl, whisk together 1 1/3 cups all‑purpose flour, 3 tablespoons unsweetened cocoa powder, 1/2 teaspoon baking powder, and 1/2 teaspoon salt.
- Add the dry ingredients to the butter mixture and mix on low speed just until combined; do not overmix.
- Spread the batter evenly into the prepared pan. Bake 15–18 minutes, or until the top is set and a toothpick inserted in the center comes out with moist crumbs (not wet batter).
- Remove the pan from the oven. Evenly sprinkle 4 cups mini marshmallows over the baked layer. Return the pan to the oven for 2–3 minutes, watching closely, until the marshmallows have softened and begun to melt.
- Remove the pan again. Dip a knife in warm water and wipe it dry, then use the knife to gently spread the melted marshmallows into an even layer over the first layer. Let the pan cool until the marshmallow layer is set to the touch.
- For the topping, place 8 ounces milk chocolate chips, 3 tablespoons butter, and 1 cup peanut butter in a medium saucepan over low heat. Cook, stirring frequently, until the mixture is completely melted and smooth. Remove from heat.
- Stir 2 cups Rice Krispies into the melted chocolate–peanut butter mixture until evenly coated. Immediately spread this mixture evenly over the marshmallow layer and smooth to level.
- Chill the assembled bars until the topping is firm. Cut into bars and serve.